Difference between revisions of "Manuals:MBPlusFblV5:Governormenu D/de"
Shornstein (talk | contribs) (Created page with "== Elektroheli == beim '''Elektroheli''' wird der Motorsteller nicht mehr vom Piloten über den Fernsteuersender kontrolliert, sondern das MICROBEAST PLUS übernimmt die Kontr...") |
Shornstein (talk | contribs) |
||
| Line 23: | Line 23: | ||
</gallery> | </gallery> | ||
<br /> | <br /> | ||
| − | Die niedrigste wählbare Rotordrehzahl beträgt 800U/min, die Maximaldrehzahl | + | Die niedrigste wählbare Rotordrehzahl beträgt 800U/min, die Maximaldrehzahl liegt bei 5000U/min. Um in den Autorotationsmodus zu schalten muss der Gaskanal auf einen Wert zwischen 5% und 15% gebracht werden.<br /> |
<br /> | <br /> | ||
{|style="text-align:center; font-size: 80%; margin:0px 20px 0px 0px;" cellpadding="4" cellspacing="0" border="1" | {|style="text-align:center; font-size: 80%; margin:0px 20px 0px 0px;" cellpadding="4" cellspacing="0" border="1" | ||
Revision as of 08:58, 12 January 2018
Im folgenden Schritt werden im Sender die gewünschten Drehzahlen bzw. Betriebszustände des Governors eingestellt. Ähnlich wie beim GOVERNORMENÜ Punkt A werden bei diesem Einstellschritt am MICROBEAST PLUS bzw. in der Software/App nur bestimmte Zustände abgebildet, am Gerät selbst muss nichts eingestellt werden. Die Farbe der Status-LED gibt an, welcher Betriebszustand gerade aktiv ist (gilt sowohl für Elektro- als auch Verbrennermodelle):
Governor aus = aus, Autorotation = violett, Gov aktiv = rot oder blau (= max. RPM)
Die Einstellung im Sender bzw. die Ansteuerung dieser Betriebszustände unterscheided sich etwas, abhängig vom gewählten Helityp und abhängig davon, ob bei der Funktionszuweisung im Empfängermenü ein separater Schaltkanal für die Drehzahlregelung zugewiesen wurde (gilt nur für Verbrennerhelis).
Ansteuerung des Drehzahlreglers
Elektroheli
beim Elektroheli wird der Motorsteller nicht mehr vom Piloten über den Fernsteuersender kontrolliert, sondern das MICROBEAST PLUS übernimmt die Kontrolle über den Motorsteller. Über den Fernsteuersender wird nur noch die gewünschte Drehzahl vorgegeben. Die Drehzahlregelung vom MICROBEAST PLUS lässt den Motor sanft hochlaufen und sorgt dafür, dass die Drehzahl über den ganzen Flug hinweg konstant gehalten wird. Um Autorotationen zu üben kann der Drehzahlregler in einen speziellen Betriebsmodus geschaltet werden, in dem der Motor zwar ausgeschaltet wird, bei Abbruch der Autorotation aber sofort wieder hochgefahren wird, viel schneller als mit dem anfänglichen Sanftanlauf.
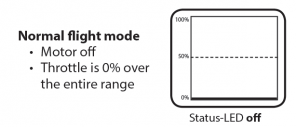
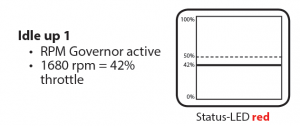
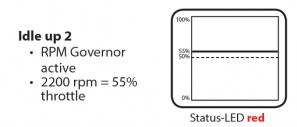
Die Drehzahlvorgabe erfolgt über den Gaskanal vom Fernsteuersender. Hierzu bietet es sich an die Gaskurven im Fernsteuersender in Verbindung mit einer Flugphasenumschaltung zu verwenden, um den Motor ein- und auszuschalten und um verschiedene Drehzahlen vorwählen zu können. Anstatt von Gaskurven werden aber nur waagerechte Geraden programmiert, so dass der Gaswert nicht von der Steuerknüppelposition abhängt sondern in der jeweiligen Flugphase fest ist. Die Flugphasenumschaltung wirkt dann wie ein Schalter, der zwischen verschiedenen Drehzahlvorgaben bzw. verschiedenen Gaspositionen umschaltet. Alternativ könnte man auch einen Schalter oder Schieberegler verwenden, der im Sender fest dem Gaskanal zugewiesen ist, dies ist aber erfahrungsgemäß wesentlich unpraktischer.
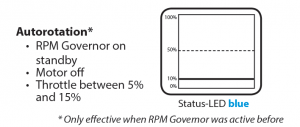
Die niedrigste wählbare Rotordrehzahl beträgt 800U/min, die Maximaldrehzahl liegt bei 5000U/min. Um in den Autorotationsmodus zu schalten muss der Gaskanal auf einen Wert zwischen 5% und 15% gebracht werden.
| Gasposition (Bezeichnung Senderabhängig) |
Rotor rpm |
Status-LED | |
|---|---|---|---|
| 100% | +100 | 5000 | blau |
| 95% | +90 | 4750 | rot |
| 90% | +80 | 4500 | |
| 85% | +70 | 4250 | |
| 80% | +60 | 4000 | |
| 75% | +50 | 3750 | |
| 70% | +40 | 3500 | |
| 65% | +30 | 3250 | |
| 60% | +20 | 3000 | |
| 55% | +10 | 2750 | |
| 50% | 0 | 2500 | |
| 45% | -10 | 2300 | |
| 40% | -20 | 2050 | |
| 35% | -30 | 1800 | |
| 30% | -40 | 1550 | |
| 25% | -50 | 1300 | |
| 20% | -60 | 1050 | |
| 15% | -70 | 800 | |
| 10% | -80 | Motor aus/ Autorotation |
purple |
| 5% | -90 | ||
| 0% | -100 | Motor aus | off |
Nitro Governor - with separate control channel
When the nitro Governor mode is used, the throttle servo can be controlled entirely via the throttle channel of the remote control as long as the RPM Governor is switched off. This is especially necessary to start and warm up the engine as well as to stop the engine after the flight. Only when the RPM Governor is switched on, the system will take over control of the throttle servo to spool up the rotor to the desired speed (if this is not yet reached) and ensure that the rotor speed is maintained during the flight. As some model engines react very sensitive in the lower throttle sector and abrupt engagement can cause the engine to quit, i.e. when the clutch is not fully engaged and/or the rotor is not yet turning, also the manual throttle control can be of advantage. The pilot can run the engine to speed "by hand" before control is passed over to the RPM Governor.
Depending on whether an auxiliary channel was assigned to control the RPM Governor in Receiver setup menu or not, the RPM Governor is either controlled separately via this channel or you can control both RPM Governor and throttle servo alone by using the throttle channel of the transmitter. In general the adjustable throttle range in „nitro“ mode is 2500 rpm/min. The lowest head speed to govern is 500 rpm/min, the maximum head speed is 3000 rpm/min.
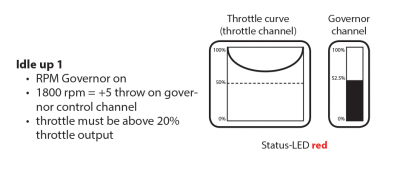
If a separate control channel is used for the RPM Governor the throttle servo can be controlled as usual via throttle channel and throttle curves of the transmitter. By switching the separate control channel in different positions, the RPM Governor can be activated and the desired rotor rpm can be preset. Note that for safety reason the throttle channel has priority over the RPM Governor when the output is below 25%. So you can always control the lower throttle servo positions by hand, even if the RPM Governor is already switched on. Then when the throttle is raised above 25% the RPM Governor intervenes and spools up the rotor. Also when you want to bring the throttle servo to idle position for autorotation or to shut off the engine you can always do this, regardsless of how the RPM Governor is switched. Anyhow keep in mind that MICROBEAST PLUS will be set to autorotation bail out mode if the RPM Governor is switched on and the throttle channel is brought below 25%. When throttle then is increased again, the RPM Governor will speed up the rotor faster than on initial spool up! Therefore if you make a stopover and the rotor is completely stopped, the RPM Governor must be completely disabled once by using the separate control channel. So the RPM Governor is reset and will perform an initial startup again. Otherwise if autorotation mode would still be active, the helicopter may tip over due to the abrupt speed up (this does not apply if you set the bail out spool up rate at Parameter menu point K as high as the initial spool up rate).
| Throttle position (scale depending on transmitter) |
Status-LED | |
|---|---|---|
| 100% | +100 | off (= Manual control) red or blue (= RPM control) |
| 95% | +90 | |
| 90% | +80 | |
| 85% | +70 | |
| 80% | +60 | |
| 75% | +50 | |
| 70% | +40 | |
| 65% | +30 | |
| 60% | +20 | |
| 55% | +10 | |
| 50% | 0 | |
| 45% | -10 | |
| 40% | -20 | |
| 35% | -30 | |
| 30% | -40 | |
| 25% | -50 | |
| 20% | -60 | Manual control/ Autorotation
|
| 15% | -70 | |
| 10% | -80 | |
| 5% | -90 | |
| 0% | -100 | |
Rotor rpm |
Governor channel |
|---|---|
| 3000 | +100 |
| 2870 | +90 |
| 2740 | +80 |
| 2605 | +70 |
| 2470 | +60 |
| 2340 | +50 |
| 2210 | +40 |
| 2080 | +30 |
| 1950 | +20 |
| 1820 | +10 |
| 1680 | 0 |
| 1550 | -10 |
| 1420 | -20 |
| 1290 | -30 |
| 1160 | -40 |
| 1030 | -50 |
| 895 | -60 |
| 760 | -70 |
| 630 | -80 |
| 500 | -90 |
| off | -100 |
Nitro Governor - simple mode
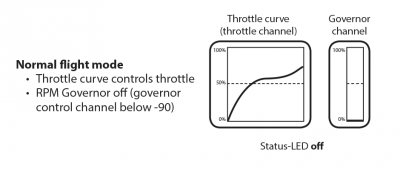
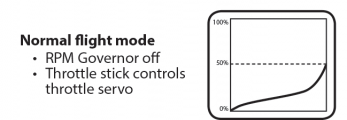
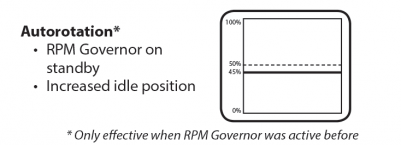
If no separate control channel is used for the RPM Governor, throttle servo and RPM Governor are solely controlled by the throttle channel. For this purpose the control range of the throttle channel is divided into two parts: Below the center position, the throttle servo is controlled manually by the throttle channel. The RPM Governor is switched off and the servo output range is doubled, so that the throttle servo can be moved over the entire range. Once the throttle channel is moved (switched) to the upper area, the RPM Governor will activate, spool up the rotor and try to hold the preset rpm. Similar as it was described above for electric models you make the throttle curve a horizontal line, so that regardless of the position of the throttle stick MICROBEAST PLUS will always see the same throttle value and so the preset rpm will stays the same. So at least two flight phases are necessary. One that the throttle curve goes only up to the middle and in which the motor can be controlled by hand, i.e. for starting the motor and one flight phase that activates the RPM Governor and the throttle curve is used to preset the desired rotor head speed.
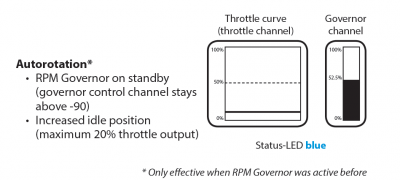
A third flight mode is used for auto-rotation: Here the throttle channel is constantly set to a value close below center position (between 40% and 50%) . When you switch to this flight mode once the governor was active, the throttle servo will be moved to the idle position set at menu point B. When switching back to governor mode, i.e. when you want to bail out from autorotation, the rotor will be spooled up at an increased rate (this does not apply if you set the bail out spool up rate at Parameter menu point K as high as the initial spool up rate - see chapter 8). Alternatively if it is switch back to the flight phase with manual control, autorotation mode is canceled and the next time you switch on the RPM Governor, the rotor is spooled up slowly.
| Throttle position (scale depending on transmitter) |
Rotor rpm |
Status-LED | |
|---|---|---|---|
| 100% | +100 | 3000 | blue |
| 95% | +90 | 2750 | red |
| 90% | +80 | 2500 | |
| 85% | +70 | 2250 | |
| 80% | +60 | 2000 | |
| 75% | +50 | 1750 | |
| 70% | +40 | 1500 | |
| 65% | +30 | 1250 | |
| 60% | +20 | 1000 | |
| 55% | +10 | 750 | |
| 50% | 0 | 500 | |
| 45% | -10 | Manual control or Autorotation | purple |
| 40% | -20 | ||
| 35% | -30 | Manual control | off |
| 30% | -40 | ||
| 25% | -50 | ||
| 20% | -60 | ||
| 15% | -70 | ||
| 10% | -80 | ||
| 5% | -90 | ||
| 0% | -100 | ||
Adjustment on the device
Setup with StudioX
Setup with StudioXm
