SETUPMENÜ B - Ansteuerfrequenz Taumelscheibenservos
Bei Einstellpunkt B wird die Ansteuerfrequenz für die Taumelscheibenservos ausgewählt. Damit die Regelung des MICROBEAST PLUS am effektivsten arbeiten kann gilt für die Ansteuerfrequenz: je höher umso besser! Denn: je höher die Ansteuerfrequenz, umso öfter errechnet das System die Position neu und umso öfter sendet es neue Befehle an die Servos. Sollten die Servos für eine derartige Anwendung aber nicht ausgelegt sein, wird der Stromverbrauch ungewöhnlich stark ansteigen und die Servos werden sich stark erwärmen! Das Servo könnte dann Schaden nehmen und ausfallen. Stell die Ansteuerfrequenz daher immer nur so hoch, wie vom Servo-Hersteller empfohlen, als maximal zulässig angegeben, oder auch nur so hoch, wie praktisch sinnvoll, also so, dass sich das Servo nicht zu stark erwärmt.
Wenn ein Servo verwendet wird, für das eine höhere Ansteuerfrequenz zulässig ist, als die maximal mögliche, oder ein Wert angegeben ist, der nicht am MICROBEAST PLUS anwählbar ist, so ist immer der jeweils kleinere Wert auszuwählen. Eine niedrigere Ansteuerfrequenz ist ohne Probleme verwendbar, nur eine zu hohe Ansteuerfrequenz kann für die Servos schädlich sein! Hier kann eine Liste mit Daten zu den gebräuchlichsten Servotypen abgerufen werden. Bitte haben Sie Verständnis dafür, dass wir nicht sämtliche Servotypen auflisten können. Ausserdem können wir für die Richtigkeit dieser Daten nicht garantieren. Wenden Sie sich im Zweifel immer an den Hersteller der Servos oder Ihren Fachhändler!
Wenn Sie nicht wissen welche Ansteuerfrequenz Ihre Servos maximal vertragen, wählen Sie bitte keine höhere Ansteuerfrequenz als 50 Hz aus.Eine höhere Ansteuerfrequenz kann zum Ausfall der Servos führen!
Manche Servos scheinen bei höherer Ansteuerfrequenz etwas rau zu laufen, was auf die hohe Geschwindigkeit zurückzuführen ist, in der das Servo die Stellsignale erhält. Insbesondere bei Servos mit schnell ansprechenden Motoren (wie z. B. Brushlessservos) kann dies der Fall sein und ist im Normalfall vollkommen unkritisch.
After setting the correct update frequency plug in the swashplate servos, but do not install the servo horns yet as the servos could bind and get damaged on first power up:
 |
 |
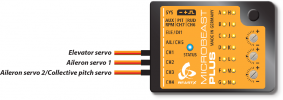
With electronic swashplate mixing the two aileron servos have to be connected to CH2 (=left) and CH3 (=right). With a mechanical mixed head (H1) the aileron servo connects to CH2 and collective pitch servo to CH3. Plug the the elevator servo into CH1 port. When using a scale helicopter with 90 degrees eCCPM you can connect a second elevator servo to CH7 output on the MICROBEAST PLUS. Note that CH7 only is a signal output, so you must power the servo from elsewhere, i.e. by getting power from the SYS-port or CH5 using a Y-adapter (for + and - only!). Anyhow, with large scale helicopters we recommend to use a separate power distribution unit to which you connect the servos. This will be the better option in regards to robust and fail safe power distribution.
When you route the wire leads in your model make sure that there is no tension passed to the MICROBEAST PLUS. Make sure that MICROBEAST PLUS is able to move freely, so no vibrations get passed onto the unit by the wire leads. It is not recommended to bundle or tie down the leads close to the MICROBEAST PLUS. On the other hand the wires must be attached so that they are unable to move the MICROBEAST PLUS during the flight caused by g-force. In particular, do not use any shrink tubing or fabric hose to bundle or encase the wiring in close proximity to the point at which the cables are plugged into the MICROBEAST PLUS. This makes the cables stiff and inflexible and can cause vibrations being transmitted to MICROBEAST PLUS.
Adjustment on the device
To select the desired servo frequency move the rudder stick repeatedly in one direction until the Status-LED lights in the correct color at SETUP MENU point B:
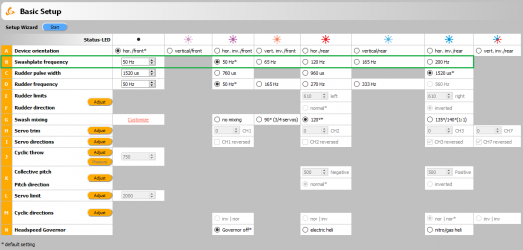
| Status-LED | Swashplate servo frequency |
|---|---|
| purple | 50 Hz |
| red flashing | 65 Hz |
| red | 120 Hz |
| blue flashing | 165 Hz |
| blue | 200 Hz |
Note: When you set a different frequency using the StudioX or StudioXm App the Status LED will be off. You can change back to a preset setting by tapping the rudder stick as described, but this will remove your custom setting!
Setup with StudioX
Choose a preset frequency by clicking one of the provided buttons for Menu Point B (Swashplate frequency) or set a custom frequency by directly changing the value in the box on the left.

Setup with StudioXm
Choose a preset frequency by clicking one of the provided buttons for Menu Point B (Swashplate frequency) or set a custom frequency by directly changing the value with the dial or buttons.
File:SetupB mobile.png