|
|
| Line 35: |
Line 35: |
| | '''Always make sure that the motor in electric models can not start when doing the adjustment work!''' If the drive | | '''Always make sure that the motor in electric models can not start when doing the adjustment work!''' If the drive |
| | battery is used as power supply for receiver, servos and Microbeast PLUS, disconnect the motor from the ESC. | | battery is used as power supply for receiver, servos and Microbeast PLUS, disconnect the motor from the ESC. |
| − | <br />
| |
| − |
| |
| − | ===Preparations for RPM Governor usage (optional)===
| |
| − | Please note the RPM Governor function can only be used in combination with a single-line receiver or
| |
| − | Spektrum remote satellite. When using a receiver with standard connection layout there is no option
| |
| − | for connecting the rpm sensor and throttle servo/ESC and no connector for throttle control.
| |
| − | To use the RPM Governor function of Microbeast PLUS it is necessary that Microbeast PLUS is able to measure the motor speed. Therefor the separate purchase of a motor rpm sensor is required. Additionaly you need the rpm sensor adapter cable (Order Nr. BXA76401) to be able to connect the sensor to your Microbeast PLUS unit and power it from there. When using an electric helicopter it is possible that your speed controller already supplies a rpm signal output. In this case no additional accessories are required as you can directly connect this signal wire's connector to the front pin board of Microbeast PLUS.<br />
| |
| − | <br />
| |
| − | When using a nitro helicopter remove the servo horn of the throttle servo before powering up the system or do not connect the throttle servo linkage yet, in order to avoid blocking and in consequence damage of the servo due to incorrect setting.<br />
| |
| − | <br />
| |
| − | Using an electric model ensure that the speed controller is programmed correctly and that the travels for the throttle channel have been adjusted in the transmitter if necessary. '''Note that the speed controller itself must not be operated in a (heli specific) governor mode, but must be operated in a simple motor control mode that allows to control the motor rpm as direct as possible.''' The throttle signal must not be filtered by the ESC and should be processed as linear as possible. This ensures that the control loop of Microbeast PLUS can govern the motor rpm optimally. Also you should switch off any "soft start" function, as this will be done by Microbeast PLUS. Some electric speed controllers offer a special „External control mode“ or „Flybarless mode“ which meet these requirements. If your motor controller does not have such a mode, we recommend to select a mode that typically offers such behavior, like a some mode for fixed wing aircraft. Note, however, that no brake function (which is required for electric gliders) must be active and that the throttle response should be set to maximum speed, if such a feature is provided.<br />
| |
| − | <br />
| |
| − | [[File:Warning.png|18px|sub]] Pay attention to your own safety and the safety of other people and property in your vicinity when using our product.
| |
| − | When using helicopters with nitro/gas engines make sure that the motor will not start when making adjustments to the system.
| |
| − | When using a gas engine always keep the ignition system deactivated!
| |
| − |
| |
| − | [[File:Warning.png|18px|sub]] For electric helicopters remove the motor pinion from the main gear during initial setup. '''Warning! Risk of injury!'''
| |
| − | Never touch the motor when it‘s running. Always keep a save distance to all rotating parts of the helicopter.
| |
| − | <br />
| |
| − |
| |
| − | ===Operating principles of AttitudeControl (optional)===
| |
| − | When the term „AttitudeControl“ is used in the further course, in general reference is made to the function
| |
| − | of the artificial horizon, irrespective of a particular operating mode such as „Bail out rescue mode“,
| |
| − | „3D – Mode“ or „Flight trainer mode“.
| |
| − | AttitudeControl can be enabled or disabled via Parameter menu point L by selecting one of the operating modes as mentioned above. Only if AttitudeControl is enabled, i.e. one of the five operating modes is selected, then AttitudeControl can be activated in operation via the remote control transmitter. ''Enable/disable'' and ''activate/deactivate'' are therefore to separate conceptually!<br />
| |
| − | <br />
| |
| − | For the use of AttitudeControl it is strongly recommended to use a single-line receiver, since for activating AttitudeControl in flight an additional control channel is needed. Almost every manufacturer of remote control systems offers such a receiver for his system and Microbeast PLUS supports almost all types of single-line protocols. The additional control channel allows to activate AttitudeControl before, during and after the flight via the remote control transmitter, so that the helicopter is stabilized depending on the selected operating mode if required. As long as AttitudeControl is deactived the helicopter can be flown as usual and Microbeast PLUS solely works as flybarless stabilization system. Preferably use a switch or push button on the transmitter that actuates the specific channel for activation/deactivation and that is safe and easy to reach.<br />
| |
| − | <br />
| |
| − | Alternatively, the already existing channel for the tail gyro gain can be used to additionally switch AttitudeControl on and off, e.g. if a standard receiver is used (here only 5 channels can be plugged into Microbeast PLUS) or a transmitter with only six channels is used. This alternative, however, is far less convenient as it may require some complex programming of the transmitter, especially if several flight modes are programmed with different tail gyro sensitivity settings on the transmitter.<br />
| |
| − | <br />
| |
| | </translate> | | </translate> |
Mounting the Microbeast PLUS unit
Attach the Microbeast PLUS unit by using one of the provided gyropads at a preferably low vibrating position on your helicopter such as the gyro platform or receiver platform. You may need to choose another type of mounting pad depending on the vibration pattern of your helicopter. For more information please ask you Microbeast PLUS dealer.
The MICROBEAST PLUS unit can be attached flat or upright and even upside down under the helicopter. However, the servo connector pins must always point toward the front (or rear) of the helicopter.
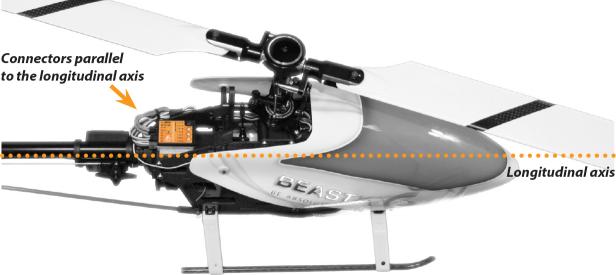
Pay attention that the edges of the Microbeast PLUS unit are all parallel with the corresponding axes of the helicopter! And be sure that the mounting platform is perpendicular to the main shaft!
Preparing the transmitter
You can use nearly any transmitter that provides at least 6 channels. By default 5 channels are used for controlling Microbeast PLUS and one channel controls the motor. If using additional features like AttitudeControl or (nitro) RPM Governor more channels may be useful to have.
Create a new model in your radio‘s model memory. Disable any mixing functions for the swashplate or rudder. Each function should be assigned to just one receiver channel.
Never enable your radio‘s eCCPM mixing function! All the swashplate mixing will be done by Microbeast PLUS.
Always set your radio‘s swash mixer to mCCPM (mechanical mixing) which is often called “H1”,  “1 servo” or
“normal“ mixing or disable “swash mixing” if applicable.
Be sure that all trims and sub trims are disabled and that all servo travels are set to 100%. Increasing or decreasing the servo travel/stick throw for aileron, elevator and rudder will later adjust the (maximum) control rates. For the moment to setup Microbeast PLUS let anything stay at default. Also do not adjust the collective pitch curve at the moment. For the setup procedures it has to be set as a straight line reaching from -100% to +100% (or 0 to 100% depending on radio brand).
Again make sure that there are no mixing functions active (for example rudder revo-mixing). Have a look at the radio’s servo monitor: each stick has to control one channel/servo output (except for thrust stick which typically controls collective pitch and motor). Remember when using Microbeast PLUS you do not directly control the servos of the helicopter. By moving a stick you give a control command to the Microbeast PLUS unit which then performs the necessary servo movements to move the helictoper in the commanded direction. Each control command is bound to one servo output channel of the transmitter.
Other functions such as throttle curves, ESC switches or auxiliary functions can be adjusted as usual. When using the RPM Governor function the throttle adjustment will be described later. Also the switch assignment for AttitudeControl will discussed at the specific topic.
Always make sure that the motor in electric models can not start when doing the adjustment work! If the drive
battery is used as power supply for receiver, servos and Microbeast PLUS, disconnect the motor from the ESC.


