Vorbereitung
Einbau des MICROBEAST PLUS
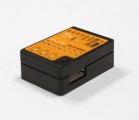
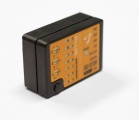
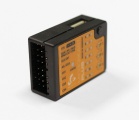
Befestigen Sie MICROBEAST PLUS mit einem der beiliegenden 3M® Klebepads an einer möglichst vibrationsarmen Stelle in Ihrem Helikopter (z.B. auf der Kreisel- oder Empfängerplattform). Abhängig vom Vibrationspotential des Helikopters kann auch ein anderes, geeigneteres Klebepad für die einwandfreie Funktion notwendig sein. Bei Fragen hierzu wenden Sie sich bitte an Ihren MICROBEAST PLUS Fachhändler.
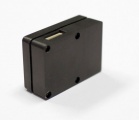
Der Einbau des MICROBEAST PLUS kann wahlweise flach oder hochkant erfolgen, auch verkehrt herum unter dem Helikopter. Die Stecker der Anschlusskabel müssen aber immer in oder gegen die Flugrichtung des Helikopters zeigen. Die kleine weiße Sensoranschlussleiste muss immer längs zur Flugrichtung sein.

|

|
Achten Sie darauf, dass die Gehäusekanten von MICROBEAST PLUS absolut parallel zu den Drehachsen des Helikopters ausgerichtet sind und der Montageort auf der Roll- und Nickachse winkelrichtig zur Hauptrotorwelle ist! Es ist hingegen nicht unbedingt notwendig, dass das Gerät genau auf den Drehachsen montiert wird (dies ist praktisch nahezu unmöglich).

|
Es ergeben sich acht mögliche Einbaulagen:
flach, Deckel oben, Servoanschlussleiste zeigt zur Spitze
hochkant, Taster oben, Servoanschlussleiste zeigt zur Spitze
flach, Deckel unten, Servoanschlussleiste zeigt zur Spitze
hochkant, Taster unten, Servoanschlussleiste zeigt zur Spitze


flach, Deckel oben, Servoanschlussleiste zeigt zum Heck
hochkant, Taster oben, Servoanschlussleiste zeigt zum Heck
flach, Deckel unten, Servoanschlussleiste zeigt zum Heck
hochkant, Taster unten, Servoanschlussleiste zeigt zum Heck


Preparing the transmitter
You can use nearly any transmitter that provides at least 6 channels. By default 5 channels are used for controlling Microbeast PLUS and one channel controls the motor. If using additional features like AttitudeControl or (nitro) RPM Governor more channels may be useful to have.
Create a new model in your radio‘s model memory. Disable any mixing functions for the swashplate or rudder. Each function should be assigned to just one receiver channel.
Never enable your radio‘s eCCPM mixing function! All the swashplate mixing will be done by Microbeast PLUS. Always set your radio‘s swash mixer to mCCPM (mechanical mixing) which is often called “H1”, “1 servo” or “normal“ mixing or disable “swash mixing” if applicable.
Be sure that all trims and sub trims are disabled and that all servo travels are set to 100%. Increasing or decreasing the servo travel/stick throw for aileron, elevator and rudder will later adjust the (maximum) control rates. For the moment to setup Microbeast PLUS let anything stay at default. Also do not adjust the collective pitch curve at the moment. For the setup procedures it has to be set as a straight line reaching from -100% to +100% (or 0 to 100% depending on radio brand).
Again make sure that there are no mixing functions active (for example rudder revo-mixing). Have a look at the radio’s servo monitor: each stick has to control one channel/servo output (except for thrust stick which typically controls collective pitch and motor). Remember when using Microbeast PLUS you do not directly control the servos of the helicopter. By moving a stick you give a control command to the Microbeast PLUS unit which then performs the necessary servo movements to move the helictoper in the commanded direction. Each control command is bound to one servo output channel of the transmitter.
Other functions such as throttle curves, ESC switches or auxiliary functions can be adjusted as usual. When using the RPM Governor function the throttle adjustment will be described later. Also the switch assignment for AttitudeControl will discussed at the specific topic.
Always make sure that the motor in electric models can not start when doing the adjustment work! If the drive battery is used as power supply for receiver, servos and Microbeast PLUS, disconnect the motor from the ESC.