Difference between revisions of "Manuals:MB Plus:Setupmenu intro/en"
(Importing a new version from external source) |
(Importing a new version from external source) |
||
| (One intermediate revision by the same user not shown) | |||
| Line 1: | Line 1: | ||
{{TOC_MBPlus}} | {{TOC_MBPlus}} | ||
{{DISPLAYTITLE:Setup menu|noerror}} | {{DISPLAYTITLE:Setup menu|noerror}} | ||
| − | Before the first flight MICROBEAST PLUS has to be adjusted to your helicopter mechanics and its components. This is done in Setup menu level.< | + | <p> |
| − | < | + | Before the first flight MICROBEAST PLUS has to be adjusted to your helicopter mechanics and its components. This is done in Setup menu level.</p> |
| − | When MICROBEAST PLUS shows that the system is ready, press and hold the button down | + | <p> |
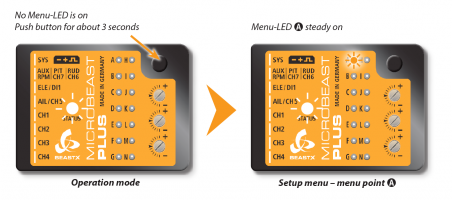
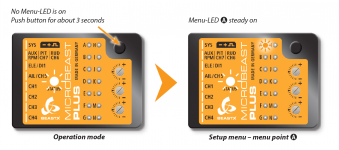
| − | < | + | When MICROBEAST PLUS shows that the system is ready, press and hold the button down. The '''Menu-LED next to menu point A''' will begin to flash and then after a while will be '''steady on'''. Now and only now you can release the button. You just entered the Setup menu at [[Manuals:MB_Plus:Setupmenu_A/en|menu point '''A''']].</p> |
| + | <div class="noprint"> | ||
[[Image:Setupmenu_open.png|x200px|none]] | [[Image:Setupmenu_open.png|x200px|none]] | ||
| + | </div> | ||
| + | <div class="onlyinprint"> | ||
| + | [[Image:Setupmenu_open.png|x150px|none]] | ||
| + | </div> | ||
<br /> | <br /> | ||
| − | Proceed step by step through the different menu points and perform the basic adjustment as described on the specific pages. By briefly pushing the button at each step you will save the current setting and proceed to the next step. To leave the Setup menu you have to go through all menu points. After pushing the button at the last menu point (depending on installed firmware features and selected receiver type this can be | + | <p> |
| + | Proceed step by step through the different menu points and perform the basic adjustment as described on the specific pages. By briefly pushing the button at each step you will save the current setting and proceed to the next step. To leave the Setup menu you have to go through all menu points. After pushing the button at the last menu point (depending on installed firmware features and selected receiver type this either can be [[Manuals:MB_Plus:Setupmenu_M|Setup menu point '''M''']] or [[Manuals:MB_Plus:Setupmenu_N|'''N''']] or [[Manuals:MB_Plus:Governormenu_F|Governor menu point '''F''']] or [[Manuals:MB_Plus:Governormenu_F|'''H''']]) you will exit the Setup menu and the system is ready for operation again. Then again none of the LEDs A - N are glowing anymore.</p> | ||
<br /> | <br /> | ||
[[Image:Menuskip.png|x170px|none]] | [[Image:Menuskip.png|x170px|none]] | ||
<br /> | <br /> | ||
| − | If you need to change some specific setting later onwards you can enter the Setup menu again and skip the other menu points by only pressing the button without changing anything at these points. So you can navigate to the desired menu point by simply pressing the button several times untli you reach this point. Then after you have finished the adjustment, again press the button repeatedly to proceed to the end of the menu and to get back into operation mode.< | + | <p> |
| + | If you need to change some specific setting later onwards you can enter the Setup menu again and skip the other menu points by only pressing the button without changing anything at these points. So you can navigate to the desired menu point by simply pressing the button several times untli you reach this point. Then after you have finished the adjustment, again press the button repeatedly to proceed to the end of the menu and to get back into operation mode.</p> | ||
<br /> | <br /> | ||
{{WARNING_QUOTE|'''Never fly while MICROBEAST PLUS is in Setup menu!''' In this condition the gyro control and the stick controls are disabled.<br /> | {{WARNING_QUOTE|'''Never fly while MICROBEAST PLUS is in Setup menu!''' In this condition the gyro control and the stick controls are disabled.<br /> | ||
<br /> | <br /> | ||
[[Image:Warning.png|18px|sub]] If there is no stick or button input for 4 minutes while being in the Setup menu, MICROBEAST PLUS will exit the menu automatically. However, this will not happen at Setup menu points [[Manuals:MB_Plus:Setupmenu_D|'''D''']], [[Manuals:MB_Plus:Setupmenu_G|'''G''']], [[Manuals:MB_Plus:Setupmenu_I|'''I''']] and [[Manuals:MB_Plus:Setupmenu_J|'''J''']] to give you enough time to adjust the mechanical setup of your helicopter at these points.}} | [[Image:Warning.png|18px|sub]] If there is no stick or button input for 4 minutes while being in the Setup menu, MICROBEAST PLUS will exit the menu automatically. However, this will not happen at Setup menu points [[Manuals:MB_Plus:Setupmenu_D|'''D''']], [[Manuals:MB_Plus:Setupmenu_G|'''G''']], [[Manuals:MB_Plus:Setupmenu_I|'''I''']] and [[Manuals:MB_Plus:Setupmenu_J|'''J''']] to give you enough time to adjust the mechanical setup of your helicopter at these points.}} | ||
Latest revision as of 14:32, 19 November 2015
Before the first flight MICROBEAST PLUS has to be adjusted to your helicopter mechanics and its components. This is done in Setup menu level.
When MICROBEAST PLUS shows that the system is ready, press and hold the button down. The Menu-LED next to menu point A will begin to flash and then after a while will be steady on. Now and only now you can release the button. You just entered the Setup menu at menu point A.
Proceed step by step through the different menu points and perform the basic adjustment as described on the specific pages. By briefly pushing the button at each step you will save the current setting and proceed to the next step. To leave the Setup menu you have to go through all menu points. After pushing the button at the last menu point (depending on installed firmware features and selected receiver type this either can be Setup menu point M or N or Governor menu point F or H) you will exit the Setup menu and the system is ready for operation again. Then again none of the LEDs A - N are glowing anymore.
If you need to change some specific setting later onwards you can enter the Setup menu again and skip the other menu points by only pressing the button without changing anything at these points. So you can navigate to the desired menu point by simply pressing the button several times untli you reach this point. Then after you have finished the adjustment, again press the button repeatedly to proceed to the end of the menu and to get back into operation mode.
Never fly while MICROBEAST PLUS is in Setup menu! In this condition the gyro control and the stick controls are disabled.
If there is no stick or button input for 4 minutes while being in the Setup menu, MICROBEAST PLUS will exit the menu automatically. However, this will not happen at Setup menu points D, G, I and J to give you enough time to adjust the mechanical setup of your helicopter at these points.


