BEASTX Updater Classic/en: Difference between revisions
Importing a new version from external source |
Importing a new version from external source |
||
| (17 intermediate revisions by the same user not shown) | |||
| Line 1: | Line 1: | ||
< | The tool "BEASTX Updater Classic" can be used if you encounter problems with the StudioX application and want to check if your device can be recognized at all. Also you can use it to do a firmware update with a provided update file from the BEASTX service team if necessary. You can find the BEASTX Updater Classic here:<br /> | ||
<br /> | <br /> | ||
[http://studiox.beastx.com/download/misc/BXUpdaterClassic.zip Updater Classic for Windows]<br /> | |||
[ | <br /> | ||
[http://studiox.beastx.com/download/misc/BXUpdaterClassic.pkg Updater Classic for macOS]<br /> | |||
<br /> | <br /> | ||
''' | '''On Windows computers make sure that the driver files for your USB2SYS interface have been installed or install the files if necessary.''' For further information see this page: [[USB2SYS/SPMA3030 driver installation]].<br /> | ||
<br /> | <br /> | ||
'''1. Connecting to the | '''1. Connecting to the BEASTX device''' | ||
The | The BEASTX device will not be powered from the USB2SYS-Interface! So the unit must be supplied with power from a different source | ||
before(!) you connect it to the PC, e.g. simply switch on tx and rx as you would go flying (on electric helis take care of the motor!). | before(!) you connect it to the PC, e.g. simply switch on tx and rx as you would go flying (on electric helis take care of the motor!). | ||
The cable from the interface goes into the | The cable from the interface goes into the '''[SYS]''' port of the device. Watch out for correct polarity on both devices.<br /> | ||
<br /> | <br /> | ||
If the COM-Port to which the USB2SYS-Interface has been assigned by windows is known, you can directly choose it from the list of available interfaces: | If the COM-Port to which the USB2SYS-Interface has been assigned by windows is known, you can directly choose it from the list of available interfaces. On macOS/Linux usually the port is called "cu.SLAB_USBtoUART" or "tty.SLAB_USBtoUART" (you can use either of them): | ||
[[File:Step 5_1.png|200px|thumb|none]] | [[File:Step 5_1.png|200px|thumb|none]] | ||
| Line 42: | Line 43: | ||
After you selected a COM-Port the BEASTX Updater Classic will automatically try to identify the unit connected to it. | After you selected a COM-Port the BEASTX Updater Classic will automatically try to identify the unit connected to it. | ||
If the MICROBEAST/ | If the MICROBEAST PLUS/AR7210BX/nanoBEAST was not connected at this moment you can manually force a new detection by pressing the "Refresh" button. | ||
If the correct COM-Port was chosen (red), and the | If the correct COM-Port was chosen (red), and the device is connected to the USB2SYS-Interface, some information (green) about it will be shown in the "BEASTX Device" section: | ||
| Line 50: | Line 51: | ||
* Hardware-Version 1.1 and 1.2 stand for MICROBEAST units. Hardware-Version 2.x shows that a MICROBEAST PLUS is connected. Hardware Version 8.0 identifies Spektrum | * Hardware-Version 1.1 and 1.2 stand for MICROBEAST units. Hardware-Version 2.x shows that a MICROBEAST PLUS is connected. Hardware Version 8.0 identifies Spektrum AR7200BX units. | ||
* Application-Version is the actually installed firmware of the device (in this case 1.0.0). | * Application-Version is the actually installed firmware of the device (in this case 1.0.0). | ||
* Data-Version is the format that is used to store settings on the MICROBEAST. | * Data-Version is the format that is used to store settings on the MICROBEAST. | ||
| Line 58: | Line 59: | ||
'''3. Select Update-File''' | '''3. Select Update-File''' | ||
If the | If the device was successfully identified you can go on with selecting an Update-File: | ||
"Open File…" button opens a dialog where you can choose the Update-File. | "Open File…" button opens a dialog where you can choose the Update-File. | ||
| Line 67: | Line 68: | ||
Or you can just drag'n'drop an Update-File from the Explorer to the Main window of the BEASTXUpdater. | Or you can just drag'n'drop an Update-File from the Explorer to the Main window of the BEASTXUpdater. | ||
An Updates-File can only be loaded if it is free of damage, complete and has the mentioned "upd" ending. | An Updates-File can only be loaded if it is free of damage, complete and has the mentioned ".upd" ending. | ||
Application-Version, Data-Version and Target-Hardware will be shown if the file was loaded successfully: | Application-Version, Data-Version and Target-Hardware will be shown if the file was loaded successfully: | ||
| Line 75: | Line 76: | ||
Only a compatible "Target Hardware Version" can be installed | Only a compatible "Target Hardware Version" can be installed to your device. | ||
The firmware version in the Update-File will be shown next to "Application Version" (in this case 1.0.11). | The firmware version in the Update-File will be shown next to "Application Version" (in this case 1.0.11). | ||
The format of settings will be shown next to "Data Version". | The format of settings will be shown next to "Data Version". '''IMPORTANT''': If the major version of the "Data Version" is different between the actual and new firmware, then the Basic-Setup has to be done again after the update. | ||
IMPORTANT: If the major version of the "Data Version" is different between the actual and new firmware, then the Basic-Setup has to be done again after the update. | |||
| Line 101: | Line 101: | ||
After your confirmation with "Ok" BEASTX Updater Classic will detect the version information of the connected | After your confirmation with "Ok" BEASTX Updater Classic will detect the version information of the connected the device again. | ||
[[File:Step 8_4.png|200px|thumb|none]] | [[File:Step 8_4.png|200px|thumb|none]] | ||
| Line 108: | Line 108: | ||
You can refresh this information using the "Refresh" button. | You can refresh this information using the "Refresh" button. | ||
Your | Your device is now updated to the latest firmware. | ||
Latest revision as of 18:46, 6 August 2018
The tool "BEASTX Updater Classic" can be used if you encounter problems with the StudioX application and want to check if your device can be recognized at all. Also you can use it to do a firmware update with a provided update file from the BEASTX service team if necessary. You can find the BEASTX Updater Classic here:
Updater Classic for Windows
Updater Classic for macOS
On Windows computers make sure that the driver files for your USB2SYS interface have been installed or install the files if necessary. For further information see this page: USB2SYS/SPMA3030 driver installation.
1. Connecting to the BEASTX device
The BEASTX device will not be powered from the USB2SYS-Interface! So the unit must be supplied with power from a different source
before(!) you connect it to the PC, e.g. simply switch on tx and rx as you would go flying (on electric helis take care of the motor!).
The cable from the interface goes into the [SYS] port of the device. Watch out for correct polarity on both devices.
If the COM-Port to which the USB2SYS-Interface has been assigned by windows is known, you can directly choose it from the list of available interfaces. On macOS/Linux usually the port is called "cu.SLAB_USBtoUART" or "tty.SLAB_USBtoUART" (you can use either of them):
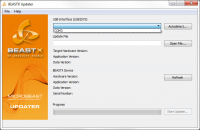
If the COM-Port is not known you can use the "Autodetect…" function:
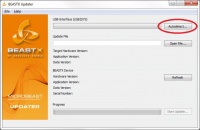
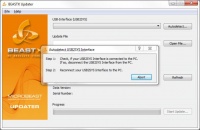
When the dialog is shown, disconnect the USB2SYS-Interface from the PC (if already connected) and reconnect it again.
The Autodetect-function will only work if the driver was installed successfully.
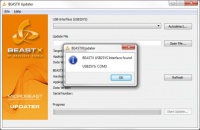
After a successful detection the BEASTX Updater Classic will tell you which COM-Port was detected:
2. Detection of the BEASTX device
After you selected a COM-Port the BEASTX Updater Classic will automatically try to identify the unit connected to it.
If the MICROBEAST PLUS/AR7210BX/nanoBEAST was not connected at this moment you can manually force a new detection by pressing the "Refresh" button.
If the correct COM-Port was chosen (red), and the device is connected to the USB2SYS-Interface, some information (green) about it will be shown in the "BEASTX Device" section:
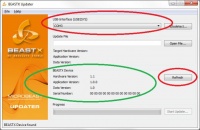
- Hardware-Version 1.1 and 1.2 stand for MICROBEAST units. Hardware-Version 2.x shows that a MICROBEAST PLUS is connected. Hardware Version 8.0 identifies Spektrum AR7200BX units.
- Application-Version is the actually installed firmware of the device (in this case 1.0.0).
- Data-Version is the format that is used to store settings on the MICROBEAST.
- Serial-Number is an unique identifier for each device.
3. Select Update-File
If the device was successfully identified you can go on with selecting an Update-File:
"Open File…" button opens a dialog where you can choose the Update-File.
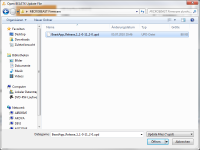
Or you can just drag'n'drop an Update-File from the Explorer to the Main window of the BEASTXUpdater.
An Updates-File can only be loaded if it is free of damage, complete and has the mentioned ".upd" ending.
Application-Version, Data-Version and Target-Hardware will be shown if the file was loaded successfully:
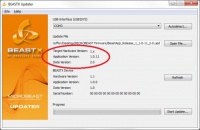
Only a compatible "Target Hardware Version" can be installed to your device.
The firmware version in the Update-File will be shown next to "Application Version" (in this case 1.0.11).
The format of settings will be shown next to "Data Version". IMPORTANT: If the major version of the "Data Version" is different between the actual and new firmware, then the Basic-Setup has to be done again after the update.
4. Perform Update
If a valid COM-Port is selected an a valid Update-File was loaded, the "Start Update…" button will be enabled:
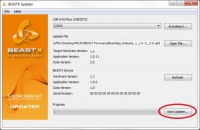
After pressing the "Start Update…" button, the actual firmware version, and the new target firmware version will be shown:
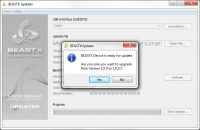
Press "Yes" to start the update.
After a successful update a message will be displayed:
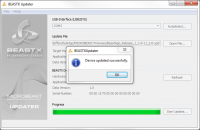
After your confirmation with "Ok" BEASTX Updater Classic will detect the version information of the connected the device again.
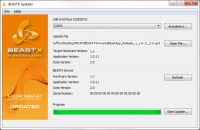
You can refresh this information using the "Refresh" button.
Your device is now updated to the latest firmware.