StudioX/en: Difference between revisions
Importing a new version from external source |
Importing a new version from external source |
||
| (67 intermediate revisions by 2 users not shown) | |||
| Line 1: | Line 1: | ||
{{DISPLAYTITLE:BEASTX StudioX|noerror}} | |||
{{TOC_StudioX}} | |||
__TOC__ | |||
<br /> | <br /> | ||
= | =StudioX - What's that?= | ||
StudioX | The StudioX software can be used to configure, backup, restore and update any BEASTX flybarless system with your computer. Also you can purchase firmware upgrades for additional functionality. Please note that you need to register to the freakware Network from within StudioX to get online content like firmware updates for your devices. For registration you need to enter a valid email address. Registration is free of charge and mainly is necessary to protect us from software piracy. We do not use your email for advertising or other economic reasons.<br /> | ||
<br /> | |||
<br /> | |||
== | =Requirements= | ||
To connect your BEASTX flybarless device to the computer or to update your BLE2SYS bluetooth interface you need one of the following USB interfaces:<br /> | |||
<br /> | |||
{|class="gallery" | |||
|width="150pt" style="padding:20px 40px;" align="center"|[[File:Stacks-image-9BB8209.png|left|130px]] | |||
|width="150pt" style="padding:20px 40px;" align="center"|[[File:SPMA3030 art.png|left|120px]] | |||
|style="padding:20px 40px;" align="center"|[[File:Stacks image 1478.png|left|180px]] | |||
|- | |||
|width="150pt" style="padding:0px 20px; vertical-align: top; text-align: center;"|BEASTX<br />USB2SYS interface | |||
|width="150pt" style="padding:0px 20px; vertical-align: top; text-align: center;"|SPEKTRUM<br />SPMA3030 interface | |||
|width="150pt" style="padding:0px 20px; vertical-align: top; text-align: center;"|RCWARE RX2SIM<br />Wireless Multi-Sim Adapter<br />with USB2SYS interface emulation | |||
|}<br /> | |||
<br /> | |||
<br /> | |||
=Installation on a Windows system= | |||
[http://studiox.beastx.com/download/win/StudioXSetup_224.exe <img src="http://www.beastx.com/deu/support_files/studiox_win.jpg" alt="" height="25" /> StudioX for Windows (7, 8, 10)]<br /> | |||
<br /> | |||
After downloading the StudioXSetup_xxx.exe open it by double clicking from the folder where it was downloaded (here we downloaded it directly to the Desktop): | |||
[[File:Open studioxsetup.png|200px|100px|noframe|none]] | |||
<br /> | |||
Simply start the install routine by clicking "Next" and "Install". The files will be copied to your default Program Files folder. When done click "Finish": | |||
<gallery mode="nolines"> | |||
File:Studioxsetup 1.png | |||
File:Studioxsetup 2.png | |||
File:Studioxsetup 3.png | |||
File:Studioxsetup 4.png | |||
</gallery> | |||
'''Before using the software make sure that the driver files for your USB2SYS interface have been installed.''' For further information see this topic: [[USB2SYS/SPMA3030 driver installation#Microsoft Windows|Driver installation for Microsoft Windows]].<br /> | |||
<br /> | |||
<br /> | |||
=Installation= | =Installation on a Mac= | ||
[http://studiox.beastx.com/download/mac/StudioX_224.pkg <img src="http://www.beastx.com/deu/support_files/studiox_mac.jpg" alt="" height="25" /> StudioX for macOS (10.7 and above)]<br /> | |||
<br /> | |||
Due to the security features of MacOS the installation might be a little bit more complicated than with Windows. | |||
Open the downloaded StudioX_xxx.dmg Disk Image and Drag'n'Drop the StudioX Application in your Applications folder: | |||
[[File:studiox_dnd_dmg.png|200px|noframe|none]] | |||
<br /> | |||
If StudioX is running then everything is fine. | |||
If you get this warning, proceed with the steps mentioned below: | |||
[[File:studiox_gatekeeper_warning.png|200px|noframe|none]] | |||
<br /> | |||
Open your Applications folder and select "Open in Finder": | |||
[[File:studiox_application_open_in_finder.png|180px|noframe|none]] | |||
<br /> | |||
Right-click on the StudioX.app and select "Open": | |||
[[File: | [[File:studiox_open.png|200px|noframe|none]] | ||
<br /> | |||
Click the "Open" button: | |||
[[File:studiox_gatekeeper_open.png|200px|noframe|none]] | |||
<br /> | |||
'''Before using the software make sure that the driver files for your USB2SYS/SPMA3030 interface have been installed.''' For further information see this page: [[USB2SYS/SPMA3030 driver installation#Apple MacOS|Driver installation for Apple MacOS]].<br /> | |||
<br /> | |||
<br /> | |||
''' | |||
[[ | |||
Latest revision as of 20:53, 22 November 2018
StudioX - What's that?
The StudioX software can be used to configure, backup, restore and update any BEASTX flybarless system with your computer. Also you can purchase firmware upgrades for additional functionality. Please note that you need to register to the freakware Network from within StudioX to get online content like firmware updates for your devices. For registration you need to enter a valid email address. Registration is free of charge and mainly is necessary to protect us from software piracy. We do not use your email for advertising or other economic reasons.
Requirements
To connect your BEASTX flybarless device to the computer or to update your BLE2SYS bluetooth interface you need one of the following USB interfaces:
 |
 |
 |
| BEASTX USB2SYS interface |
SPEKTRUM SPMA3030 interface |
RCWARE RX2SIM Wireless Multi-Sim Adapter with USB2SYS interface emulation |
Installation on a Windows system
<img src="http://www.beastx.com/deu/support_files/studiox_win.jpg" alt="" height="25" /> StudioX for Windows (7, 8, 10)
After downloading the StudioXSetup_xxx.exe open it by double clicking from the folder where it was downloaded (here we downloaded it directly to the Desktop):
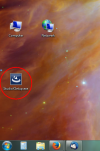
Simply start the install routine by clicking "Next" and "Install". The files will be copied to your default Program Files folder. When done click "Finish":
Before using the software make sure that the driver files for your USB2SYS interface have been installed. For further information see this topic: Driver installation for Microsoft Windows.
Installation on a Mac
<img src="http://www.beastx.com/deu/support_files/studiox_mac.jpg" alt="" height="25" /> StudioX for macOS (10.7 and above)
Due to the security features of MacOS the installation might be a little bit more complicated than with Windows.
Open the downloaded StudioX_xxx.dmg Disk Image and Drag'n'Drop the StudioX Application in your Applications folder:
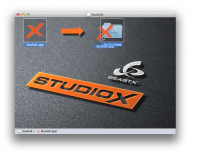
If StudioX is running then everything is fine. If you get this warning, proceed with the steps mentioned below:
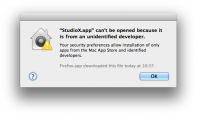
Open your Applications folder and select "Open in Finder":
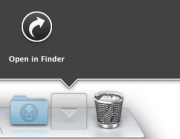
Right-click on the StudioX.app and select "Open":

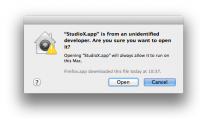
Click the "Open" button:
Before using the software make sure that the driver files for your USB2SYS/SPMA3030 interface have been installed. For further information see this page: Driver installation for Apple MacOS.


