StudioXm/de: Difference between revisions
Shornstein (talk | contribs) Created page with "{{DISPLAYTITLE:StudioX Software und App|noerror}} {{TOC_StudioXm/de}} __TOC__ <br />" |
Shornstein (talk | contribs) No edit summary |
||
| (82 intermediate revisions by 2 users not shown) | |||
| Line 4: | Line 4: | ||
<br /> | <br /> | ||
StudioX / | Mit der StudioX App lässt sich Dein MICROBEAST PLUS/MICROBEAST ULTRA, Spektrum AR7210BX oder NANOBEAST per Computer oder Smartphone/Tablet umfassend konfigurieren. Darüber hinaus kannst Du Backups erstellen, vorgefertigte Konfigurationen laden, Firmware Updates und Upgrades durchführen und vieles mehr. Mit der PC/mac Software kann außerdem das BLE2SYS Bluetooth Smart Interface konfiguriert und geupdated werden, welches zur Verbindung Deines BEASTX Geräts mit einem Smartphone/Tablet dient. Zusätzlich können auch an älteren Geräten wie MICROBEAST und Spektrum AR7200BX/AR7300BX einige Grundeinstellungen durchgeführt werden.<br /> | ||
<br /> | <br /> | ||
{{ | {{QUOTE|Die neuste Version von StudioX lautet: <b>15.8.4</b>.<br /> Bitte verwende immer die aktuelle Version, da nur so eine volle Kompatibilität zu den neuesten Geräteupdates gewährleistet ist!}} | ||
<br /> | <br /> | ||
<br /> | <br /> | ||
= | = Smartphone/Tablet = | ||
Die jeweils neuste Version der StudioX App findest Du im Apple iTunes Store und GooglePlay Store:<br /> | |||
<br /> | <br /> | ||
[ | {| | ||
|width="300pt" | [https://itunes.apple.com/us/app/studioxm/id1145413743?ls=1&mt=8 <img src="http://beastx.com/deu/support_files/Download_on_the_App_Store_Badge_DE_Source_135x40.svg" alt="" /> StudioXm für iOS] | |||
|[https://play.google.com/store/apps/details?id=com.freakware.StudioXm <img src="https://play.google.com/intl/en_us/badges/images/generic/de_badge_web_generic.png" alt="" width = "150"/> StudioXm für Android] | |||
|}<br /> | |||
'''Achte darauf, dass die App ausreichende Zugriffsrechte für die Nutzung der Bluetooth Schnittstelle bekommt sowie Lese- und Schreibrechte für den Geräteinternen Speicher.'''<br /> | |||
Bei iOS Geräten wird eine entsprechende Nachfrage auftauchen, wenn die App zum ersten Mal gestartet wird. Bei einigen Android Geräten ist es manchmal erforderlich, dass das von Hand in den App Einstellungen gemacht werden muss! (Wenn die StudioXm App nicht auf den internen Speicher zugreifen kann, werden benutzerspezifische Daten nicht gespeichert, wie z.B. die Spracheinstellung, Gerätenamen, Backups, usw.) Außerdem benötigt die App Zugriff auf Deine Internetverbindung, wenn Du Firmware Updates durchführen willst. Beachte, dass hierbei zusätzliche Kosten anfallen können, z.B. wenn Du eine mobile Datenverbindung nutzt!<br /> | |||
<br /> | |||
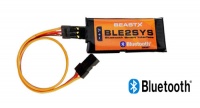
Um Dein BEASTX System mit dem Smartphone/Tablet zu verbinden wird das BLE2SYS Bluetooth LE Interface benötigt. Dieses wird am SYS Anschluss eingesteckt und stellt dann die Funkverbindung zu Deinem Endgerät her. | |||
{|class="gallery" | |||
|[[File:Ble2sys.jpg|none|200px]] | |||
|}<br /> | |||
<br /> | |||
= Windows PC/mac = | |||
Die neuste Version von StudioX findest Du unter folgendem Link:<br /> | |||
<br /> | <br /> | ||
[ | [https://www.beastx.com/deu/support.php BEASTX website]<br /> | ||
<br /> | <br /> | ||
<br /> | <br /> | ||
Um Dein BEASTX Gerät mit dem Computer zu verbinden wird eines der folgenden Interfaces benötigt:<br /> | |||
<br /> | <br /> | ||
{|class="gallery" | {|class="gallery" | ||
| Line 28: | Line 41: | ||
|style="padding:0px 20px;" align="center"|[[File:Stacks image 1478.png|none|150px]] | |style="padding:0px 20px;" align="center"|[[File:Stacks image 1478.png|none|150px]] | ||
|- | |- | ||
|width="150pt" style="padding:0px 0px; vertical-align: top; text-align: center; font-size: x-small;"|BEASTX<br />USB2SYS | |width="150pt" style="padding:0px 0px; vertical-align: top; text-align: center; font-size: x-small;"|BEASTX<br />USB2SYS Interface | ||
|width="150pt" style="padding:0px 20px; vertical-align: top; text-align: center; font-size: x-small;"|SPEKTRUM<br />SPMA3030 interface | |width="150pt" style="padding:0px 20px; vertical-align: top; text-align: center; font-size: x-small;"|SPEKTRUM<br />SPMA3030 interface | ||
|width="150pt" style="padding:0px 20px; vertical-align: top; text-align: center; font-size: x-small;"|RCWARE RX2SIM<br /> | |width="150pt" style="padding:0px 20px; vertical-align: top; text-align: center; font-size: x-small;"|RCWARE RX2SIM<br />Multi-Sim Adapter<br />im USB2SYS Emulationsmodus | ||
|}<br /> | |}<br /> | ||
Seit Version 15.7.0 kann das BLE2SYS auch für eine drahtlose Verbindung zu Deinem BEASTX-Gerät verwendet werden (nur in Kombination mit macOS oder Windows 10/11 64-Bit-Versionen!). Auf der Computerseite ist hierzu ein eingebautes oder externes Bluetooth-Modul (Bluetooth 5.0-kompatibel oder besser) erforderlich. Wenn Dein Computer kein Bluetooth-Modul hat, kannst Du einen günstigen Bluetooth-5.0-USB-Stick im örtlichen Computerladen kaufen.<br /> | |||
<br /> | |||
{|class="gallery" | |||
|[[File:Ble2sys.jpg|none|200px]] | |||
|}<br /> | |||
<br /> | |||
<br /> | |||
==Windows Installation== | |||
Das Setup sollte selbsterklärend sein, es läuft wie üblich ab. Nach Installation des StudioX Software Pakets sollte Windows die Treiberdateien für das USB2SYS Interface automatisch installieren, sobald Du das Interface zum ersten mal am USB Anschluss ansteckst oder wenn Du den RX2SIM Multi-Sim Adapter in den USB2SYS Emulationsmodus schaltest (dazu den Knopf wiederholt drücken, bis die LED am Gerät gelb leuchtet, siehe RX2SIM Anleitung). Achte auf entsprechende Meldungen auf deinem Windows Desktop/in der Taskleiste: | |||
{|class="gallery" | {|class="gallery" | ||
|[[File:Driver install.png|x50px|noframe|none]] | |[[File:Driver install.png|x50px|noframe|none]] | ||
| Line 39: | Line 61: | ||
|}<br /> | |}<br /> | ||
<br /> | <br /> | ||
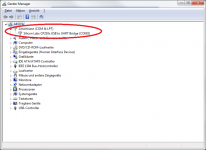
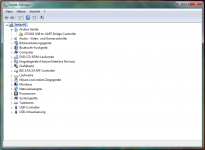
Wenn Du keinerlei Meldungen/Hinweistöne wahrnehmen konntest, überprüfe im Windows Gerätemanager, ob das Gerät korrekt erkannt wird und installiert ist. Unter Windows 7 oder höher tippe devmgmt.msc in der Suchleiste des Startmenüs ein oder auch einfach '''Gerätemanager'''. | |||
Dort solltest Du folgenden Eintrag sehen können:<br /> | |||
{|class="gallery" | {|class="gallery" | ||
|width="180pt" style="padding:10px 20px;" align="center"|[[File:Step 4.png|x150px|noframe|none]] | |width="180pt" style="padding:10px 20px;" align="center"|[[File:Step 4.png|x150px|noframe|none]] | ||
|width="180pt" style="padding:10px 20px;" align="center"|[[File:Device mgr failed.png|x150px|noframe|none]] | |width="180pt" style="padding:10px 20px;" align="center"|[[File:Device mgr failed.png|x150px|noframe|none]] | ||
|- style="font-size: x-small;" | |- style="font-size: x-small;" | ||
|width="180pt" style="padding:0px 20px;" align="center"| | |width="180pt" style="padding:0px 20px;" align="center"| Die Bezeichnung COM3 ist nur beispielhaft und kann auf deinem Rechner anders lauten. Der Eintrag sollte verschwinden, wenn Du das Interface absteckst, und wieder auftauchen, wenn Du es ansteckst. | ||
|width="180pt" style="padding:0px 20px; vertical-align: top;" align="center" | | |width="180pt" style="padding:0px 20px; vertical-align: top;" align="center" | Wenn Du nur einen Eintrag mit einem gelben "!" siehst, dann ist vermutlich etwas schief gelaufen und Du musst die Treiberdateien von Hand installieren. | ||
|} | |} | ||
<br /> | <br /> | ||
Falls die Treiber nicht installiert wurden, kannst Du ihn hier herunterladen: [https://studiox.beastx.com/download/win/CP210x_VCP_Windows.zip SiLabs driver package (Windows)]<br /> | |||
<br /> | |||
<br /> | <br /> | ||
<br /> | <br /> | ||
= | ==macOS Installation== | ||
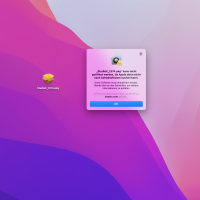
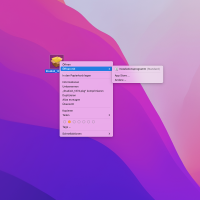
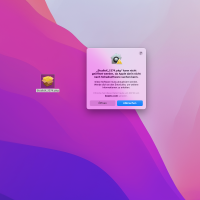
Beim Öffnen per Doppelklick der StudioX.pkg Datei erscheint möglicherweise eine Meldung, dass die Installation nicht zulässig ist. Klicke in diesem Fall bitte mit der rechten Maustaste auf die .pkg-Datei und wählen dann „Öffnen“. Es erscheint eine ähnliche Meldung, aber dieses Mal kann man „Öffnen“ wählen. | |||
{|class="gallery" | {|class="gallery" | ||
|[[File: | |width="180pt" style="padding:10px 20px;" align="center"| [[File:Studiox_macos_error.png|x200px|none]] | ||
|width="180pt" style="padding:10px 20px;" align="center"| [[File:Studiox_macos_open.png|x200px|none]] | |||
|width="180pt" style="padding:10px 20px;" align="center"| [[File:Studiox_macos_open_2.png|x200px|none]] | |||
|width="180pt" style="padding:10px 20px;" align="center"| [[File:Studiox_macos_install.png|x200px|none]] | |||
|}<br /> | |}<br /> | ||
<br /> | <br /> | ||
Falls das USB2SYS Interface nicht im StudioX gefunden wird (kein Gerät mit der Bezeichnung "cu.SLAB_USBtoUART"), kannst Du die nötigen Treiberdateien hier herunterladen: | |||
[https://studiox.beastx.com/download/mac/SiLabsUSBDriverDisk.dmg SiLabs driver package (macOS)]<br /> | |||
<br /> | <br /> | ||
<br /> | <br /> | ||
Revision as of 09:51, 2 January 2024
Mit der StudioX App lässt sich Dein MICROBEAST PLUS/MICROBEAST ULTRA, Spektrum AR7210BX oder NANOBEAST per Computer oder Smartphone/Tablet umfassend konfigurieren. Darüber hinaus kannst Du Backups erstellen, vorgefertigte Konfigurationen laden, Firmware Updates und Upgrades durchführen und vieles mehr. Mit der PC/mac Software kann außerdem das BLE2SYS Bluetooth Smart Interface konfiguriert und geupdated werden, welches zur Verbindung Deines BEASTX Geräts mit einem Smartphone/Tablet dient. Zusätzlich können auch an älteren Geräten wie MICROBEAST und Spektrum AR7200BX/AR7300BX einige Grundeinstellungen durchgeführt werden.
Die neuste Version von StudioX lautet: 15.8.4.
Bitte verwende immer die aktuelle Version, da nur so eine volle Kompatibilität zu den neuesten Geräteupdates gewährleistet ist!
Smartphone/Tablet
Die jeweils neuste Version der StudioX App findest Du im Apple iTunes Store und GooglePlay Store:
Achte darauf, dass die App ausreichende Zugriffsrechte für die Nutzung der Bluetooth Schnittstelle bekommt sowie Lese- und Schreibrechte für den Geräteinternen Speicher.
Bei iOS Geräten wird eine entsprechende Nachfrage auftauchen, wenn die App zum ersten Mal gestartet wird. Bei einigen Android Geräten ist es manchmal erforderlich, dass das von Hand in den App Einstellungen gemacht werden muss! (Wenn die StudioXm App nicht auf den internen Speicher zugreifen kann, werden benutzerspezifische Daten nicht gespeichert, wie z.B. die Spracheinstellung, Gerätenamen, Backups, usw.) Außerdem benötigt die App Zugriff auf Deine Internetverbindung, wenn Du Firmware Updates durchführen willst. Beachte, dass hierbei zusätzliche Kosten anfallen können, z.B. wenn Du eine mobile Datenverbindung nutzt!
Um Dein BEASTX System mit dem Smartphone/Tablet zu verbinden wird das BLE2SYS Bluetooth LE Interface benötigt. Dieses wird am SYS Anschluss eingesteckt und stellt dann die Funkverbindung zu Deinem Endgerät her.
 |
Windows PC/mac
Die neuste Version von StudioX findest Du unter folgendem Link:
BEASTX website
Um Dein BEASTX Gerät mit dem Computer zu verbinden wird eines der folgenden Interfaces benötigt:
 |
 |
 |
| BEASTX USB2SYS Interface |
SPEKTRUM SPMA3030 interface |
RCWARE RX2SIM Multi-Sim Adapter im USB2SYS Emulationsmodus |
Seit Version 15.7.0 kann das BLE2SYS auch für eine drahtlose Verbindung zu Deinem BEASTX-Gerät verwendet werden (nur in Kombination mit macOS oder Windows 10/11 64-Bit-Versionen!). Auf der Computerseite ist hierzu ein eingebautes oder externes Bluetooth-Modul (Bluetooth 5.0-kompatibel oder besser) erforderlich. Wenn Dein Computer kein Bluetooth-Modul hat, kannst Du einen günstigen Bluetooth-5.0-USB-Stick im örtlichen Computerladen kaufen.
 |
Windows Installation
Das Setup sollte selbsterklärend sein, es läuft wie üblich ab. Nach Installation des StudioX Software Pakets sollte Windows die Treiberdateien für das USB2SYS Interface automatisch installieren, sobald Du das Interface zum ersten mal am USB Anschluss ansteckst oder wenn Du den RX2SIM Multi-Sim Adapter in den USB2SYS Emulationsmodus schaltest (dazu den Knopf wiederholt drücken, bis die LED am Gerät gelb leuchtet, siehe RX2SIM Anleitung). Achte auf entsprechende Meldungen auf deinem Windows Desktop/in der Taskleiste:
 |
 |
Wenn Du keinerlei Meldungen/Hinweistöne wahrnehmen konntest, überprüfe im Windows Gerätemanager, ob das Gerät korrekt erkannt wird und installiert ist. Unter Windows 7 oder höher tippe devmgmt.msc in der Suchleiste des Startmenüs ein oder auch einfach Gerätemanager.
Dort solltest Du folgenden Eintrag sehen können:
Falls die Treiber nicht installiert wurden, kannst Du ihn hier herunterladen: SiLabs driver package (Windows)
macOS Installation
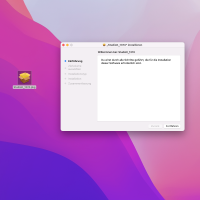
Beim Öffnen per Doppelklick der StudioX.pkg Datei erscheint möglicherweise eine Meldung, dass die Installation nicht zulässig ist. Klicke in diesem Fall bitte mit der rechten Maustaste auf die .pkg-Datei und wählen dann „Öffnen“. Es erscheint eine ähnliche Meldung, aber dieses Mal kann man „Öffnen“ wählen.
 |
 |
 |
 |
Falls das USB2SYS Interface nicht im StudioX gefunden wird (kein Gerät mit der Bezeichnung "cu.SLAB_USBtoUART"), kannst Du die nötigen Treiberdateien hier herunterladen:
SiLabs driver package (macOS)
