Translations:Manuals:BXFbl:Setupmenu E/8/en: Difference between revisions
Jump to navigation
Jump to search
Importing a new version from external source |
Importing a new version from external source |
||
| Line 2: | Line 2: | ||
* When you move the rudder stick to full deflection, the Status LED on the BEASTX system should light solid and the label ''right'' or ''left'' should change the color accordingly. If the stick is not moving far enough, you will see the message "Increase!" In this case '''increase the servo throw/endpoint of the rudder channel in the transmitter just as far so that the Status LED changes from flashing to solid when the rudder stick reaches the end position''' and the label will disappear in the software. Repeat this for the other direction. Note: Do not increase the endpoint too much in the transmitter. We need an exact match of full stick position and stick end position. So the Status LED should just change from flashing to solid when raching the end position.<br /> | * When you move the rudder stick to full deflection, the Status LED on the BEASTX system should light solid and the label ''right'' or ''left'' should change the color accordingly. If the stick is not moving far enough, you will see the message "Increase!" In this case '''increase the servo throw/endpoint of the rudder channel in the transmitter just as far so that the Status LED changes from flashing to solid when the rudder stick reaches the end position''' and the label will disappear in the software. Repeat this for the other direction. Note: Do not increase the endpoint too much in the transmitter. We need an exact match of full stick position and stick end position. So the Status LED should just change from flashing to solid when raching the end position.<br /> | ||
<br /> | <br /> | ||
<div class=" | <html> | ||
< | <div class="ios-gallery-container"> | ||
<div class=" | <!-- Erstes Bild und Text --> | ||
</div> | <div class="ios-gallery-item"> | ||
<div class=" | <div class="ios-gallery-image"> | ||
< | <img src="https://wiki.beastx.com/images/studiox/freakware%202019-07-09%20037.PNG" alt="Screenshot"> | ||
<div class=" | </div> | ||
<div class="ios-gallery-text">Stick moved into one direction, deflection not enough!</div> | |||
</div> | |||
<div class="ios-gallery-item"> | |||
<div class="ios-gallery-image"> | |||
<img src="https://wiki.beastx.com/images/studiox/freakware%202019-07-09%20038.PNG" alt="Screenshot"> | |||
</div> | |||
<div class="ios-gallery-text">Stick moved into one direction, maximum position reached!</div> | |||
</div> | |||
</div> | </div> | ||
</html> | |||
<br /> | <br /> | ||
* Now check the rudder direction of the servo on the helicopter. '''If the stick is moving the servo into the wrong direction use the servo reverse function of your transmitter''' and reverse the rudder channel to set stick control direction correctly. When the servo is moving correctly, set the rudder direction of the BEASTX gyro: When you move the rudder stick/servo to the <span style="color: #4169E1;">'''right'''</span>, the Status LED must light up or flash in <span style="color: #4169E1;">'''blue'''</span> color. When you move the rudder stick to the <span style="color: #DC143C;">'''left'''</span>, the Status LED must light up or flash in <span style="color: #DC143C;">'''red'''</span> color. '''When the display is inverted (red = right and blue = left), reverse the display (internal control direction) by choosing either ''normal'' or ''inverted'' in the software.'''<br /> | * Now check the rudder direction of the servo on the helicopter. '''If the stick is moving the servo into the wrong direction use the servo reverse function of your transmitter''' and reverse the rudder channel to set stick control direction correctly. When the servo is moving correctly, set the rudder direction of the BEASTX gyro: When you move the rudder stick/servo to the <span style="color: #4169E1;">'''right'''</span>, the Status LED must light up or flash in <span style="color: #4169E1;">'''blue'''</span> color. When you move the rudder stick to the <span style="color: #DC143C;">'''left'''</span>, the Status LED must light up or flash in <span style="color: #DC143C;">'''red'''</span> color. '''When the display is inverted (red = right and blue = left), reverse the display (internal control direction) by choosing either ''normal'' or ''inverted'' in the software.'''<br /> | ||
<br /> | <br /> | ||
<div class=" | <html> | ||
< | <div class="ios-gallery-container"> | ||
<div class=" | <!-- Erstes Bild und Text --> | ||
</div> | <div class="ios-gallery-item"> | ||
<div class=" | <div class="ios-gallery-image"> | ||
< | <img src="https://wiki.beastx.com/images/studiox/freakware%202019-07-09%20038.PNG" alt="Screenshot"> | ||
<div class=" | </div> | ||
<div class="ios-gallery-text">Stick moved left, but label shows right!</div> | |||
</div> | |||
<div class="ios-gallery-item"> | |||
<div class="ios-gallery-image"> | |||
<img src="https://wiki.beastx.com/images/studiox/freakware%202019-07-09%20041.PNG" alt="Screenshot"> | |||
</div> | |||
<div class="ios-gallery-text">Stick moved left, label shows left!</div> | |||
</div> | |||
</div> | </div> | ||
</html> | |||
<br /> | <br /> | ||
* Finally adjust the servo limit by changing the values in the two adjustment boxes for each direction. To do so, carefully use the rudder stick to move the servo to the endpoint (watch out to not jam the servo) and increase/decrease the endpoint as necessary.<br /> | * Finally adjust the servo limit by changing the values in the two adjustment boxes for each direction. To do so, carefully use the rudder stick to move the servo to the endpoint (watch out to not jam the servo) and increase/decrease the endpoint as necessary.<br /> | ||
<br /> | <br /> | ||
<div class=" | <html> | ||
< | <div class="ios-gallery-container"> | ||
<div class=" | <!-- Erstes Bild und Text --> | ||
<div class="ios-gallery-item"> | |||
<div class="ios-gallery-image"> | |||
<img src="https://wiki.beastx.com/images/studiox/freakware%202019-07-09%20040.PNG" alt="Screenshot"> | |||
</div> | |||
<div class="ios-gallery-text">Use + and - buttons to adjust endpoint.</div> | |||
</div> | |||
</div> | </div> | ||
</html> | |||
<br /> | <br /> | ||
<br /> | <br /> | ||
Latest revision as of 09:45, 10 August 2024
Setup with StudioX app
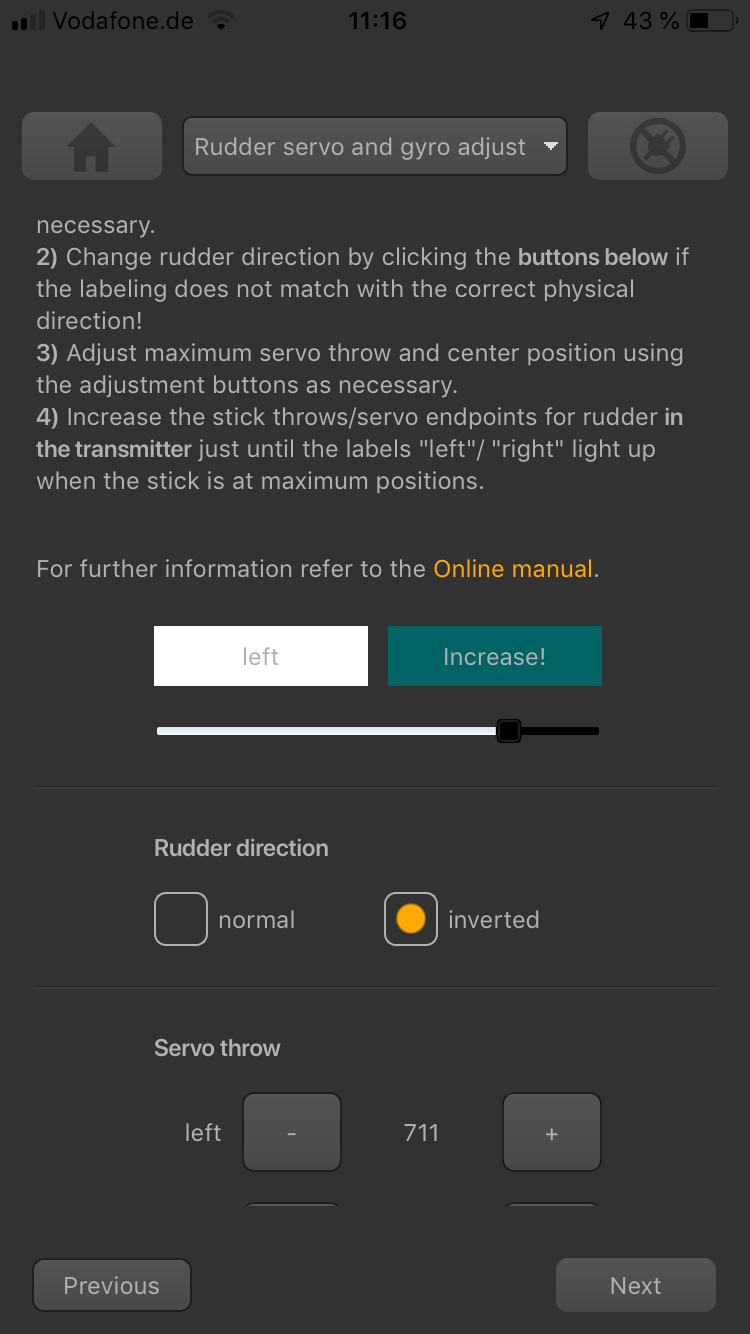
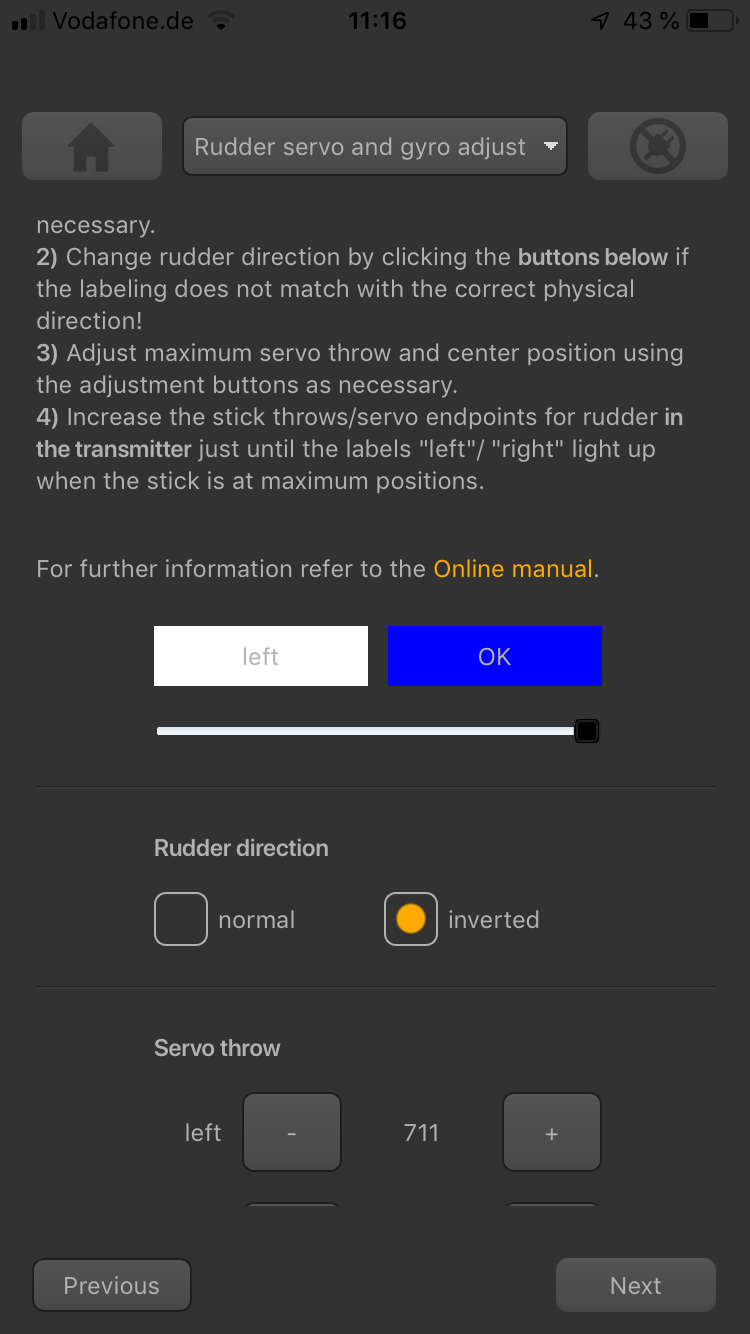
- When you move the rudder stick to full deflection, the Status LED on the BEASTX system should light solid and the label right or left should change the color accordingly. If the stick is not moving far enough, you will see the message "Increase!" In this case increase the servo throw/endpoint of the rudder channel in the transmitter just as far so that the Status LED changes from flashing to solid when the rudder stick reaches the end position and the label will disappear in the software. Repeat this for the other direction. Note: Do not increase the endpoint too much in the transmitter. We need an exact match of full stick position and stick end position. So the Status LED should just change from flashing to solid when raching the end position.

Stick moved into one direction, deflection not enough!

Stick moved into one direction, maximum position reached!
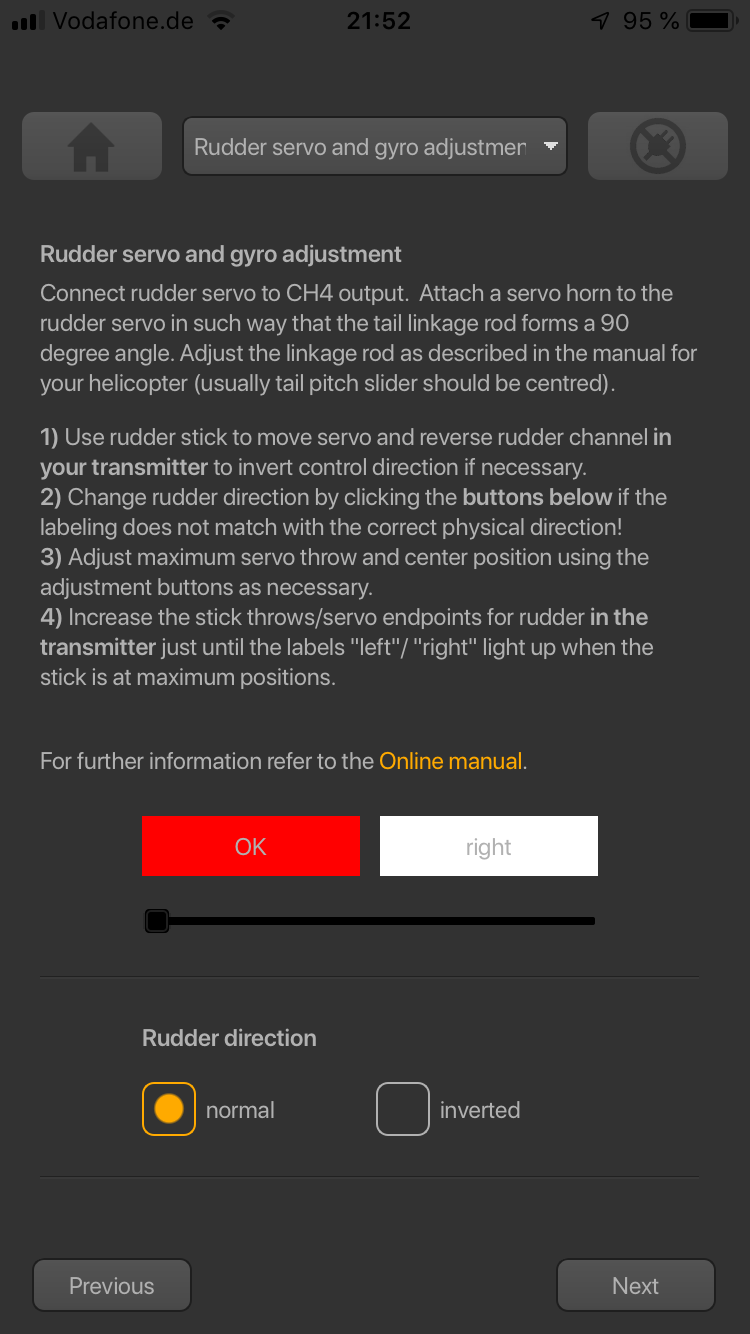
- Now check the rudder direction of the servo on the helicopter. If the stick is moving the servo into the wrong direction use the servo reverse function of your transmitter and reverse the rudder channel to set stick control direction correctly. When the servo is moving correctly, set the rudder direction of the BEASTX gyro: When you move the rudder stick/servo to the right, the Status LED must light up or flash in blue color. When you move the rudder stick to the left, the Status LED must light up or flash in red color. When the display is inverted (red = right and blue = left), reverse the display (internal control direction) by choosing either normal or inverted in the software.

Stick moved left, but label shows right!

Stick moved left, label shows left!
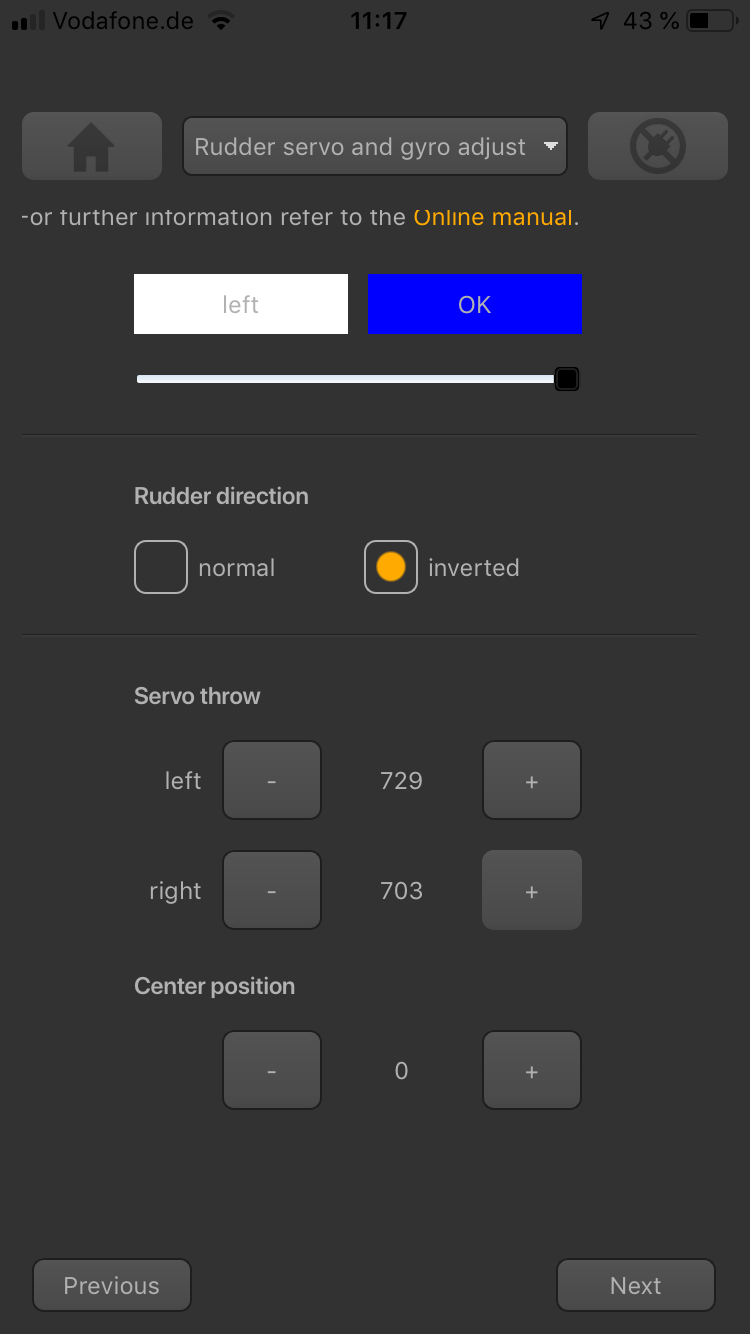
- Finally adjust the servo limit by changing the values in the two adjustment boxes for each direction. To do so, carefully use the rudder stick to move the servo to the endpoint (watch out to not jam the servo) and increase/decrease the endpoint as necessary.

Use + and - buttons to adjust endpoint.