Manuals:MB Plus:Setupmenu E/en: Difference between revisions
Importing a new version from external source |
Importing a new version from external source |
||
| Line 8: | Line 8: | ||
<br /> | <br /> | ||
Then adjust the servo limit for the other direction. Drive the tail pitch slider by using the rudder stick to the other maximum endpoint and then release the rudder stick. After a short moment, the color of the Status-LED should start flashing followed by lightning steady purple (mix of red and blue) indicating that the servo endpoint adjustment is complete.<br /> | Then adjust the servo limit for the other direction. Drive the tail pitch slider by using the rudder stick to the other maximum endpoint and then release the rudder stick. After a short moment, the color of the Status-LED should start flashing followed by lightning steady purple (mix of red and blue) indicating that the servo endpoint adjustment is complete.<br /> | ||
<br /> | |||
[[Image:Setupmenu_E_left.png|600px|none|border]]<br /> | [[Image:Setupmenu_E_left.png|600px|none|border]]<br /> | ||
<br /> | <br /> | ||
| Line 13: | Line 14: | ||
<br /> | <br /> | ||
[[Image:Warning.png|18px|sub]] If the Status-LED does not light or lights in an unexpected color, the servo throw is obviously too small. In this case mount the linkage ball of the tail linkage rod further inward on the servo horn. This ensures that the tail gyro of MICROBEAST PLUS will perform in the best way and that enough servo resolution is available.<br /> | [[Image:Warning.png|18px|sub]] If the Status-LED does not light or lights in an unexpected color, the servo throw is obviously too small. In this case mount the linkage ball of the tail linkage rod further inward on the servo horn. This ensures that the tail gyro of MICROBEAST PLUS will perform in the best way and that enough servo resolution is available.<br /> | ||
<br />[[Image:Warning.png|18px|sub]] By (re-)adjusting tail rotor endpoints the servo center trim will be reset to zero (in case it has been changed at [[Manuals:MB_Plus:Parametermenu_A|Parameter menu point '''A''']]).}}<br /> | <br />[[Image:Warning.png|18px|sub]] By (re-)adjusting tail rotor endpoints the servo center trim will be reset to zero (in case it has been changed at [[Manuals:MB_Plus:Parametermenu_A|Parameter menu point '''A''']]).}} | ||
<br /> | |||
<br /> | <br /> | ||
---- | |||
Push the button to save the configuration and to proceed to [[Manuals:MB_Plus:Setupmenu_F|Setup menu point '''F''']]. | Push the button to save the configuration and to proceed to [[Manuals:MB_Plus:Setupmenu_F|Setup menu point '''F''']]. | ||
---- | |||
Latest revision as of 09:42, 29 May 2015
At Setup menu point E you adjust the best possible servo throw for your tail rotor. The optimum throw is determined by the maximum possible control travel of the tail mechanism or based on the maximum allowed angle of attack of the tail rotor blades that will not lead to an aerodynamic stall of the blades. Such stalls can cause very bad stopping behavior like overshooting of the tail when stopping from rotation and can also cause bad tail response to rudder stick input when performing directional changes. Keep this in mind when adjusting the tail rotor endpoints. Several helicopters on the market allow for a very wide range of tail travel. Here is not necessarily useful to use the whole range of travel. Check the helicopter‘s manual to find out where to set tail pitch end points.
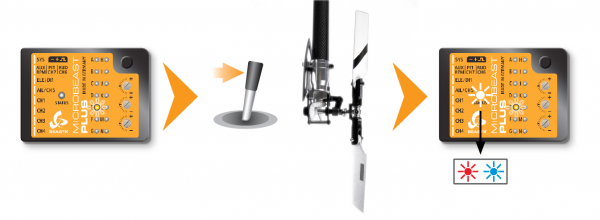
To adjust the limits, move the rudder stick in one direction until the servo reaches the maximum endpoint without any binding or stall and release the rudder stick. The further you move the rudder stick the quicker the servo will steer into the given direction. If you move the servo too far you can steer the stick to the opposite direction and move the pitch slider a short way back. Once you adjusted the maximum endpoint don‘t move the rudder stick anymore and wait for the Status-LED to flash and light steady red or blue, depending on the adjusted direction. Now you have saved the servo limit for one direction.

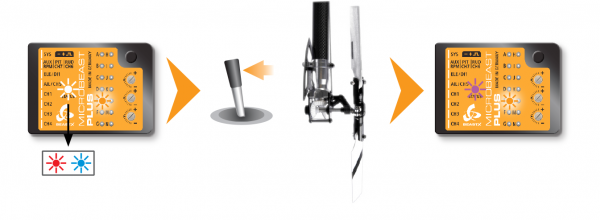
Then adjust the servo limit for the other direction. Drive the tail pitch slider by using the rudder stick to the other maximum endpoint and then release the rudder stick. After a short moment, the color of the Status-LED should start flashing followed by lightning steady purple (mix of red and blue) indicating that the servo endpoint adjustment is complete.

Pay attention that the steered direction of your rudder stick corresponds to the direction your helicopter should turn. If this is not the case, use your transmitter‘s servo reversing function for the rudder stick. If you‘re not sure in which direction the helicopter should rotate consult the manual for your helicopter.
If the Status-LED does not light or lights in an unexpected color, the servo throw is obviously too small. In this case mount the linkage ball of the tail linkage rod further inward on the servo horn. This ensures that the tail gyro of MICROBEAST PLUS will perform in the best way and that enough servo resolution is available.
By (re-)adjusting tail rotor endpoints the servo center trim will be reset to zero (in case it has been changed at Parameter menu point A).
Push the button to save the configuration and to proceed to Setup menu point F.