Manuals:MBPlusFblV5:Governormenu D: Difference between revisions
Shornstein (talk | contribs) Created page with "<translate> {{TOC_MBPlusV5}} {{DISPLAYTITLE:Setting up the transmitter|noerror}} __TOC__ <br /> Similar to GOVERNOR MENU point A here we will only get some status information..." |
Shornstein (talk | contribs) No edit summary |
||
| (4 intermediate revisions by the same user not shown) | |||
| Line 1: | Line 1: | ||
<translate> | <translate> | ||
<!--T:5--> | |||
{{DISPLAYTITLE:Setting up the transmitter|noerror}} | {{DISPLAYTITLE:GOVERNOR MENU D - Setting up the transmitter|noerror}} | ||
{{TOC_MBPlusV5|Manuals:MBPlusFblV5:Governormenu_C/en|Manuals:MBPlusFblV5:Governormenu_E/en|GOVMENU}} | |||
__TOC__ | __TOC__ | ||
<br /> | <br /> | ||
Similar to GOVERNOR MENU point A here we will only get some status information. At GOVERNOR MENU point D the different activation points of the | <!--T:6--> | ||
Similar to GOVERNOR MENU point A here we will only get some status information. At GOVERNOR MENU point D the different activation points of the Governor will be displayed based on color and state of the Status-LED. So you can prepare your transmitter for use with the Headspeed Governor function. The information conveyed by the Status-LED is basically the same in every Governor operation mode: | |||
<p>Governor off = '''off''', Autorotation = <font color="purple">'''purple'''</font>, Gov active = <font color="#FF3300">'''red'''</font> or <font color="#0066FF">'''blue'''</font> (= max. RPM)</p> | <p>Governor off = '''off''', Autorotation = <font color="purple">'''purple'''</font>, Gov active = <font color="#FF3300">'''red'''</font> or <font color="#0066FF">'''blue'''</font> (= max. RPM)</p> | ||
However, the setup of the transmitter and the range of headspeed will be slightly different, depending on whether the mode '''electric''' or '''nitro''' is used.<br /> | However, the setup of the transmitter and the range of headspeed will be slightly different, depending on whether the mode '''electric''' or '''nitro''' is used.<br /> | ||
<br /> | <br /> | ||
=How to control the Governor= | =How to control the Governor= <!--T:7--> | ||
==Electric Governor== | ==Electric Governor== <!--T:8--> | ||
In '''electric''' governor mode the pilot does no longer control the speed controller with the transmitter. MICROBEAST PLUS completely takes over control of the ESC. With the transmitter you only specifiy the desired rotor | In '''electric''' governor mode the pilot does no longer control the speed controller with the transmitter. MICROBEAST PLUS completely takes over control of the ESC. With the transmitter you only specifiy the desired rotor speed you want the helicopter to maintain. When setting a speed higher than minimum, MICROBEAST PLUS will speed up the rotor smoothly and ensure that the demanded rotor speed is kept constant throughout the flight. To practice autorotation landings, additionaly you can keep MICROBEAST PLUS in a special mode that causes the speed controller to be switched off during the maneuver but speed up the rotor fast when aborting the autorotation (faster than with the initial soft start).<br /> | ||
<br /> | <br /> | ||
The rotor | The rotor speed is set via the throttle channel of the transmitter. You may use the transmitter's throttle curves for instance, so you can switch the motor on and off and pretend different speeds using the flight mode system of the transmitter. Instead of curves you have to set horizontal lines so that the channel output value does not depend on the throttle stick position but is fixed in each flight mode. The flight mode switch then acts as a switch that switches between different speed settings. Alternatively, of course you may use a switch that is directly assigned to the throttle channel and adjust the switch position to preset different rotor speeds and to switch off the motor, but this may be much less convenient.<br /> | ||
<br /> | <br /> | ||
<gallery mode="nolines" widths="300" heights="127"> | <gallery mode="nolines" widths="300" heights="127"> | ||
| Line 24: | Line 26: | ||
</gallery> | </gallery> | ||
<br /> | <br /> | ||
In '''electric''' mode the adjustable throttle range is | In '''electric''' mode the adjustable throttle range is 4200rpm/min. The lowest rotor speed that can be set is 800rpm/min, the maximum speed is 5000rpm/min. To enable autorotation bail out mode the throttle must be set to a value between 5% and 15%.<br /> | ||
<br /> | <br /> | ||
{|style="text-align:center; margin:0px 0px 0px | {|style="text-align:center; font-size: 80%; margin:0px 20px 0px 0px;" cellpadding="4" cellspacing="0" border="1" | ||
!colspan="2" | Throttle position<br />(scale depending on transmitter) | !colspan="2" | Throttle position<br />(scale depending on transmitter) | ||
!style="width:100px;" | <br />Rotor | !style="width:100px;" | <br />Rotor speed | ||
!<br />Status-LED | !<br />Status-LED | ||
|- | |- | ||
| 100% || +100 || 5000 | | 100% || +100 || 5000 | ||
|style="background-color:# | | style="background-color:#0066FF; color:white" | '''blue''' | ||
|- | |- | ||
| 95% || +90 || 4750 | | 95% || +90 || 4750 | ||
| Line 71: | Line 73: | ||
| 10% || -80 | | 10% || -80 | ||
| rowspan="2" | Motor off/<br />Autorotation | | rowspan="2" | Motor off/<br />Autorotation | ||
| rowspan="2" style="background-color:# | | rowspan="2" style="background-color:#CC66CC; color:white" | '''purple''' | ||
|- | |- | ||
| 5% || -90 | | 5% || -90 | ||
| Line 80: | Line 82: | ||
<br /> | <br /> | ||
==Nitro Governor - with separate control channel== | ==Nitro Governor - with separate control channel== <!--T:9--> | ||
When the '''nitro''' Governor mode is used, the throttle servo can be controlled entirely via the throttle channel of the remote control as long as the | When the '''nitro''' Governor mode is used, the throttle servo can be controlled entirely via the throttle channel of the remote control as long as the Governor function is switched off. This is especially necessary to start and warm up the engine as well as to stop the engine after the flight. Only when the Governor is switched on, the system will take over control of the throttle servo to spool up the rotor to the desired speed (if this is not yet reached) and ensure that the rotor speed is maintained during the flight. As some model engines react very sensitive in the lower throttle sector and abrupt engagement can cause the engine to quit, i.e. when the clutch is not fully engaged and/or the rotor is not yet turning, also the manual throttle control can be of advantage. The pilot can run the engine to speed "by hand" before control is passed over to the Governor.<br /> | ||
<br /> | <br /> | ||
The adjustable rotorspeed range in "nitro" mode is 2500rpm/min. The lowest head speed to govern is 500rpm/min, the maximum head speed is 3000rpm/min.<br /> | |||
<br /> | <br /> | ||
When a separate control channel is used for the Governor function the throttle servo can be controlled as usual via throttle channel and throttle curves of the transmitter. By switching the separate control channel in different positions, the Governor can be activated and the desired rotor speed can be preset. Note that for safety reason the throttle channel has priority over the Governor control channel as long as the output is below 25%. So you can always control the lower throttle servo positions by hand, even if the Governor is already switched on by the separate control channel. Only when the throttle is raised above 25% the Governor intervenes and controls the throttle servo to spool up and maintain the rotor head speed. So when you want to bring the throttle servo to idle position for autorotation or to shut off the engine you can always do this, regardsless of how the Governor is set at the momement. In respect to this please note that MICROBEAST PLUS will be set to Autorotation bail out mode if the Governor was activated once and the throttle channel is brought back below 25%. Now when throttle is increased again, the Governor will speed up the rotor faster than on initial spool up! Therefore if you make a stopover and the rotor is completely stopped, you must completely disable the Governor once with the separate control channel. So the Governor is reset and will perform an initial startup again. Otherwise Autorotation mode would still be active and may cause the helicopter to tip over due to the abrupt speed up.<br /> | |||
<br /> | <br /> | ||
<gallery mode="nolines" widths="400" heights="200"> | <gallery mode="nolines" widths="400" heights="200"> | ||
| Line 93: | Line 95: | ||
</gallery> | </gallery> | ||
<br /> | <br /> | ||
{|style="text-align:center; margin:0px 20px 0px | {|style="text-align:center; font-size: 80%; margin:0px 20px 0px 0px; float: left;" cellpadding="4" cellspacing="0" border="1" | ||
!colspan="2" | Throttle position<br />(scale depending on transmitter) | !colspan="2" | Throttle position<br />(scale depending on transmitter) | ||
!style="width: | !style="width: 150px;" | <br />Status-LED | ||
|- | |- | ||
| 100% || +100 | | 100% || +100 | ||
| rowspan="16" | Manual control/<br />< | | rowspan="16" | '''off'''<br />(= Manual control)<br /><br /><span style="color:#FF3300">'''red'''</span> or <span style="color:#0066FF">'''blue'''</span><br />(= RPM control) | ||
|- | |- | ||
| 95% || +90 | | 95% || +90 | ||
| Line 131: | Line 133: | ||
|- | |- | ||
| 20% || -60 | | 20% || -60 | ||
| rowspan="5" | Manual control/<br /><div style="color:# | | rowspan="5" | '''Manual control'''/<br /><div style="color:#CC66CC">'''Autorotation'''</div> | ||
|- | |- | ||
| 15% || -70 | | 15% || -70 | ||
| Line 143: | Line 145: | ||
<!--T:4--> | <!--T:4--> | ||
{|style="text-align:center; | {|style="text-align:center; font-size: 80%; margin:0px 20px 0px 0px;" cellpadding="4" cellspacing="0" border="1" | ||
!style="width:100px;" | <br />Rotor | !style="width:100px;" | <br />Rotor speed | ||
!style="width:150px;" | | !style="width:150px;" | <br />Governor channel | ||
|- | |- | ||
|3000 || +100 | |3000 || +100 | ||
| Line 187: | Line 189: | ||
|500|| -90 | |500|| -90 | ||
|- | |- | ||
| | |off || -100 | ||
|} | |} | ||
<div style="clear:both"> | <div style="clear:both"> | ||
| Line 194: | Line 196: | ||
<br /> | <br /> | ||
==Nitro Governor - simple mode== | ==Nitro Governor - simple mode== <!--T:10--> | ||
If no separate control channel | If no separate control channel was assigned in RECEIVER MENU for the Governor, throttle servo and Governor function are solely controlled by the throttle channel. For this purpose the control range of the throttle channel is divided into two parts: Below the center position, the throttle servo is controlled manually by the throttle channel. The Governor is switched off and the servo output range is doubled, so that the throttle servo can be moved over the entire range. Once the throttle channel is switched to the upper area, the Governor will activate, spool up the rotor and try to hold the preset headspeed (the throttle position determines the headspeed here). Similar as it was described above for electric models you make the throttle curve a horizontal line, so that regardless of the position of the throttle stick, MICROBEAST PLUS will always see the same throttle value. So the preset headspeed will stays the same and does not change when moving throttle stick. At least two flight modes are necessary: One that the throttle curve goes only up to the middle position and in which the motor can be controlled by hand, i.e. for starting the motor, and one flight mode in which the throttle curve is a horizontal line used to preset the desired rotor head speed.<br /> | ||
<br /> | <br /> | ||
<gallery mode="nolines" widths="350" heights="120"> | <gallery mode="nolines" widths="350" heights="120"> | ||
| Line 201: | Line 203: | ||
File:NGov_simple_idleup_1.png | File:NGov_simple_idleup_1.png | ||
</gallery> | </gallery> | ||
A third flight mode | A third flight mode can be used for performing autorotation maneuvers: Here the throttle channel must be set to a constant value close below center position (between 40% and 50%). When you switch to this position once the governor was active, the throttle servo will be moved to the idle position set at menu point B. When switching back to governor mode, i.e. when you want to bail out from autorotation, the rotor will be spooled up at an increased rate. Alternatively if it is switch back to the flight phase with manual control, Autorotation mode is canceled and the next time you switch on the Governor, the rotor is spooled up slowly.<br /> | ||
<br /> | <br /> | ||
[[File:NGov_simple_hold.png|noframe|x145px]]<br /> | [[File:NGov_simple_hold.png|noframe|x145px]]<br /> | ||
<br /> | <br /> | ||
<br /> | <br /> | ||
{|style="text-align:center; margin:0px 0px 0px | {|style="text-align:center; font-size: 80%; margin:0px 20px 0px 0px;" cellpadding="4" cellspacing="0" border="1" | ||
!colspan="2" | Throttle position<br />(scale depending on transmitter) | !colspan="2" | Throttle position<br />(scale depending on transmitter) | ||
!style="width:100px;" | <br />Rotor | !style="width:100px;" | <br />Rotor speed | ||
!<br />Status-LED | !<br />Status-LED | ||
|- | |- | ||
| 100% || +100 || 3000 | | 100% || +100 || 3000 | ||
|style="background-color:# | |style="background-color:#0066FF; color:white" | '''blue''' | ||
|- | |- | ||
| 95% || +90 || 2750 | | 95% || +90 || 2750 | ||
| Line 236: | Line 238: | ||
|- | |- | ||
| 45% || -10 | | 45% || -10 | ||
| rowspan="2" | Manual control | | rowspan="2" | Manual control or Autorotation | ||
| rowspan="2" style="background-color:# | | rowspan="2" style="background-color:#CC66CC; color:white" | '''purple''' | ||
|- | |- | ||
| 40% || -20 | | 40% || -20 | ||
| Line 262: | Line 264: | ||
<br /> | <br /> | ||
=Adjustment on the device= | =Adjustment on the device= <!--T:11--> | ||
<br /> | <br /> | ||
<br /> | <br /> | ||
<br /> | <br /> | ||
=Setup with StudioX= | =Setup with StudioX= <!--T:12--> | ||
<br /> | <br /> | ||
<br /> | <br /> | ||
<br /> | <br /> | ||
=Setup with StudioXm= | =Setup with StudioXm= <!--T:13--> | ||
<br /> | <br /> | ||
<br /> | <br /> | ||
Latest revision as of 09:33, 12 January 2018
Similar to GOVERNOR MENU point A here we will only get some status information. At GOVERNOR MENU point D the different activation points of the Governor will be displayed based on color and state of the Status-LED. So you can prepare your transmitter for use with the Headspeed Governor function. The information conveyed by the Status-LED is basically the same in every Governor operation mode:
Governor off = off, Autorotation = purple, Gov active = red or blue (= max. RPM)
However, the setup of the transmitter and the range of headspeed will be slightly different, depending on whether the mode electric or nitro is used.
How to control the Governor
Electric Governor
In electric governor mode the pilot does no longer control the speed controller with the transmitter. MICROBEAST PLUS completely takes over control of the ESC. With the transmitter you only specifiy the desired rotor speed you want the helicopter to maintain. When setting a speed higher than minimum, MICROBEAST PLUS will speed up the rotor smoothly and ensure that the demanded rotor speed is kept constant throughout the flight. To practice autorotation landings, additionaly you can keep MICROBEAST PLUS in a special mode that causes the speed controller to be switched off during the maneuver but speed up the rotor fast when aborting the autorotation (faster than with the initial soft start).
The rotor speed is set via the throttle channel of the transmitter. You may use the transmitter's throttle curves for instance, so you can switch the motor on and off and pretend different speeds using the flight mode system of the transmitter. Instead of curves you have to set horizontal lines so that the channel output value does not depend on the throttle stick position but is fixed in each flight mode. The flight mode switch then acts as a switch that switches between different speed settings. Alternatively, of course you may use a switch that is directly assigned to the throttle channel and adjust the switch position to preset different rotor speeds and to switch off the motor, but this may be much less convenient.
In electric mode the adjustable throttle range is 4200rpm/min. The lowest rotor speed that can be set is 800rpm/min, the maximum speed is 5000rpm/min. To enable autorotation bail out mode the throttle must be set to a value between 5% and 15%.
| Throttle position (scale depending on transmitter) |
Rotor speed |
Status-LED | |
|---|---|---|---|
| 100% | +100 | 5000 | blue |
| 95% | +90 | 4750 | red |
| 90% | +80 | 4500 | |
| 85% | +70 | 4250 | |
| 80% | +60 | 4000 | |
| 75% | +50 | 3750 | |
| 70% | +40 | 3500 | |
| 65% | +30 | 3250 | |
| 60% | +20 | 3000 | |
| 55% | +10 | 2750 | |
| 50% | 0 | 2500 | |
| 45% | -10 | 2300 | |
| 40% | -20 | 2050 | |
| 35% | -30 | 1800 | |
| 30% | -40 | 1550 | |
| 25% | -50 | 1300 | |
| 20% | -60 | 1050 | |
| 15% | -70 | 800 | |
| 10% | -80 | Motor off/ Autorotation |
purple |
| 5% | -90 | ||
| 0% | -100 | Motor off | off |
Nitro Governor - with separate control channel
When the nitro Governor mode is used, the throttle servo can be controlled entirely via the throttle channel of the remote control as long as the Governor function is switched off. This is especially necessary to start and warm up the engine as well as to stop the engine after the flight. Only when the Governor is switched on, the system will take over control of the throttle servo to spool up the rotor to the desired speed (if this is not yet reached) and ensure that the rotor speed is maintained during the flight. As some model engines react very sensitive in the lower throttle sector and abrupt engagement can cause the engine to quit, i.e. when the clutch is not fully engaged and/or the rotor is not yet turning, also the manual throttle control can be of advantage. The pilot can run the engine to speed "by hand" before control is passed over to the Governor.
The adjustable rotorspeed range in "nitro" mode is 2500rpm/min. The lowest head speed to govern is 500rpm/min, the maximum head speed is 3000rpm/min.
When a separate control channel is used for the Governor function the throttle servo can be controlled as usual via throttle channel and throttle curves of the transmitter. By switching the separate control channel in different positions, the Governor can be activated and the desired rotor speed can be preset. Note that for safety reason the throttle channel has priority over the Governor control channel as long as the output is below 25%. So you can always control the lower throttle servo positions by hand, even if the Governor is already switched on by the separate control channel. Only when the throttle is raised above 25% the Governor intervenes and controls the throttle servo to spool up and maintain the rotor head speed. So when you want to bring the throttle servo to idle position for autorotation or to shut off the engine you can always do this, regardsless of how the Governor is set at the momement. In respect to this please note that MICROBEAST PLUS will be set to Autorotation bail out mode if the Governor was activated once and the throttle channel is brought back below 25%. Now when throttle is increased again, the Governor will speed up the rotor faster than on initial spool up! Therefore if you make a stopover and the rotor is completely stopped, you must completely disable the Governor once with the separate control channel. So the Governor is reset and will perform an initial startup again. Otherwise Autorotation mode would still be active and may cause the helicopter to tip over due to the abrupt speed up.
| Throttle position (scale depending on transmitter) |
Status-LED | |
|---|---|---|
| 100% | +100 | off (= Manual control) red or blue (= RPM control) |
| 95% | +90 | |
| 90% | +80 | |
| 85% | +70 | |
| 80% | +60 | |
| 75% | +50 | |
| 70% | +40 | |
| 65% | +30 | |
| 60% | +20 | |
| 55% | +10 | |
| 50% | 0 | |
| 45% | -10 | |
| 40% | -20 | |
| 35% | -30 | |
| 30% | -40 | |
| 25% | -50 | |
| 20% | -60 | Manual control/ Autorotation
|
| 15% | -70 | |
| 10% | -80 | |
| 5% | -90 | |
| 0% | -100 | |
Rotor speed |
Governor channel |
|---|---|
| 3000 | +100 |
| 2870 | +90 |
| 2740 | +80 |
| 2605 | +70 |
| 2470 | +60 |
| 2340 | +50 |
| 2210 | +40 |
| 2080 | +30 |
| 1950 | +20 |
| 1820 | +10 |
| 1680 | 0 |
| 1550 | -10 |
| 1420 | -20 |
| 1290 | -30 |
| 1160 | -40 |
| 1030 | -50 |
| 895 | -60 |
| 760 | -70 |
| 630 | -80 |
| 500 | -90 |
| off | -100 |
Nitro Governor - simple mode
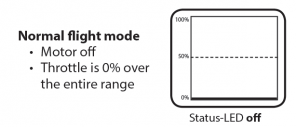
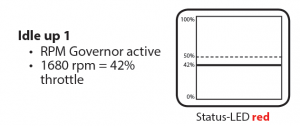
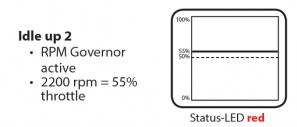
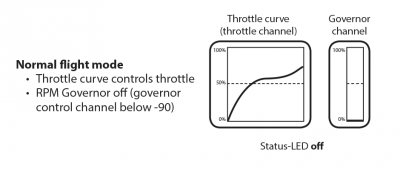
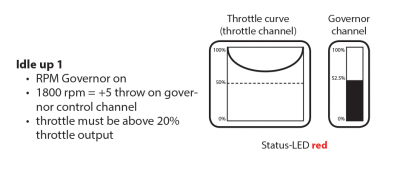
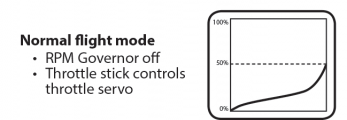
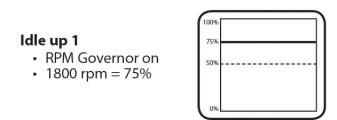
If no separate control channel was assigned in RECEIVER MENU for the Governor, throttle servo and Governor function are solely controlled by the throttle channel. For this purpose the control range of the throttle channel is divided into two parts: Below the center position, the throttle servo is controlled manually by the throttle channel. The Governor is switched off and the servo output range is doubled, so that the throttle servo can be moved over the entire range. Once the throttle channel is switched to the upper area, the Governor will activate, spool up the rotor and try to hold the preset headspeed (the throttle position determines the headspeed here). Similar as it was described above for electric models you make the throttle curve a horizontal line, so that regardless of the position of the throttle stick, MICROBEAST PLUS will always see the same throttle value. So the preset headspeed will stays the same and does not change when moving throttle stick. At least two flight modes are necessary: One that the throttle curve goes only up to the middle position and in which the motor can be controlled by hand, i.e. for starting the motor, and one flight mode in which the throttle curve is a horizontal line used to preset the desired rotor head speed.
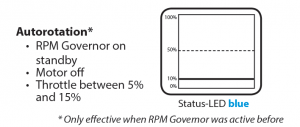
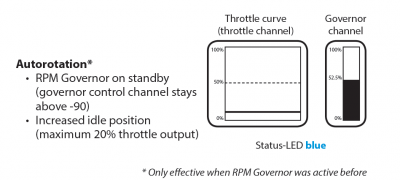
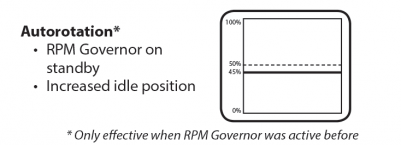
A third flight mode can be used for performing autorotation maneuvers: Here the throttle channel must be set to a constant value close below center position (between 40% and 50%). When you switch to this position once the governor was active, the throttle servo will be moved to the idle position set at menu point B. When switching back to governor mode, i.e. when you want to bail out from autorotation, the rotor will be spooled up at an increased rate. Alternatively if it is switch back to the flight phase with manual control, Autorotation mode is canceled and the next time you switch on the Governor, the rotor is spooled up slowly.
| Throttle position (scale depending on transmitter) |
Rotor speed |
Status-LED | |
|---|---|---|---|
| 100% | +100 | 3000 | blue |
| 95% | +90 | 2750 | red |
| 90% | +80 | 2500 | |
| 85% | +70 | 2250 | |
| 80% | +60 | 2000 | |
| 75% | +50 | 1750 | |
| 70% | +40 | 1500 | |
| 65% | +30 | 1250 | |
| 60% | +20 | 1000 | |
| 55% | +10 | 750 | |
| 50% | 0 | 500 | |
| 45% | -10 | Manual control or Autorotation | purple |
| 40% | -20 | ||
| 35% | -30 | Manual control | off |
| 30% | -40 | ||
| 25% | -50 | ||
| 20% | -60 | ||
| 15% | -70 | ||
| 10% | -80 | ||
| 5% | -90 | ||
| 0% | -100 | ||
Adjustment on the device
Setup with StudioX
Setup with StudioXm
