Manuals:MBUltraFblV5:Setupmenu B/de: Difference between revisions
Shornstein (talk | contribs) Created page with "Bei Einstellpunkt '''B''' wird die Ansteuerfrequenz für die Taumelscheibenservos ausgewählt. Damit die Regelung des MICROBEAST ULTRA am effektivsten arbeiten kann, gilt für..." |
Shornstein (talk | contribs) No edit summary |
||
| (6 intermediate revisions by 2 users not shown) | |||
| Line 14: | Line 14: | ||
<br /> | <br /> | ||
= | =Einstellung am Gerät= | ||
Stelle die Ansteuerfrequenz für die Taumelscheibenservos durch Auswahl über den Hecksteuerknüppel so ein, dass die Status LED bei Punkt '''B''' in der passenden Farbe leuchtet. Durch kurzen Druck auf den Knopf wird die Einstellung bestätigt und weiter zum nächsten Punkt gesprungen.<br /> | |||
<br /> | <br /> | ||
{{TABLEV5| | {{TABLEV5/de|Ansteuerfrequenz|50 Hz|65 Hz|120 Hz|165 Hz|200 Hz}}<br /> | ||
''' | '''Hinweis:''' Wenn über die StudioX App ein anderer Wert eingestellt wurde, so ist die Status LED '''aus'''. Du kannst hier jederzeit mit dem Hecksteuerknüppel einen der vorgegebenen Werte auswählen, der benutzerdefinierte Wert wird dadurch aber gelöscht!<br /> | ||
<br /> | <br /> | ||
<br /> | <br /> | ||
= | =Einstellung über die StudioX App= | ||
Wähle eine der vorgegebenen Ansteuerraten oder ändere den Wert "Ansteuerfrequenz Taumelscheibe" über die Knöpfe +/- oder das Drehrad. Über die StudioX App kann die Wiederholfrequenz auf der Taumelscheibe auf bis zu 300Hz eingestellt werden. Höhere Werte sind praktisch nicht sinnvoll, auch wenn ein Servo lt. Datenblatt höhere Werte verkraften könnte!<br /> | |||
<br /> | <br /> | ||
<div class="iosgallery"> | <div class="iosgallery"> | ||
| Line 36: | Line 36: | ||
<br /> | <br /> | ||
= | =Anschluss der Servos= | ||
''' | '''Stecke nach Auswahl der korrekten Ansteuerfrequenz die Taumelscheibenservos in die entsprechenden Steckplätze an den Ausgängen [CH1] bis [CH3] (und [CH6] bei 4 Servos) am MICROBEAST ULTRA ein. Montiere jedoch noch nicht die Ruderhörner oder Anlenkgestänge, um ein Blockieren der Servos beim ersten Anlaufen zu verhindern!'''<br /> | ||
<br /> | <br /> | ||
{|class="gallery" | {|class="gallery" | ||
| Line 45: | Line 45: | ||
<br /> | <br /> | ||
<br /> | <br /> | ||
* Das Nickservo kommt immer an den Anschluss [CH1]. | |||
* Bei elektronischer Mischung werden die beiden Rollservos an [CH2] (=links) and [CH3] (=rechts) angesteckt. | |||
* Wenn mechanisch gemischt wird (H1-Mischung), kommt das Rollservo an [CH2] und das Pitchservo an [CH3]. * Wenn ein Scale Helikopter mit 90° eCCPM verwendet wird, kann ein zweites Nickservo bei [CH6] angeschlossen werden. Zu beachten ist aber, dass [CH6] nur ein Steuersignal bereitstellt und keinen Strom. Die Versorgung (+ und -) muss hier von anderer Stelle abgezweigt werden, z.B. mit einem Y-Kabel vom [SYS] Anschluss. Wir empfehlen bei großen Scale-Helis den Einsatz einer separaten Akkuweiche.<br /> | |||
<br /> | <br /> | ||
{{QUOTE| | {{QUOTE|Achte beim Verlegen der Kabel darauf, dass diese am MICROBEAST ULTRA zugspannungsfrei anliegen. Verlege sie in einer losen Schleife und befestige sie nach ca. 5 - 7cm am Chassis des Modells. Verwende in unmittelbarer Nähe zu der Stelle, an der die Kabel im MICROBEAST ULTRA eingesteckt sind, keinen Schrumpf- oder Gewebeschlauch um die Kabel zu bündeln oder zu ummanteln. Dies macht die Kabel steif und unflexibel und kann dazu führen, dass selbst geringste Vibrationen auf das MICROBEAST ULTRA übertragen werden.}}<br /> | ||
<br /> | <br /> | ||
<br /> | <br /> | ||
Latest revision as of 15:26, 15 March 2023
Bei Einstellpunkt B wird die Ansteuerfrequenz für die Taumelscheibenservos ausgewählt. Damit die Regelung des MICROBEAST ULTRA am effektivsten arbeiten kann, gilt für die Ansteuerfrequenz: je höher umso besser! Denn: je höher die Ansteuerfrequenz, umso öfter errechnet das System die Position neu und umso öfter sendet es neue Befehle an die Servos. Sollten die Servos für eine derartige Anwendung aber nicht ausgelegt sein, wird der Stromverbrauch ungewöhnlich stark ansteigen und die Servos werden sich stark erwärmen! Das Servo könnte dann Schaden nehmen und ausfallen. Stelle die Ansteuerfrequenz daher immer nur so hoch, wie vom Servo-Hersteller empfohlen oder als maximal zulässig angegeben. Oft aber auch nur so hoch, wie praktisch sinnvoll, damit sich das Servo nicht zu stark erwärmt!
Hinweise:
- Wenn ein Servo verwendet wird, für das eine höhere Ansteuerfrequenz zulässig ist, als am MICROBEAST ULTRA auswählbar, dann nimm den nächst kleineren Wert.
- Eine niedrigere Ansteuerfrequenz ist ohne Probleme verwendbar, nur eine zu hohe Ansteuerfrequenz kann für die Servos schädlich sein! Hier kann eine Liste mit Daten zu den gebräuchlichsten Servotypen abgerufen werden. Wir bitten um Verständnis dafür, dass wir nicht sämtliche Servotypen auflisten können. Ausserdem können wir für die Richtigkeit dieser Daten nicht garantieren. Wende Dich im Zweifel immer an den Hersteller der Servos oder Deinen Fachhändler!
- Manche Servos scheinen bei höherer Ansteuerfrequenz etwas rau zu laufen, was auf die hohe Geschwindigkeit zurückzuführen ist, in der das Servo die Stellsignale erhält. Insbesondere bei Servos mit schnell ansprechenden Motoren (wie z. B. Brushlessservos) kann dies der Fall sein und ist im Normalfall vollkommen unkritisch.
Wenn Du die maximal zulässige oder optimale Ansteuerfrequenz für die Servos nicht kennst, dann wähle bitte keine höhere Ansteuerfrequenz als 50 Hz aus. Eine höhere Ansteuerfrequenz kann zum Ausfall der Servos führen!
Einstellung am Gerät
Stelle die Ansteuerfrequenz für die Taumelscheibenservos durch Auswahl über den Hecksteuerknüppel so ein, dass die Status LED bei Punkt B in der passenden Farbe leuchtet. Durch kurzen Druck auf den Knopf wird die Einstellung bestätigt und weiter zum nächsten Punkt gesprungen.
| Status-LED | Ansteuerfrequenz |
|---|---|
| violett | 50 Hz |
| rot blinkend | 65 Hz |
| rot | 120 Hz |
| blau blinkend | 165 Hz |
| blau | 200 Hz |
Hinweis: Wenn über die StudioX App ein anderer Wert eingestellt wurde, so ist die Status LED aus. Du kannst hier jederzeit mit dem Hecksteuerknüppel einen der vorgegebenen Werte auswählen, der benutzerdefinierte Wert wird dadurch aber gelöscht!
Einstellung über die StudioX App
Wähle eine der vorgegebenen Ansteuerraten oder ändere den Wert "Ansteuerfrequenz Taumelscheibe" über die Knöpfe +/- oder das Drehrad. Über die StudioX App kann die Wiederholfrequenz auf der Taumelscheibe auf bis zu 300Hz eingestellt werden. Höhere Werte sind praktisch nicht sinnvoll, auch wenn ein Servo lt. Datenblatt höhere Werte verkraften könnte!
<img class="ios" src="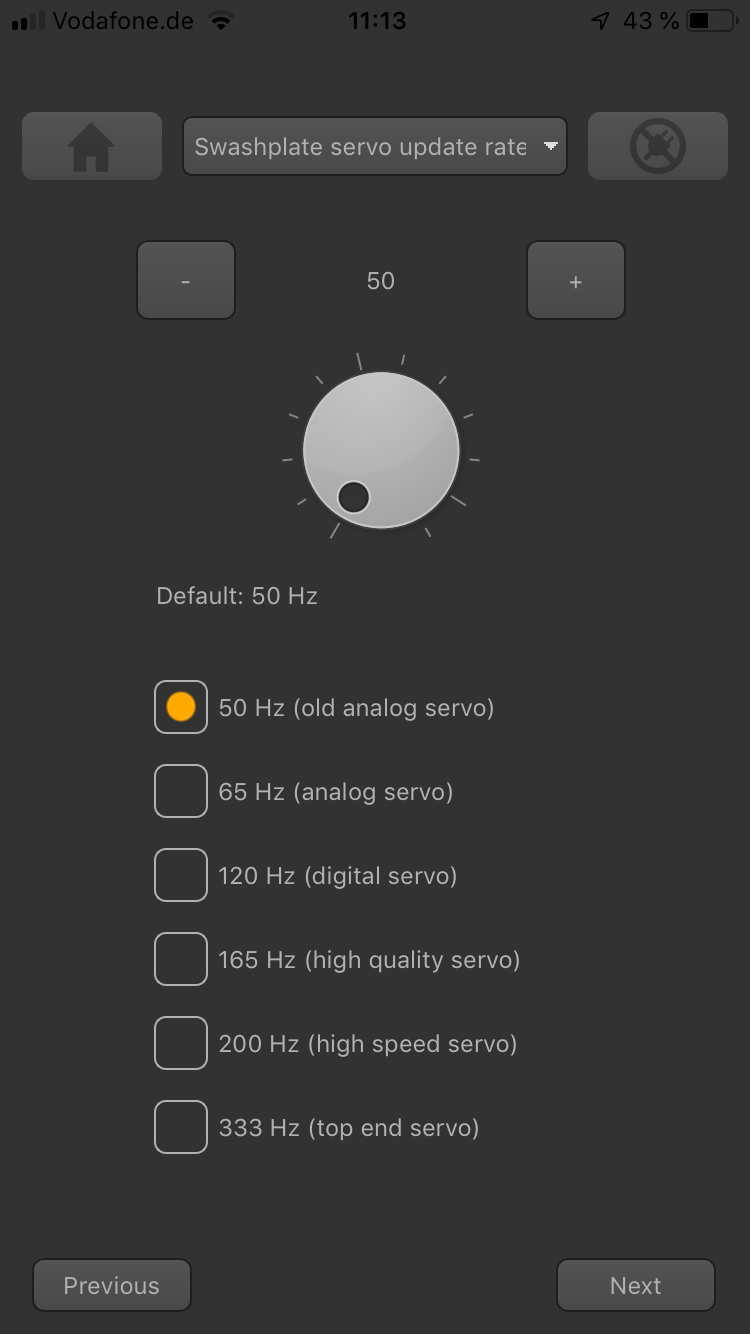 ">
">
<img class="ios" src="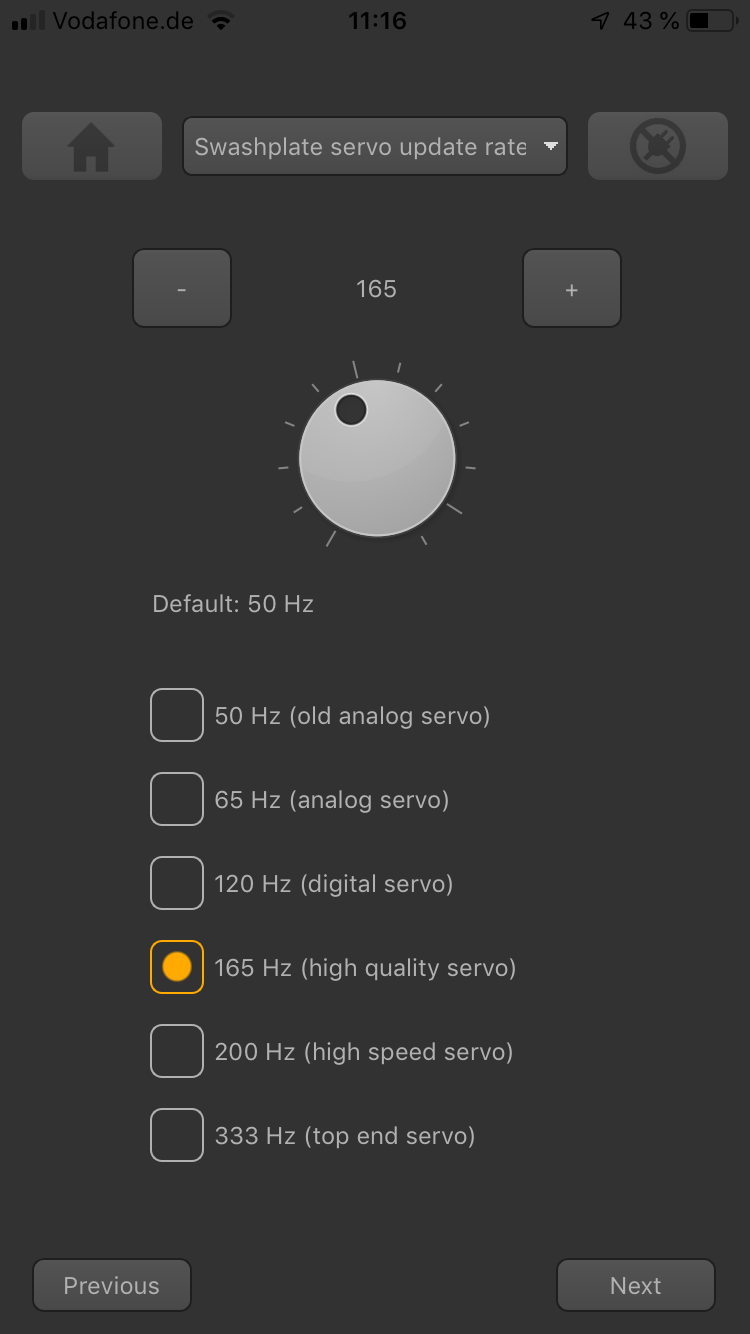 ">
">
Anschluss der Servos
Stecke nach Auswahl der korrekten Ansteuerfrequenz die Taumelscheibenservos in die entsprechenden Steckplätze an den Ausgängen [CH1] bis [CH3] (und [CH6] bei 4 Servos) am MICROBEAST ULTRA ein. Montiere jedoch noch nicht die Ruderhörner oder Anlenkgestänge, um ein Blockieren der Servos beim ersten Anlaufen zu verhindern!
 |
 |
- Das Nickservo kommt immer an den Anschluss [CH1].
- Bei elektronischer Mischung werden die beiden Rollservos an [CH2] (=links) and [CH3] (=rechts) angesteckt.
- Wenn mechanisch gemischt wird (H1-Mischung), kommt das Rollservo an [CH2] und das Pitchservo an [CH3]. * Wenn ein Scale Helikopter mit 90° eCCPM verwendet wird, kann ein zweites Nickservo bei [CH6] angeschlossen werden. Zu beachten ist aber, dass [CH6] nur ein Steuersignal bereitstellt und keinen Strom. Die Versorgung (+ und -) muss hier von anderer Stelle abgezweigt werden, z.B. mit einem Y-Kabel vom [SYS] Anschluss. Wir empfehlen bei großen Scale-Helis den Einsatz einer separaten Akkuweiche.
Achte beim Verlegen der Kabel darauf, dass diese am MICROBEAST ULTRA zugspannungsfrei anliegen. Verlege sie in einer losen Schleife und befestige sie nach ca. 5 - 7cm am Chassis des Modells. Verwende in unmittelbarer Nähe zu der Stelle, an der die Kabel im MICROBEAST ULTRA eingesteckt sind, keinen Schrumpf- oder Gewebeschlauch um die Kabel zu bündeln oder zu ummanteln. Dies macht die Kabel steif und unflexibel und kann dazu führen, dass selbst geringste Vibrationen auf das MICROBEAST ULTRA übertragen werden.