Translations:StudioX Plugins/1/en: Difference between revisions
Importing a new version from external source |
Importing a new version from external source |
||
| Line 3: | Line 3: | ||
<br /> | <br /> | ||
=General= | =General= | ||
Due to a plugin-based architecture StudioX is compatible with many different | Due to a plugin-based architecture StudioX is compatible with many different devices: | ||
* [[StudioX_Microbeast_Plugin/en|MICROBEAST]] | * [[StudioX_Microbeast_Plugin/en|MICROBEAST]] | ||
* [[Studiox_microbeast_plus_plugin/en|MICROBEAST PLUS / MICROBEAST PLUS HD]] | * [[Studiox_microbeast_plus_plugin/en|MICROBEAST PLUS / MICROBEAST PLUS HD]] | ||
* [[Studiox_ar7200bx_plugin/en|SPEKTRUM AR7200BX / SPEKTRUM AR7300BX]] | * [[Studiox_ar7200bx_plugin/en|SPEKTRUM AR7200BX / SPEKTRUM AR7300BX]] | ||
* [[Studiox_ar7210bx_plugin/en|SPEKTRUM AR7210BX]] | * [[Studiox_ar7210bx_plugin/en|SPEKTRUM AR7210BX]] | ||
* RCWare RX2SIM Multi-SIM Adapter | * [[Studiox_BLE2SYS_plugin/en|BLE2SYS bluetooth LE adapter]] | ||
* [[Studiox_RX2SIM_plugin/en|RCWare RX2SIM Wireless Multi-SIM Adapter]] | |||
<br /> | <br /> | ||
The plugins provide the following functionality | The plugins may provide the following functionality: | ||
* administration | * administration | ||
* configuration | * configuration | ||
* updating | * updating and buying software upgrades | ||
* backup and restore | * backup and restore your settings | ||
* load predefined presets<br /> | |||
<br /> | <br /> | ||
== Connecting a BEASTX | You can get detailed explanation about each plugin when you click the links to the devices above!<br /> | ||
All BEASTX | <br /> | ||
== Connecting a BEASTX gyro to the computer == | |||
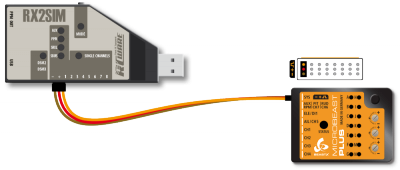
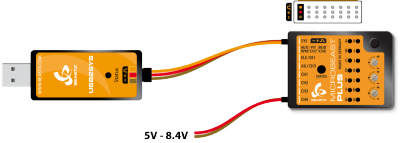
All BEASTX gyros come with a serial communication port which typically is marked with the letters ''SYS''. Connect the servo wire coming from your USB interface to this port. Make sure to connect the wire in correct polarity on both sides! When using the USB2SYS interface you have to power the device with a separate power supply, i.e. receiver battery or BEC of the R/C model. It will not be powered from the USB port.<br /> | |||
<br /> | <br /> | ||
<div style= "padding: 0px 50px;"> | <div style= "padding: 0px 50px;"> | ||
| Line 25: | Line 28: | ||
<br /> | <br /> | ||
<br /> | <br /> | ||
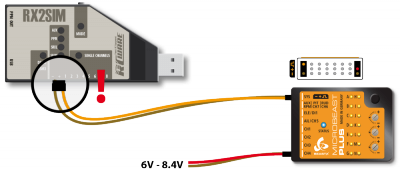
Also you can use a RX2SIM Wireless Multi-Sim Adapter instead of the USB2SYS interface. For this you can switch the RX2SIM into an USB2SYS emulation mode (push button on the RX2SIM several times until the LED lights up in orange color). In this configuration the BEASTX gyro will be powered from the USB port. Anyhow, this only will work when receiver and servos are not connected to the gyro! Otherwise the power of the USB port will not be sufficient to supply all consumers. In this case you have to power the device from the receiver battery as well. '''But here when using more than 6 Volts (i. e. using a 2s Lipo battery as receiver power supply) you must disconnect the red wire (plus pole) from the servo wire going to the interface. Otherwise you will damage the RX2SIM and/or USB port of your computer!'''<br /> | |||
<br /> | <br /> | ||
<table> | <table> | ||
Revision as of 07:03, 18 August 2017
General
Due to a plugin-based architecture StudioX is compatible with many different devices:
- MICROBEAST
- MICROBEAST PLUS / MICROBEAST PLUS HD
- SPEKTRUM AR7200BX / SPEKTRUM AR7300BX
- SPEKTRUM AR7210BX
- BLE2SYS bluetooth LE adapter
- RCWare RX2SIM Wireless Multi-SIM Adapter
The plugins may provide the following functionality:
- administration
- configuration
- updating and buying software upgrades
- backup and restore your settings
- load predefined presets
You can get detailed explanation about each plugin when you click the links to the devices above!
Connecting a BEASTX gyro to the computer
All BEASTX gyros come with a serial communication port which typically is marked with the letters SYS. Connect the servo wire coming from your USB interface to this port. Make sure to connect the wire in correct polarity on both sides! When using the USB2SYS interface you have to power the device with a separate power supply, i.e. receiver battery or BEC of the R/C model. It will not be powered from the USB port.
Also you can use a RX2SIM Wireless Multi-Sim Adapter instead of the USB2SYS interface. For this you can switch the RX2SIM into an USB2SYS emulation mode (push button on the RX2SIM several times until the LED lights up in orange color). In this configuration the BEASTX gyro will be powered from the USB port. Anyhow, this only will work when receiver and servos are not connected to the gyro! Otherwise the power of the USB port will not be sufficient to supply all consumers. In this case you have to power the device from the receiver battery as well. But here when using more than 6 Volts (i. e. using a 2s Lipo battery as receiver power supply) you must disconnect the red wire (plus pole) from the servo wire going to the interface. Otherwise you will damage the RX2SIM and/or USB port of your computer!
 |
 |
