StudioX UpdateInstructions/de: Difference between revisions
Shornstein (talk | contribs) No edit summary |
Updating to match new version of source page |
||
| Line 3: | Line 3: | ||
<br /> | <br /> | ||
== | ==Prerequisites== | ||
You can request firmware updates, buy firmware upgrades (if available) and download the firmware to your device directly from within the [[StudioX/en|StudioX Software]]. Usually this requires three things:<br /> | |||
<br /> | <br /> | ||
1. | '''1.''' The device must be connected to the computer and StudioX must have recognized it. The main screen should open and show general device informations: | ||
[[File:Not supported.PNG|300px|noframe|none]] | [[File:Not supported.PNG|300px|noframe|none]] | ||
<br /> | <br /> | ||
2. | '''2.''' You must have internet connection and you must be connected to the freakware Network using your fw Network login. If not already done open the connection dialog by clicking the icon in the upper left and enter your login credentials or create a new user account as described [[StudioX_Plugins/en#freakware_Network_Account|here]]. When you're logged in the connection warning will disappear on the main screen and you will see generally available online content like instruction manuals for this device and similar: | ||
[[File:Register device.PNG|300px|noframe|none]] | [[File:Register device.PNG|300px|noframe|none]] | ||
<br /> | <br /> | ||
3. | '''3.''' The device must be registered to your user account. Click on the '''Register Device''' button on the right hand side so that the device is linked to your fw Network account: | ||
[[File:Register device_2.PNG|300px|noframe|none]] | [[File:Register device_2.PNG|300px|noframe|none]] | ||
<br /> | <br /> | ||
When this is all given you will see all available firmware files for your device in the ''Online Content'' section of the StudioX main screen. Also there will be a note showing that the device has been registered: | |||
[[File:Registered 2.png|300px|noframe|none]] | [[File:Registered 2.png|300px|noframe|none]] | ||
<br /> | <br /> | ||
== | ==Update procedure== | ||
If there are any update files available you can request them from the server. Firmware with ''Status'' "available" can be requested and will be generated once you double-click on the specific entry in the list. When file generation is finished ''Status'' will show "done" and you can download the firmware to your device by double-clicking the file entry again. Accept the confirmation dialog and the screen will show the progress of update procedure. '''Do not remove or power off the device during update process!''' When the update has finished the device will reboot and you will see the main screen again, showing the new firmware number and installed optional features.<br /> | |||
<br /> | <br /> | ||
[[File:Sure.PNG|200px|noframe|left]] | [[File:Sure.PNG|200px|noframe|left]] | ||
| Line 28: | Line 28: | ||
<div style="clear:both;"></div> | <div style="clear:both;"></div> | ||
<br /> | <br /> | ||
'''Firmware files which may add more features and which are not for "free" (and that have not been bought already) can be bought by double-clicking on the specific file entry.''' In this case a PayPal payment dialog will open. When the payment has been processed the firmware file can be requested and downloaded as described above. Please note that depending on your payment method it can take some time (even some days) until the payment process is finished. The firmware will be available once the payment has been credited. Firmware is paid per device and can only be used for the specific device that the firmware has been bought for!<br /> | |||
<br /> | |||
Upgrading optional firmware features can be done stepwise. Usually if you buy a lower priced feature the price will be accounted later when you want to upgrade one step further. '''Apart from StudioX have a look at the [[Manuals:MBPlusFblV5:Intro/en|User manual]] to check latest upgrade options and prices.'''<br /> | |||
<br /> | <br /> | ||
==Fehlerbehebung== | ==Fehlerbehebung== | ||
Revision as of 11:38, 13 November 2017
Prerequisites
You can request firmware updates, buy firmware upgrades (if available) and download the firmware to your device directly from within the StudioX Software. Usually this requires three things:
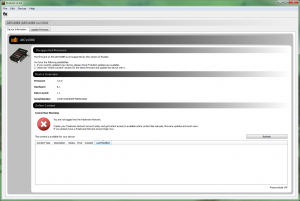
1. The device must be connected to the computer and StudioX must have recognized it. The main screen should open and show general device informations:
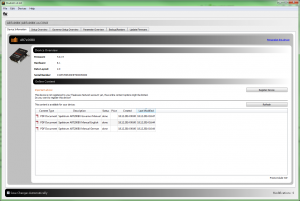
2. You must have internet connection and you must be connected to the freakware Network using your fw Network login. If not already done open the connection dialog by clicking the icon in the upper left and enter your login credentials or create a new user account as described here. When you're logged in the connection warning will disappear on the main screen and you will see generally available online content like instruction manuals for this device and similar:
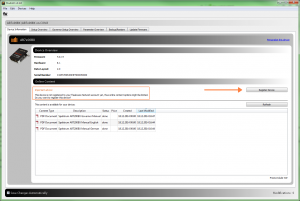
3. The device must be registered to your user account. Click on the Register Device button on the right hand side so that the device is linked to your fw Network account:
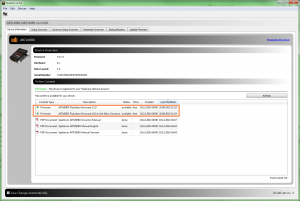
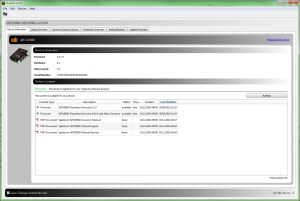
When this is all given you will see all available firmware files for your device in the Online Content section of the StudioX main screen. Also there will be a note showing that the device has been registered:
Update procedure
If there are any update files available you can request them from the server. Firmware with Status "available" can be requested and will be generated once you double-click on the specific entry in the list. When file generation is finished Status will show "done" and you can download the firmware to your device by double-clicking the file entry again. Accept the confirmation dialog and the screen will show the progress of update procedure. Do not remove or power off the device during update process! When the update has finished the device will reboot and you will see the main screen again, showing the new firmware number and installed optional features.


Firmware files which may add more features and which are not for "free" (and that have not been bought already) can be bought by double-clicking on the specific file entry. In this case a PayPal payment dialog will open. When the payment has been processed the firmware file can be requested and downloaded as described above. Please note that depending on your payment method it can take some time (even some days) until the payment process is finished. The firmware will be available once the payment has been credited. Firmware is paid per device and can only be used for the specific device that the firmware has been bought for!
Upgrading optional firmware features can be done stepwise. Usually if you buy a lower priced feature the price will be accounted later when you want to upgrade one step further. Apart from StudioX have a look at the User manual to check latest upgrade options and prices.
Fehlerbehebung
StudioX ist gestartet und das BEASTX Gerät ist mit dem Computer verbunden, aber nichts passiert. StudioX scheint das Gerät nicht zu erkennen.
- Stecken Sie das Kabel das zum USB Interface führt beim MICROBEAST / SPEKTRUM AR7xxxBX an den Anschluss SYS. Das Gerät muss außerdem mit Strom versorgt werden, falls das nicht über das Interface geschieht (nur bei Verwendung des RX2SIM Interface der Fall)!
- Prüfen Sie nochmals die Verkabelung. Wenn die blaue LED dauerhaft am USB Interface leuchtet, dann haben Sie das Kabel zwischen Interface und BEASTX Gerät falsch herum eingesteckt! Die LED dient zur Anzeige des Datentransfers zwischen Interface und angeschlossenem Gerät und blitzt bei korrektem Anschluss immer nur kurz auf, wenn Datenpakete gesendet werden.
- Bevor Sie das Programm verwenden können, müssen die Treiberdateien für das USB2SYS / SPMA3030 / RX2SIM Interface korrekt installiert werden. Prüfen Sie, ob dies der Fall ist und installieren Sie die Treiberdateien, falls notwendig. Nähere Informationen hierzu erhalten Sie auf dieser Seite: Treiber Installation.
- Überprüfen Sie die PlugIn Konfiguration von StudioX (diese können Sie aufrufen indem Sie in der Menüleiste auf "Edit" und dann auf "Plugins..." klicken). Achten Sie insbesondere darauf, dass der notwendige Port nicht aus Versehen angewählt und somit deaktiviert ist. Lesen Sie hierzu die Hinweise zur Plugin Konfiguration des jeweiligen Geräts, z.B. Microbeast Plugin.