Translations:Manuals:MBPlusFblV52:Setupmenu I/5/en: Difference between revisions
Importing a new version from external source |
Importing a new version from external source |
||
| Line 1: | Line 1: | ||
= Setup with StudioXm = | = Setup with StudioXm = | ||
[[File: | [[File:Basic_setup_cyclic_dir.PNG|x250px]]<br /> | ||
<br /> | <br /> | ||
1. When you see the adjustment screen for the cyclic directions move the stick(s) for '''aileron and elevator''' on the radio and check whether the swashplate is '''moved correctly''' on the helicopter.<br /> | 1. When you see the adjustment screen for the cyclic directions move the stick(s) for '''aileron and elevator''' on the radio and check whether the swashplate is '''moved correctly''' on the helicopter.<br /> | ||
Latest revision as of 14:24, 22 June 2021
Setup with StudioXm
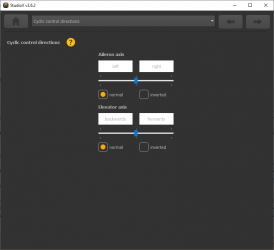
1. When you see the adjustment screen for the cyclic directions move the stick(s) for aileron and elevator on the radio and check whether the swashplate is moved correctly on the helicopter.
(Note for beginners: the swashplate must follow the stick movement, so pushing elevator forward will tilt the swashplate forwards, adding aileron to the right will move the swash to the right and so on.)
If the stick is moving the swashplate into the wrong direction use the reverse function of your transmitter and reverse the aileron and/or elevator channel in the transmitter to set stick control direction correctly.
2. Now adjust the internal control direction of the MICROBEAST PLUS gyro: When you push elevator forwards, the Status LED must light up or flash in blue color and you should see the label forwards getting blue as well. When you pull elevator backwards, the Status LED must light up or flash in red color and you should see the label backwards getting red as well. When you move aileron to the right, the Status LED must light up or flash in blue color. When you move aileron to the left, the Status LED must light up or flash in red color. When the display is inverted (red = right or forwards and blue = left or backwards) reverse the display (internal control direction) by choosing one of the four buttons below the direction label.
3. When the stick is not moving far enough, you will see the message "Increase!" In this case increase the servo throw/endpoint of the aileron or elevator channel in the transmitter just as far so that the Status LED changes from flashing to solid when the stick reaches the end position and the label in the software changes to "OK". (Note: Do not increase the endpoints too much in the transmitter. We need an exact match of full stick position and internal end position. So the Status LED should just change from flashing to solid when reaching the end position.)
Always set servo direction in the transmitter first, then check the display on the MICROBEAST PLUS or in the software and change the internal control direction if it does not match the real direction. Do not change the internal direction in order to change the servo direction! This is only used for telling the gyro in which direction it must move the swashplate. Be very conscientious when doing this setup step as wrong gyro direction will cause loss of control during takeoff and you probably crash the helicopter!
In addition you can check the gyro direction by turning the helicopter by hand around its horizontal and longitudinal axis. When turning the heli the gyro must move the swashplate so that the rotor will produce a counter action agains the turn direction. So later in flight the gyro will stop the helicopter from unwanted movement. Here the LED will always light up in blue color when you turn the helicopter to the right or forwards and light up in red when you turn it to the left or backwards. This is to give you a little reminder when you need to do the setup later on the field and you can't rememeber what color stands for what direction!
