Manuals:AR7210FblV5:Governormenu F/de: Difference between revisions
Shornstein (talk | contribs) Created page with "{{DISPLAYTITLE:GOVERNOR MENU F, G & H - Main gear ratio|noerror}} {{TOC_AR7210V5/de|Manuals:AR7210FblV5:Governormenu_E/de|Manuals:AR7210FblV5:Gains/de|GOVMENU|2}} __TOC__ <br />" |
Shornstein (talk | contribs) Created page with "Der Drehzahlregler des AR7210BX Empfängers arbeitet mit der Rotorkopfdrehzahl des Helikopters. So lässt sich einfach die gewünschte Rotordrehzahl vorgeben und der AR7210BX..." |
||
| Line 4: | Line 4: | ||
<br /> | <br /> | ||
Der Drehzahlregler des AR7210BX Empfängers arbeitet mit der Rotorkopfdrehzahl des Helikopters. So lässt sich einfach die gewünschte Rotordrehzahl vorgeben und der AR7210BX wird diese Drehzahl möglichst genau einhalten. Damit die über den Sensor ermittelte Motordrehzahl in die Rotordrehzahl umgerechnet werden kann, muss die Getriebeuntersetzung des Helikopters angegeben werden.<br /> | |||
<br /> | <br /> | ||
{{QUOTE| | {{QUOTE|Die Getriebeuntersetzung sollte in der Anleitung des Modellhubschraubers angegeben sein. Vor allem bei Elektromodellen kann diese abhängig vom verwendeten Motorritzel variieren. Bei Helikoptern mit einstufigem (zahnradgetriebenem) Hauptgetriebe lässt sich die Untersetzung leicht berechnen, indem die Anzahl der Zähne des Hauptzahnrads durch die Anzahl der Zähne des Ritzels geteilt wird.<br /> | ||
<br /> | <br /> | ||
''' | '''Beispiel:''' Shape S8 - Hauptzahnrad 130 Zähne / Motorritzel 15 Zähne. Untersetzung ca. 8,65:1.}}<br /> | ||
<br /> | <br /> | ||
Revision as of 23:11, 30 July 2022
Der Drehzahlregler des AR7210BX Empfängers arbeitet mit der Rotorkopfdrehzahl des Helikopters. So lässt sich einfach die gewünschte Rotordrehzahl vorgeben und der AR7210BX wird diese Drehzahl möglichst genau einhalten. Damit die über den Sensor ermittelte Motordrehzahl in die Rotordrehzahl umgerechnet werden kann, muss die Getriebeuntersetzung des Helikopters angegeben werden.
Die Getriebeuntersetzung sollte in der Anleitung des Modellhubschraubers angegeben sein. Vor allem bei Elektromodellen kann diese abhängig vom verwendeten Motorritzel variieren. Bei Helikoptern mit einstufigem (zahnradgetriebenem) Hauptgetriebe lässt sich die Untersetzung leicht berechnen, indem die Anzahl der Zähne des Hauptzahnrads durch die Anzahl der Zähne des Ritzels geteilt wird.
Beispiel: Shape S8 - Hauptzahnrad 130 Zähne / Motorritzel 15 Zähne. Untersetzung ca. 8,65:1.
Adjustment on the device
To set the gear ratio on the device you have to adjust three menu points in a row. Menu point F sets the number of gear ratio before the decimal point, menu points G and H specify the first two decimal places. Compare the following table and set the Status-LED using the rudder stick to the corresponding color and condition at each menu point so the desired gear ratio will result as a combination of all three menu points (X.YZ:1). The ratio can be adjusted in increments of 0.05. Choose the ratio that is the closest for your helicopter and set the menu points one after the other. To proceed to the each menu point briefly push the button. After menu point H the initial setup is finished and the button press will lead back to operation mode.
| Menu point F Status-LED |
X. |
|---|---|
| off | user defined |
| purple flashing | 8 |
| purple | 9 |
| red flashing | 10 |
| red | 11 |
| blue flashing | 12 |
| blue | 13 |
| red/blue | 14 |
| Menu point G Status-LED |
.YZ | Menu point H Status-LED |
|---|---|---|
| purple flashing | .00 | purple flashing |
| purple flashing | .05 | purple |
| purple flashing | .10 | red flashing |
| purple flashing | .15 | red |
| purple | .20 | purple flashing |
| purple | .25 | purple |
| purple | .30 | red flashing |
| purple | .35 | red |
| red flashing | .40 | purple flashing |
| red flashing | .45 | purple |
| red flashing | .50 | red flashing |
| red flashing | .55 | red |
| red | .60 | purple flashing |
| red | .65 | purple |
| red | .70 | red flashing |
| red | .75 | red |
| blue flashing | .80 | purple flashing |
| blue flashing | .85 | purple |
| blue flashing | .90 | red flashing |
| blue flashing | .95 | red |
When a custom gear ratio was set using StudioX or StudioXm the Status LED will be off at menu point F. Pressing the button briefly in this combination the menu points G and H will be skipped and you will directly exit the menu. Other than that also here you can change the gear ratio with the rudder stick and use one of the preset ratios, but note that in this case the custom ratio will be erased!
Setup with StudioX
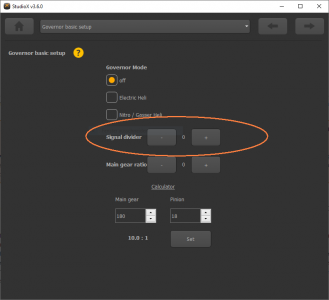
With StudioX simply enter your gear ratio in the app. Here we also added a calculator for single stage main drive systems. Enter your main gear tooth count and pinion size to easily calculate your main gear ratio. This can be directly stored then.
Please note: The value Main gear ratio does not show the dot in front of the first decimal. So the value "10.0" is displayed as "100".
