BEASTX Updater Classic: Difference between revisions
Shornstein (talk | contribs) |
Shornstein (talk | contribs) |
||
| Line 60: | Line 60: | ||
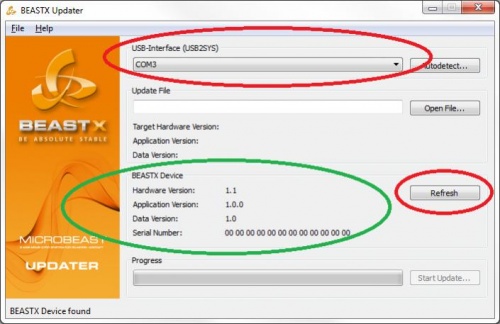
If the correct COM-Port was chosen (red), and the MICROBEAST is connected to the USB2SYS-Interface, some information (green) of this MICROBEAST will be shown in the "BEASTX Device" section: | If the correct COM-Port was chosen (red), and the MICROBEAST is connected to the USB2SYS-Interface, some information (green) of this MICROBEAST will be shown in the "BEASTX Device" section: | ||
[[File:Step 6.jpg|500px]] | [[File:Step 6.jpg|500px]] | ||
At this moment Hardware-Version 1.1 and 1.2 are existing. | At this moment Hardware-Version 1.1 and 1.2 are existing. | ||
Revision as of 15:23, 16 December 2013
1. Uninstall existing Software (Windows only)
Uninstall any existing BEASTXUpdater/Microsettings installation prior to install the BEASTXSoftware bundle.
2. Download Update Software and Install
Supported operating systems are:
   Windows (XP, Vista, 7, 8, 8.1)
   MacOS 10.6.x and later
3. Driver installation
Windows: The driver installation will not be launched automatically during setup. The installer will be copied and a link to it is added to the BEASTX group in Start-Menu. Do not connect the USB2SYS interface to the computer unless you did not perform the driver installation. After the installation when you connect the interface to the PC, Windows will recognize the device and install it as a new device.
MacOS: The driver is inside the Disk-Image and must be installed manually.
4. Validate driver installation (Windows only)
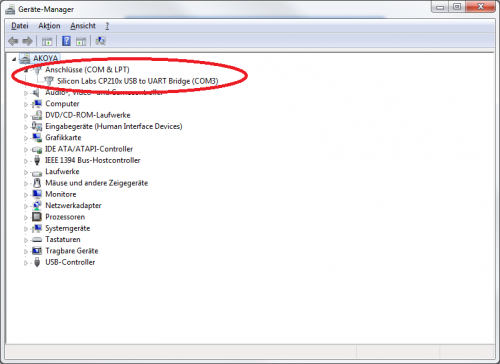
After successful installation of the driver, when the USB2SYS-Interface is connected to the PC, you must be able to find following entry in the Windwos Device Manager:
The name COM3 may be different on your PC. This entry must disappear when you disconnect the USB2SYS-Interface from the PC, and reappear when you connect it again.
To access the device manager under windows 7 type devmgmt.msc in the Startmenu's search bar. Alternatively you can enter the computer properties by pressing and holding the START key on the keyboard and addtionaly pressing the PAUSE key. Then click on device manager in the upper left corner of the appearing window.
5. Start BEASTXUpdater
IMPORTANT: The MICROBEAST will not be powered from the USB2SYS-Interface, so the MICROBEAST must be supplied with power from a different source BEFORE you connect it to the PC, e.g. simply switch on tx and rx as you would go flying (on electric helis take care of the motor!).
The cable from the interface goes into the Microbeast's [SYS] port. Watch out for correct polarity on both devices.
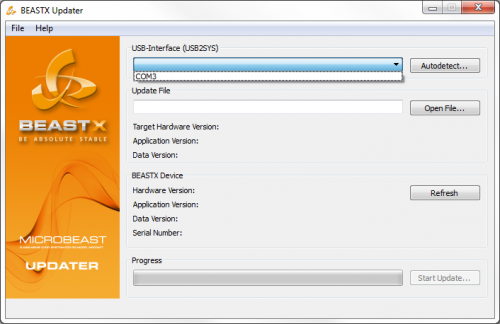
If the COM-Port, to which the USB2SYS-Interface has been assigned by windows, is known you can directly choose it from the list of available interfaces:
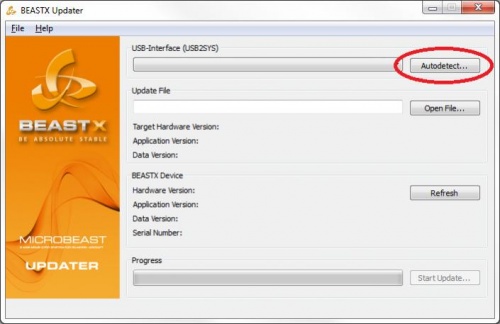
If the COM-Port is not known you can use the "Autodetect…" function:
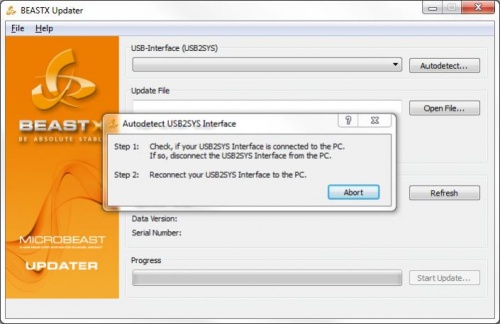
When the dialog is shown, disconnect the USB2SYS-Interface from the PC (if already connected) and reconnect it again.
The Autodetect-function will only work if the driver was installed successfully.
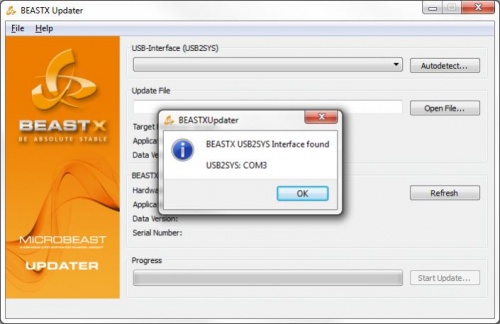
After a successful detection the BEASTXUpdater will tell you which COM-Port was detected:
6. Detect connected BEASTX device
After you selected a COM-Port the BEASTXUpdater will automatically try to identify the unit connected to it.
If the MICROBEAST/Trajectory/AR7200BX was not connected at this moment you can manually force a new detection by pressing the "Refresh" button (or "Connect" when using the MicroSettings Software).
If the correct COM-Port was chosen (red), and the MICROBEAST is connected to the USB2SYS-Interface, some information (green) of this MICROBEAST will be shown in the "BEASTX Device" section:
At this moment Hardware-Version 1.1 and 1.2 are existing.
Application-Version is the actually installed firmware of the MICROBEAST (in this case 1.0.0)
Data-Version is the format of the settings, stored on the MICROBEAST.
Serial-Number is a unique identifier for each MICROBEAST.
7. Select Update-File
If the MICROBEAST was successfully identified you can go on with selecting an Update-File (if you don't have a firmware update file yet, have a look here).
"Open File…" button opens a dialog where you can choose the Update-File. Klicken Sie auf die Grafik für eine größere Ansicht Name: Step 7_1.png Hits: 788 Größe: 78,9 KB ID: 606 Or you can just drag'n'drop an Update-File from the Explorer to the Main window of the BEASTXUpdater.
An Updates-File can only be loaded if it is free of damage, complete and has the mentioned "upd" ending.
Application-Version, Data-Version and Target-Hardware will be shown if the file was loaded successfully: Klicken Sie auf die Grafik für eine größere Ansicht Name: Step 7_2.jpg Hits: 700 Größe: 44,1 KB ID: 607
Only a compatible "Target Hardware Version" can be installed on a MICROBEAST. The firmware version in the Update-File will be shown next to "Application Version" (in this case 1.0.11).
The format of settings will be shown next to "Data Version". IMPORTANT: If the major version of the "Data Version" is different between the actual and new firmware, then the Basic-Setup has to be done again after the update.
8. Perform Update
If a valid COM-Port is selected an a valid Update-File was loaded, the "Start Update…" button will be enabled: Klicken Sie auf die Grafik für eine größere Ansicht Name: Step 8_1.jpg Hits: 475 Größe: 43,4 KB ID: 594
After pressing the "Start Update…" button, the actual firmware version, and the new target firmware version will be shown: Klicken Sie auf die Grafik für eine größere Ansicht Name: Step 8_2.png Hits: 432 Größe: 70,4 KB ID: 595 Press "Yes" to start the update.
After a successful update a message will be displayed: Klicken Sie auf die Grafik für eine größere Ansicht Name: Step 8_3.png Hits: 428 Größe: 64,0 KB ID: 596
After your confirmation with "Ok" BEASTXUpdater will detect the version information of the connected MICROBEAST again. Klicken Sie auf die Grafik für eine größere Ansicht Name: Step 8_4.png Hits: 526 Größe: 98,9 KB ID: 597 You can refresh this information using the "Refresh" button.
Your MICROBEAST is now updated to the latest firmware.
