StudioX/de: Difference between revisions
Shornstein (talk | contribs) No edit summary |
Shornstein (talk | contribs) No edit summary |
||
| Line 3: | Line 3: | ||
=Anforderungen= | =Anforderungen= | ||
Um das BEASTX Gerät an den Computer anschließen zu können wird eines der folgenden USB Interfaces benötigt: | |||
* USB2SYS Interface | |||
* SPEKTRUM SPMA3030 Interface | |||
* RX2SIM Multi-Sim Adapter mit USB2SYS Emulation | |||
<br /> | |||
Der PC muss folgenden Mindestanforderungen entsprechen: | |||
<br /> | |||
==Unterstützte Betriebssysteme== | ==Unterstützte Betriebssysteme== | ||
| Line 10: | Line 16: | ||
* OS X (10.7 "Lion" 64-Bit, 10.8 "Mountain Lion" 64-Bit, 10.9 "Mavericks" 64-Bit) | * OS X (10.7 "Lion" 64-Bit, 10.8 "Mountain Lion" 64-Bit, 10.9 "Mavericks" 64-Bit) | ||
==System | ==Minimum System Requirements== | ||
* | * available USB 2.0 socket for USB2SYS / SPMA3030 / RX2SIM Interface | ||
* CPU | * CPU Speed >= 1GHz recommended | ||
* | * Screen Resolution 1024x786 recommended | ||
| Line 23: | Line 29: | ||
<br /> | <br /> | ||
==Installation | ==Installation on a Windows system== | ||
After downloading the StudioXSetup_xxx.exe open it by double clicking from the folder where it was downloaded (here we downloaded it directly to the Desktop): | |||
[[File:Open studioxsetup.png|200px|100px|noframe|none]] | [[File:Open studioxsetup.png|200px|100px|noframe|none]] | ||
<br /> | <br /> | ||
Simply start the install routine by clicking "Next" and "Install". The files will be copied to your default Program Files folder. When done click "Finish": | |||
<gallery mode="nolines"> | <gallery mode="nolines"> | ||
File:Studioxsetup 1.png | File:Studioxsetup 1.png | ||
| Line 34: | Line 40: | ||
File:Studioxsetup 4.png | File:Studioxsetup 4.png | ||
</gallery> | </gallery> | ||
'''Before using the software make sure that the driver files for your USB2SYS interface have been installed and install the files if necessary.''' For further information see this page: [[USB2SYS/SPMA3030 driver installation#Microsoft Windows|Driver installation for Microsoft Windows]].<br /> | |||
''' | |||
<br /> | <br /> | ||
| Line 57: | Line 62: | ||
<br /> | <br /> | ||
Click the "Open" button: | |||
[[File:studiox_gatekeeper_open.png|200px|noframe|none]] | [[File:studiox_gatekeeper_open.png|200px|noframe|none]] | ||
<br /> | <br /> | ||
''' | '''Before using the software make sure that the driver files for your USB2SYS/SPMA3030 interface have been installed and install the files if necessary.''' For further information see this page: [[USB2SYS/SPMA3030 driver installation#Apple MacOS|Driver installation for Apple MacOS]].<br /> | ||
<br /> | <br /> | ||
Revision as of 13:00, 8 March 2016
Anforderungen
Um das BEASTX Gerät an den Computer anschließen zu können wird eines der folgenden USB Interfaces benötigt:
- USB2SYS Interface
- SPEKTRUM SPMA3030 Interface
- RX2SIM Multi-Sim Adapter mit USB2SYS Emulation
Der PC muss folgenden Mindestanforderungen entsprechen:
Unterstützte Betriebssysteme
StudioX ist für diese Betriebssysteme verfügbar:
- Windows (XP, Windows Vista, Windows 7, Windows 8, Windows 8.1)
- OS X (10.7 "Lion" 64-Bit, 10.8 "Mountain Lion" 64-Bit, 10.9 "Mavericks" 64-Bit)
Minimum System Requirements
- available USB 2.0 socket for USB2SYS / SPMA3030 / RX2SIM Interface
- CPU Speed >= 1GHz recommended
- Screen Resolution 1024x786 recommended
Installation
Laden Sie zuerst das aktuellste StudioX Setup passend zu Ihrem Betriebssystem herunter:
StudioX für Windows XP, Vista, 7, 8, 8.1
StudioX für MacOS
Installation on a Windows system
After downloading the StudioXSetup_xxx.exe open it by double clicking from the folder where it was downloaded (here we downloaded it directly to the Desktop):
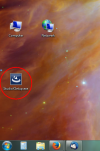
Simply start the install routine by clicking "Next" and "Install". The files will be copied to your default Program Files folder. When done click "Finish":
Before using the software make sure that the driver files for your USB2SYS interface have been installed and install the files if necessary. For further information see this page: Driver installation for Microsoft Windows.
Installation auf einem Apple Mac
Aufgrund der Sicherheitsrichtlinien von MacOS gestaltet sich die Installation etwas aufwändiger als auf Windows Systemen.
Öffnen Sie zuerst das heruntergeladene StudioX_xxx.dmg disk image und ziehen Sie im sich öffnenden Fenster per Drag'n'Drop die StudioX Anwendungen in den Programme Ordner:
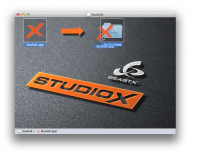
Falls StudioX sofort verwendet werden kann sind keine weiteren Schritte notwendig. Wenn aber folgende Warnmeldung erscheint, müssen noch weitere Schritte erledigt werden, bevor die Software verwendet werden kann:
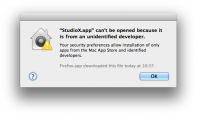
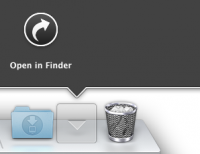
Öffnen Sie den Programme Ordner und wählen Sie "Öffnen im Finder":
Klicken Sie mit der rechten Maustaste auf die StudioX.app und wählen Sie "Öffnen":

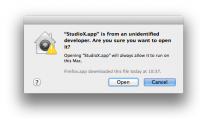
Click the "Open" button:
Before using the software make sure that the driver files for your USB2SYS/SPMA3030 interface have been installed and install the files if necessary. For further information see this page: Driver installation for Apple MacOS.
Einstellungen

Automatische nach Aktualisierungen suchen
Wenn Ihr PC mit dem Internet verbunden ist stellt diese Option sicher, dass Ihre StudioX Installation immer auf dem aktuellsten Stand ist. Spätestens nach 7 Tagen wird automatisch der Aktualisierungs Dialog geöffnet und angezeigt ob eine Aktualisierung vorhanden ist.
Sprachauswahl
Wenn die "Auto" Option ausgewählt wurde, benutzt StudioX die in der Systemeinstellung vorgegebene Sprache. Ansonsten kann aus einer der folgenden Sprachen gewählt werden:
- Englisch
- Deutsch (in Kürze)
- Französisch (in Kürze)
- Spanisch (in Kürze)
- Chinesisch (in Kürze)
Wichtig: Die Sprachumschaltung benötigt einen Neustart der StudioX Applikation, damit diese aktiv wird.
StudioX aktualisieren
StudioX zu aktualisieren ist einfach und geradlinig.

Im "Update StudioX" Dialog kann der "Download" Button gedrückt werden, falls eine Aktualisierung vorhanden ist.
Führen Sie das heruntergeladene Paket aus und folgen Sie den Anweisungen.
Stellen Sie sicher, dass die Anwendung geschlossen wird, bevor Sie eine neuere Version installieren.


