StudioX Plugins/de: Difference between revisions
Shornstein (talk | contribs) No edit summary |
Shornstein (talk | contribs) Created page with "== BLE2SYS Bluetooth LE Adapter == Mit StudioX können Updates auf den BLE2SYS Bluetooth LE Adapter aufegspielt werden und einige Parameter verändert werden. Um den BLE2SYS a..." |
||
| Line 1: | Line 1: | ||
{{DISPLAYTITLE:Basic functionality|noerror}} | |||
__TOC__ | __TOC__ | ||
<br /> | <br /> | ||
= | =General= | ||
StudioX | Due to a plugin-based architecture StudioX is compatible with many different devices: | ||
* [[StudioX_Microbeast_Plugin/ | * [[StudioX_Microbeast_Plugin/en|MICROBEAST]] | ||
* [[Studiox_microbeast_plus_plugin/ | * [[Studiox_microbeast_plus_plugin/en|MICROBEAST PLUS / MICROBEAST PLUS HD]] | ||
* [[Studiox_ar7200bx_plugin/ | * [[Studiox_ar7200bx_plugin/en|SPEKTRUM AR7200BX / SPEKTRUM AR7300BX]] | ||
* [[Studiox_ar7210bx_plugin/ | * [[Studiox_ar7210bx_plugin/en|SPEKTRUM AR7210BX]] | ||
* RCWare RX2SIM Multi-SIM Adapter | * [[Studiox_BLE2SYS_plugin/en|BLE2SYS bluetooth LE adapter]] | ||
* [[Studiox_RX2SIM_plugin/en|RCWare RX2SIM Wireless Multi-SIM Adapter]] | |||
<br /> | <br /> | ||
The plugins may provide the following functionality: | |||
* | * administration | ||
* | * configuration | ||
* | * updating and buying software upgrades | ||
* | * backup and restore your settings | ||
* load predefined presets<br /> | |||
<br /> | <br /> | ||
You can get detailed explanation about each plugin when you click the links to the devices above!<br /> | |||
<br /> | <br /> | ||
== | == Connecting a BEASTX gyro to the computer == | ||
All BEASTX gyros come with a serial communication port which typically is marked with the letters ''SYS''. Connect the servo wire coming from your USB interface to this port. Make sure to connect the wire in correct polarity on both sides! When using the USB2SYS interface you have to power the device with a separate power supply, i.e. receiver battery or BEC of the R/C model. It will not be powered from the USB port.<br /> | |||
<br /> | <br /> | ||
<div style= "padding: 0px 50px;"> | <div style= "padding: 0px 50px;"> | ||
| Line 25: | Line 28: | ||
<br /> | <br /> | ||
<br /> | <br /> | ||
Also you can use a RX2SIM Wireless Multi-Sim Adapter instead of the USB2SYS interface. For this you can switch the RX2SIM into an USB2SYS emulation mode (push button on the RX2SIM several times until the LED lights up in orange color). In this configuration the BEASTX gyro will be powered from the USB port. Anyhow, this only will work when receiver and servos are not connected to the gyro! Otherwise the power of the USB port will not be sufficient to supply all consumers. In this case you have to power the device from the receiver battery as well. '''But here when using more than 6 Volts (i. e. using a 2s Lipo battery as receiver power supply) you must disconnect the red wire (plus pole) from the servo wire going to the interface. Otherwise you will damage the RX2SIM and/or USB port of your computer!'''<br /> | |||
<br /> | <br /> | ||
<table> | <table> | ||
| Line 36: | Line 39: | ||
<br /> | <br /> | ||
== | == Connecting the RX2SIM Wireless Multi-Sim Adapter == | ||
When RX2SIM is used as USB2SYS interface emulator to connect your BEASTX device (MICROBEAST / SPEKTRUM AR7xxxBX) as mentioned above, StudioX will not recognize the RX2SIM itself. To control it with StudioX as Stand-Alone device, i.e. for updating the firmware of the RX2SIM you must push and hold the button on the RX2SIM before and while connecting it to the computer. Then it will start in bootloader mode and StudioX will open the RX2SIM Plugin. You can see that bootloader mode is active when both blue LEDs AUX and PPM light up solid.<br /> | |||
<br /> | <br /> | ||
== | == BLE2SYS Bluetooth LE Adapter == | ||
Mit StudioX können Updates auf den BLE2SYS Bluetooth LE Adapter aufegspielt werden und einige Parameter verändert werden. Um den BLE2SYS am Computer anzuschließen wird er mit dem USB2SYS Interface oder dem RX2SIM Multi-Sim Adapter verbunden. Wenn das USB2SYS verwendeet wird, muss das Gerät extern über ein Y-Anschlusskabel mit Strom versorgt werden. Achte dabei auf polungsrichtigen Anschluss!<br /> | |||
<br /> | <br /> | ||
<table> | <table> | ||
| Line 49: | Line 52: | ||
</tr> | </tr> | ||
</table> | </table> | ||
Wenn ein RX2SIM Multi-Sim Adapter verwendet wird, bringe diesen in den USB2SYS Emulationsmodus (Knopf am RXSIM wiederholt drücken, solange bis die LED in orangener Farbe leuchtet)!<br /> | |||
<br /> | <br /> | ||
<br /> | <br /> | ||
| Line 88: | Line 91: | ||
Klicken Sie auf die '''Register Device''' Schaltfläche um das Gerät an Ihr ''freakware network'' Konto zu binden. | Klicken Sie auf die '''Register Device''' Schaltfläche um das Gerät an Ihr ''freakware network'' Konto zu binden. | ||
After this the message should be gone, and the "Update Firmware" tab should offer you something.<br /> | |||
<br /> | <br /> | ||
Revision as of 07:12, 18 August 2017
General
Due to a plugin-based architecture StudioX is compatible with many different devices:
- MICROBEAST
- MICROBEAST PLUS / MICROBEAST PLUS HD
- SPEKTRUM AR7200BX / SPEKTRUM AR7300BX
- SPEKTRUM AR7210BX
- BLE2SYS bluetooth LE adapter
- RCWare RX2SIM Wireless Multi-SIM Adapter
The plugins may provide the following functionality:
- administration
- configuration
- updating and buying software upgrades
- backup and restore your settings
- load predefined presets
You can get detailed explanation about each plugin when you click the links to the devices above!
Connecting a BEASTX gyro to the computer
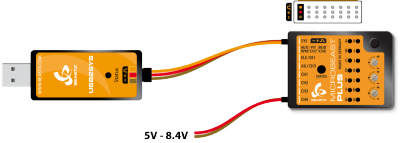
All BEASTX gyros come with a serial communication port which typically is marked with the letters SYS. Connect the servo wire coming from your USB interface to this port. Make sure to connect the wire in correct polarity on both sides! When using the USB2SYS interface you have to power the device with a separate power supply, i.e. receiver battery or BEC of the R/C model. It will not be powered from the USB port.
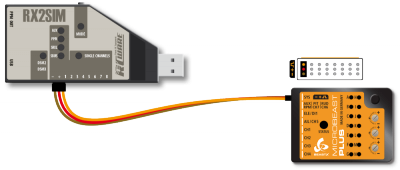
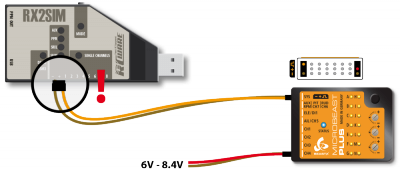
Also you can use a RX2SIM Wireless Multi-Sim Adapter instead of the USB2SYS interface. For this you can switch the RX2SIM into an USB2SYS emulation mode (push button on the RX2SIM several times until the LED lights up in orange color). In this configuration the BEASTX gyro will be powered from the USB port. Anyhow, this only will work when receiver and servos are not connected to the gyro! Otherwise the power of the USB port will not be sufficient to supply all consumers. In this case you have to power the device from the receiver battery as well. But here when using more than 6 Volts (i. e. using a 2s Lipo battery as receiver power supply) you must disconnect the red wire (plus pole) from the servo wire going to the interface. Otherwise you will damage the RX2SIM and/or USB port of your computer!
 |
 |
Connecting the RX2SIM Wireless Multi-Sim Adapter
When RX2SIM is used as USB2SYS interface emulator to connect your BEASTX device (MICROBEAST / SPEKTRUM AR7xxxBX) as mentioned above, StudioX will not recognize the RX2SIM itself. To control it with StudioX as Stand-Alone device, i.e. for updating the firmware of the RX2SIM you must push and hold the button on the RX2SIM before and while connecting it to the computer. Then it will start in bootloader mode and StudioX will open the RX2SIM Plugin. You can see that bootloader mode is active when both blue LEDs AUX and PPM light up solid.
BLE2SYS Bluetooth LE Adapter
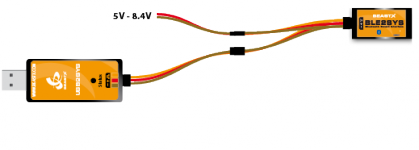
Mit StudioX können Updates auf den BLE2SYS Bluetooth LE Adapter aufegspielt werden und einige Parameter verändert werden. Um den BLE2SYS am Computer anzuschließen wird er mit dem USB2SYS Interface oder dem RX2SIM Multi-Sim Adapter verbunden. Wenn das USB2SYS verwendeet wird, muss das Gerät extern über ein Y-Anschlusskabel mit Strom versorgt werden. Achte dabei auf polungsrichtigen Anschluss!
 |
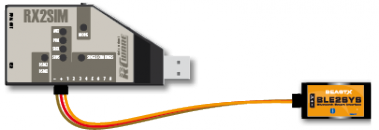 |
Wenn ein RX2SIM Multi-Sim Adapter verwendet wird, bringe diesen in den USB2SYS Emulationsmodus (Knopf am RXSIM wiederholt drücken, solange bis die LED in orangener Farbe leuchtet)!
freakware Network Konto
Um Zusatzinhalte (wie z.B. Herunterladen von Firmwareupdates) nutzen zu können, ist eine Benutzerregistrierung beim freakware Network erforderlich. Klicken Sie oben links auf das fw - Symbol, um den freakware Network Verbindungsdialog anzuzeigen:
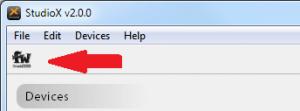
Klicken Sie hier auf Create New Account und geben Sie eine gültige eMail Addresse an, unter der Sie erreichbar sind, sowie ein sicheres Passwort:
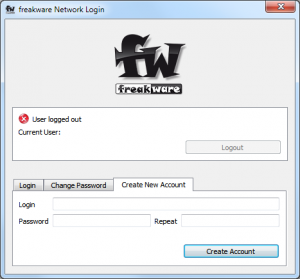
Zur Bestätigung wird an die angegebene Adresse eine Email geschickt. Nachdem Sie den Bestätigungslink in dieser Email angeklickt haben, können Sie sich ab sofort mit Ihrer Email Adresse und dem Passwort über die Login Schaltfläche im freakware Network einloggen.
Diese Adresse wird auch benötigt, falls Sie Ihr Passwort vergessen haben und um notfalls mit Ihnen in Kontakt treten zu können, z.B. im Falle wichtiger Firmware Updates. Wir versichern, dass Ihre Daten niemals weitergegeben werden und wir diese nicht zu Werbezwecken nutzen!
Wir empfehlen unbedingt eine "echte" gültige Adresse zu verwenden, keine one-time Provider.
Falls Sie keine Bestätigungsmail erhalten prüfen Sie nach, ob die Email versehentlich als Spammail klassifiziert und möglicherweise in Ihren Spam Ordner verschoben wurde. Da es sich um eine automatisch versendete Nachricht handelt ist leider nicht auszuschließen, dass manche Email Provider diese Nachricht falsch zuordnen.
Geräteregistrierung
Allgemein zugängliche Dokumente aus dem freakware Network, wie z.B. Handbücher für BEASTX oder RCWare Geräte werden sichtbar, sobald Sie eingeloggt sind.
To access Custom Data like firmware update you need to register your device, what means you permanently link the device to your user account.
Wenn Sie ein Gerät mit StudioX verbinden, sollte folgende Übersicht erscheinen (im Beispiel ist ein MICROBEAST PLUS angeschlossen):
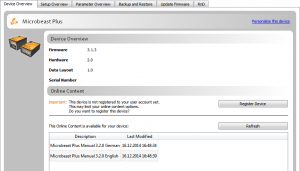
Klicken Sie auf die Register Device Schaltfläche um das Gerät an Ihr freakware network Konto zu binden.
After this the message should be gone, and the "Update Firmware" tab should offer you something.
Geräte updaten
Wenn ein Software Updaten den Status available trägt kann es vom Update Server angefordert werden. Dieser generiert dann eine individuelle Updatedatei speziell für dieses Gerät.
Wenn dieser Vorgang abgeschlossen ist, wechselt der Status auf done und Sie können das Software Update auf dem Gerät durchführen.
Alle Firmwareupdates die momentan hier angeboten werden, wurden getestet und es handelt sich um stabile Releaseversionen. Sie können also bedenkenlos ein Update durchführen, um die Funktion zu testen!
Wenn nichts in der Liste zu sehen ist, dann haben Sie das Gerät wahrscheinlich noch nicht registriert (siehe oben)!

Informationen zu aktuellen Firmware Versionen finden Sie in der Produktübersicht:
