Manuals:MBPlusFblV5:Setupmenu G/de: Difference between revisions
Shornstein (talk | contribs) Created page with "Bei Einstellpunkt G ist die für den verwendeten Helikopter notwendige Art der Taumelscheibenmischung auszuwählen. Hier stehen vordefinierte Mischer für Taumelscheiben mit 9..." |
Shornstein (talk | contribs) Created page with "x80px|none<br /> <div style="font-size: 80%;"> Der wohl am meisten verbreitete Typ ist die 120° Taumelscheibe, z.B. zu finden bei sämtlichen ALIGN..." |
||
| Line 8: | Line 8: | ||
[[File:Swashtypes_2.png|x80px|none]]<br /> | [[File:Swashtypes_2.png|x80px|none]]<br /> | ||
<div style="font-size: 80%;"> | <div style="font-size: 80%;"> | ||
Der wohl am meisten verbreitete Typ ist die 120° Taumelscheibe, z.B. zu finden bei sämtlichen ALIGN T-Rex Helis, aber auch bei SAB Goblin, Mikado Logo, MSH Protos und vielen anderen. Die mechanische Mischung wurde früher bei Thunder Tiger Raptor Helis verwendet und ist immernoch bei einige Vario Scale oder Trainer Helikoptern zu finden, wird aber immer seltener. Der Taumelscheibentyp 135°/140° (1:1) ist normalerweise zu wählen, wenn eine "140 Grad" Taumelscheibe benötigt wird. Diese wird oft auch als 135° Taumelscheibe bezeichnet! Eine einheitliche Bezeichnung gibt es hier nicht. Massgebend ist hier die Besonderheit, dass die Anlenkpunkte auf Roll und Nick so verteilt sind, dass alle Servos immer einen gleich großen Ausschlag machen. Dadurch wird die Pitchbewegung unterbunden, wenn Nick gesteuert wird. Diese tritt z.B. bei einer 120° Taumelscheibe auf, weil das hintere Nickservo einen größeren Ausschlag machen muss, als die beiden Rollservos. Zu finden ist dieser Taumelscheibentyp z.B. bei Helis von Shape, JR und Hirobo. Eine "normale" 140° Mischung ist eher unüblich, wird der Vollständigkeit halber hier aber auch zur Verfügung gestellt.</div><br /> | |||
<br /> | <br /> | ||
Revision as of 17:05, 12 December 2017
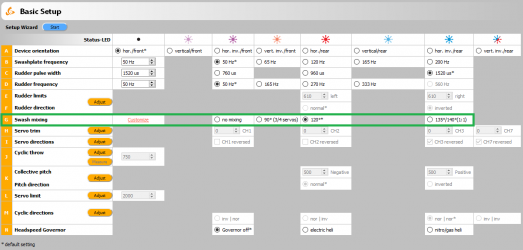
Bei Einstellpunkt G ist die für den verwendeten Helikopter notwendige Art der Taumelscheibenmischung auszuwählen. Hier stehen vordefinierte Mischer für Taumelscheiben mit 90°-, 120°- und 135°/140°- Anlenkung zur Verfügung. Natürlich lässt sich die Mischung auch deaktivieren, falls der Helikopter über eine mechanische Servomischung verfügt. Zusätzlich lässt sich über der StudioX Software eine beliebig definierbare Mischung realisieren. Für Helikopter mit Mehrblattkopf bzw. Scalehelikopter kann desweiteren die oftmals benötigte virtuelle Taumelscheibenverdrehung eingestellt werden. Welche Art der Taumelscheibenmischung Dein Modell benötigt, steht in der Anleitung des Modells.

Never set any kind of swash mixing in your transmitter even when electronic mixing is required! Deactivate the swashplate mixing in your transmitter or set it to mechanical mixing (which is often called “normal“, “H1“ or ”1 servo“ mixing), so that each stick function only moves one receiver output channel. The swashplate mixing is all done by MICROBEAST PLUS!
Adjustment on the device
The color and state of the Status-LED shows the currently selected mixing type. To select the desired type tap the rudder stick repeatedly in one direction until the Status-LED lights in the correct color:
| Status-LED | Swashplate mixer |
|---|---|
| purple | mechanical |
| red flashing | 90° (3 or 4 servos) |
| red | 120° |
| blue flashing | 140° |
| blue | 135°/140°(1:1) |
Setup with StudioX
Choose the swashplate mixing/swash type of your helicopter by clicking the corresponding button in the software.

To change the swash phasing or set a different type of swash mixing click Customize. Then a screen with advanced setup options will open.
Virtual swash rotation
To change swash phasing for multiblade helicopters adjust the Virtual swash rotation (the phasing is set independent from the actual swash mixing type, so make sure the correct swash type was chosen before!). You can turn the swashplate internally by +- 179 degrees. To find out the exact value that is necessary for your helicopter align one rotorblade in parallel to the tail boom/longitudinal axis of the helicopter. Now when you move the elevator the rotorblade mustn't move at all. If it does, increase/decrease the phasing just until the blade is standing still. It must only react to roll or collective inputs similar as this would be the case with a two bladed rotorhead! The direction (sign) of phasing determines the control direction. If you have tuned the phasing into the wrong direction your control will be inverted, i.e. elevator will move the blades into the wrong direction when aligned 90 degrees to the boom.
Custom swash mixing
You can change the Swash geometry just as you like. You will see that the values you see here are preset by the type you've chosen in the SETUP MENU overview. In example what you may do here is, when having a mechanical mixed helicopter, you can change the servo throw ratio of the aileron and elevator servo (outputs CH1 and CH2) in case these are not making similar cyclic pitch deflection (Note: You can not change the servo throw in the transmitter as with the transmitter you do not directly control the servos with the radio!).
Setup with StudioXm
Choose the swashplate mixing/swash type of your helicopter by clicking the corresponding button in the app.
File:SetupGm.png
With the buttons + and - you can adjust the Virtual swash rotation/swashplate phasing if necessary (i.e. when using a scale helicopter with multiblade rotorhead). You can turn the swashplate internally by +- 179 degrees. To find out the exact value that is necessary for your helicopter align one rotorblade in parallel to the tail boom/longitudinal axis of the helicopter. Now when you move the elevator the rotorblade mustn't move at all. If it does, increase/decrease the phasing just until the blade is standing still. It must only react to roll or collective inputs similar as this would be the case with a two bladed rotorhead! The direction (sign) of phasing determines the control direction. If you have tuned the phasing into the wrong direction your control will be inverted, i.e. elevator will move the blades into the wrong direction when aligned 90 degrees to the boom.

