Manuals:MBPlusFblV5:ReceiverType/de: Difference between revisions
Shornstein (talk | contribs) No edit summary |
Shornstein (talk | contribs) No edit summary |
||
| Line 190: | Line 190: | ||
<br /> | <br /> | ||
= | =Setup with StudioX= | ||
When StudioX is started and your MICROBEAST PLUS was detected by StudioX, click the Control Setup tab to show the adjustment options of RECEIVER MENU. The options you see here are basically similar to the Menu Points you can change directly at the device. At the top of the screen you can see which type of input signal is selected at the moment. The rows below show what channels are assigned to which control functions. Finally, in the last row you can see the internal value for throttle failsafe position that is set at the moment.<br /> | |||
<br /> | <br /> | ||
<div class="iosgallery"> | <div class="iosgallery"> | ||
| Line 224: | Line 224: | ||
==Funktionszuordnung== | ==Funktionszuordnung== | ||
=== | ===Default function assignment=== | ||
Refer to the tables above and identify the column that represents your receiver type. Check whether your radio transmits the channels in the given order, respectively each stick function on the radio is using the specified channel number on the left. To know the channel assignment of your transmitter you can check the user manual of the transmitter or look at the servo monitor of the transmitter. In order to load the preset assignment choose '''Load defaults''' from the "New receiver detected!" dialog. Immediately after that the "Failsafe" dailog will show up.<br /> | |||
<br /> | <br /> | ||
<br /> | <br /> | ||
=== | ===Manual function assignment=== | ||
<p> | <p>In case the channel to function ordering differs from the given tables above on your radio system, you have to manually assign the channel order step by step. This is done by simply actuating the appropriate channel function on your transmitter at each of the menu points B to I (PROEDITION: J). Each menu point represents one control function to assign. When you're ready click '''Teach''' in the "New receiver detected!" dialog and start with function allocation at Menu Point B. When you move the control stick/change the channel output on the transmitter, a blue flash of the Status-LED indicates that the channel has been detected. The setup will jump to the next menu point automatically. It does not matter how far or in what direction you move the stick or in what position the stick/switch was. The channel's value itself is not important, but the change of this value is. <b>It is therefore important that only the requested function is activated and not by accident several simultaneously!</b> Otherwise MICROBEAST PLUS may not recognize the allocated channel correctly. Once a channel was assigned, it is no longer available and is ignored by MICROBEAST PLUS for the remaining process. Thus, after learning of the collective pitch function (at Menu Point B) you can enable the throttle function (remove throttle hold or switch to a linear or V shape curve) and teach the throttle channel by re-operating the thrust stick at Menu Point G. Now the collective pitch channel is no longer considered as this channel has already been assigned previously and MICROBEAST PLUS will detect and use the throttle channel as actuator for throttle function!</p> | ||
< | |||
<br /> | <br /> | ||
<div class="iosgallery"> | <div class="iosgallery"> | ||
| Line 267: | Line 254: | ||
<br /> | <br /> | ||
<br /> | <br /> | ||
{{QUOTE| | <p>The first 6 functions must be assigned as they are necessary for the basic flight control. The other functions are optional to assign and can be skipped. If special features like AttitudeControl or Headspeed Governor are not installed on your device, the specific menu points for assignment will not be shown at all. | ||
* The assignment for Aux [CH6] Output can be skipped by pressing the "Skip" button without teaching a channel for this function in case it is not used. | |||
* Likewise, the assignment of the channel for internal governor can be skipped in case it is not needed or if you don‘t want to control the governor with a separate channel, e. g. if your transmitter does not provide enough free channels. By skipping the assignment the internal governor function will use a different operating mode that allows to control it by the throttle channel if you like. When used in an electric model the internal governor is controlled by the throttle channel in general. In this case the assignment can be skipped anyway, as it will have no effect. | |||
* Finally, you can assign the channel that is used to engage the AttitudeControl/rescue stabilization (only available you've installed the PROEDITION Upgrade on your device). Again this can be skipped if not needed or if you don‘t want to use a separate channel or in case you have no more free channels left). AttitudeControl can still be used then. In this case the channel for the tail gyro gain is used to engage AttitudeControl or can be enabled separately using the Bank Switch feature. Please see the section about using AttitudeControl for further details.</p> | |||
<br /> | |||
{{QUOTE|If the Status-LED lights in '''red color''' this means either there is no valid remote control signal available or that you did try to assign two or more channels to a function. So check if the receiver is connected and powered properly and that you're only moving one channel at a time when trying to do the manual function assignment.}}<br /> | |||
<br /> | <br /> | ||
Revision as of 17:09, 10 July 2019
An das MICROBEAST PLUS kann eine Vielzahl von unterschiedlichen Empfängertypen mit verschiedenen Arten von Ausgangssignalen angeschlossen werden. Welcher Empfängertyp bzw. welches Signal/Übertragungsprotokoll verwendet wird, muss vor der eigentlichen Inbetriebnahme im EMPFÄNGER MENÜ eingelernt werden. Nur so sind die Eingänge am MICROBEAST PLUS entsprechend konfiguriert und die Steuersignale können korrekt dekodiert werden. Wenn ein Singleline-Empfänger (Summensignal-Empfänger) verwendet wird, muss in diesem Menü zusätzlich die Zuordnung der Fernsteuerkanälen zu den einzelnen Funktionen bestimmt werden. Zu jedem Fernsteuertyp ist im MICROBEAST PLUS eine vorkonfigurierte Funktionsbelegung hinterlegt. Alternativ kann auch eine individuelle Funktionsbelegung durchgeführt werden, falls die vorkonfigurierte Belegung nicht zur verwendeten Fernsteueranlage passt. Dies ist nötig weil hier alle Steuerkanäle als Datenpaket oder Signalkette versendet werden und nicht von vorn herein klar ist, welche Kanäle welcher Steuerfunktion zugeordnet sind. Abschließend wird noch die Failsafe-Position eingestellt. Sie bestimmt, in welche Position das Gas gebracht wird, wenn das Eingangssignal verloren geht, z. B. falls der Empfänger abgesteckt oder die Signalausgabe abgeschaltet wird.
In der Werkseinstellung ist der Typ "Standard Empfänger" voreingestellt. Wenn das MICROBEAST PLUS neu eingebaut und mit diesem Empfängertyp verwendet wird, muss die Empfängereinstellung nicht durchgeführt werden.

Vordefinierte Funktionsbelegung für Summensignalempfänger
Spektrum® DMS2/DSMX oder JR® RJ01 DMSS Einzelsatellit
| GAS | ROL | NCK | HCK | KRE | PIT | K7 | K8 |
| Motor [CH5] | Roll | Nick | Heck (Gier) | Heckkreisel | Pitch | Aux [CH6]* | Governor (Verbrenner) |
PPM Summensignal (SPPM)
| 1 | 2 | 3 | 4 | 5 | 6 | 7 | 8 |
| Pitch | Roll | Nick | Heck (Gier) | Aux [CH6]* | Motor [CH5] | Heckkreisel | Governor (Verbrenner) |
Futaba® SBus/Sbus2 oder BEASTX® FASST kompatibler Empfänger
| 1 | 2 | 3 | 4 | 5 | 6 | 7 | 8 |
| Roll | Nick | Motor [CH5] | Heck (Gier) | Heckkreisel | Pitch | Aux [CH6]* | Governor (Verbrenner) |
Multiplex® SRXL v1 und v2, JR® XBUS Mode B, JETI® UDI 12 + 16ch
| 1 | 2 | 3 | 4 | 5 | 6 | 7 | 8 |
| Roll | Nick | Heck (Gier) | Pitch | Motor [CH5] | Heckkreisel | Aux [CH6]* | Governor (Verbrenner) |
Graupner® SUMD
| 1 | 2 | 3 | 4 | 5 | 6 | 7 | 8 |
| Pitch | Roll | Nick | Heck (Gier) | Aux [CH6]* | Motor [CH5] | Heckkreisel | Governor (nitro) |
Spektrum® SRXL
| GAS | ROL | NCK | HCK | KRE | PIT | K7 | K8 |
| Motor [CH5] | Roll | Nick | Heck (Gier) | Heckkreisel | Pitch | Aux [CH6]* | Governor (Verbrenner) |
Jeti® ExBus
| 1 | 2 | 3 | 4 | 5 | 6 | 7 | 8 |
| Motor [CH5] | Roll | Nick | Pitch | Heck (Gier) | Heckkreisel | Aux [CH6]* | Governor (Verbrenner) |
ALIGN®/FlySky® iBus
| 1 | 2 | 3 | 4 | 5 | 6 | 7 | 8 |
| Roll | Nick | Motor [CH5] | Heck (Gier) | Heckkreisel | Pitch | Aux [CH6]* | Governor (Verbrenner) |
Belegung bei PROEDITION firmware (*)
Wenn das PROEDITION Firmware Upgrade auf dem Gerät installiert ist, dann wird der Kanal vom Zusatzausgang Aux [CH6] zur Steuerung der AttitudeControl verwendet. Der Zusatzausgang Aux Aux [CH6] wird hingegen über Kanal 9 angesteuert.
Hinweis: Falls die AttitudeControl nicht über einen eigenen Steuerkanal angesteuert werden soll oder kann (z.B. weil der Sender nur über 6 Fernsteuerkanäle verfügt), kann die Funktionszuweisung für die AttitudeControl manuell übersprungen werden.
Einstellung am Gerät
Um ins Empfänger-Einstellmenü zu gelangen muss das MICROBEAST PLUS ausgeschaltet sein. Drücke und halte den Knopf bevor(!) und während Du das Gerät einschaltest. Die Menü LEDs A bis N leuchten nacheinander auf. Lass den Knopf jetzt los. Die Menü LED A wird blinken und die Status LED Farbe zeigt an, welche Art von Eingangssignal momentan ausgewählt ist.

Beachte bitte, dass der Motorausgang [CH5] am MICROBEAST PLUS bei den ersten Punkten des Empfänger-Einstellmenüs nicht angesteuert wird (gilt nur bei Verwendung eine Summensignal-Empfängers). Zum Einstellen der Failsafe-Position bei Einstellpunkt N wird der Ausgang hingegen aktiv geschaltet! Wenn ein Motorsteller mit BEC angeschlossen ist, um die Empfangsanlage mit Strom zu versorgen, stelle unbedingt sicher, dass der Motor vom Hauptgetriebe abgekoppelt ist! Bei einem Heli mit Verbrennungsmotor sollte vor der ersten Inbetriebnahme das Servohorn vom Gasservo entfernt werden, um ein Blockieren des Anlenkgestänges wegen falscher Gaseinstellung zu verhindern.
Einstellpunkt A - Empfängertyp
Damit der angesteckte Empfängertyp erkannt werden kann, muss der Fernsteuersender eingeschaltet und mit dem Empfänger gebunden sein. Stelle auch sicher, dass die Grundeinstellung des Sender wie im Kapitel Fersteuersystem beschrieben durchgeführt wurde. Drücke dann bei Einstellpunkt A einfach einmal kurz auf den Knopf, um den Scan-Vorgang zu starten. Die Farbe der Status LED gibt jeweils an, nach welchem Empfängertyp gerade gesucht wird. Sobald der entsprechende Typ erkannt wurde, wird dieser abgespeichert und die Einstellprozedur springt automatisch zu Einstellpunkt B, falls ein Summensignal -Empfänger verwendet wird. Wenn ein Standardempfänger verwendet wird, ist soweit alles Notwendige einstellt und das EMPFÄNGER MENÜ wird geschlossen.
Falls die Empfängersuche fehlschlägt, wird das System bei Einstellpunkt A bleiben und die Status LED signalisiert mit rotem Blinken, dass kein passender Typ gefunden wurde. Sollte das passieren, überprüfe nochmal ob alles korrekt angeschlossen ist, der Sender korrekt mit dem Empfänger zusammenarbeitet, die Versorgungsspannung ausreichend ist und ob der Empfänger tatsächlich die Steuersignale ausgibt und ob es sich um ein unterstützes Datenformat handelt.
| Status-LED | Empfängertyp/Übertragungsprotokoll |
|---|---|
| aus | Spektrum®/JR® Einzelsatellit |
| violett | SPPM (PPM Summensignal) |
| rot | Serielles Datensignal |
| blau | Standard Empfänger |
Funktionszuordnung
Vorkonfigurierte Funktionsbelegung
Wenn die Belegung des Fernsteuersender zu der Angabe in den oben aufgeführten Tabellen passt, kann auf eine manuelle Zuweisung verzichtet und die Punkte B bis I (J) übersprungen werden. Wenn Punkt B blinkt, drücke und halte den Knopf für mindestens 2 Sekunden, um die für den jeweiligen Fernsteuertyp vorkonfigurierte Funktionsbelegung zu laden. Die Menü LED springt dann direkt zu Punkt N weiter, wenn der Knopf losgelassen wird. Die Funktionsbelegung des Senders ist üblicherweise im Handbuch des Fernsteuersenders abgedruckt oder kann durch Zuhilfenahme des Servomonitors vom Sender herausgefunden werden.
 |
Manuelle Funktionszuweisung
Wenn die Steuerbelegung des Fernsteuersenders nicht der oben vorgegebenen Standardbelegung entspricht, können die einzelnen Steuerkanäle bei den Punkten B - I (J bei PROEDITION) beliebig den einzelnen Steuerfunktionen zugeordnet werden. Dies macht man einfach, indem man die gewünschte Funktion am Sender betätigt, wenn man beim Punkt für die entsprechende Funktion angelangt ist. Die Status LED wird dann kurz in blauer Farbe aufblinken, wenn der Steuerkanal bzw. die Knüppelbewegung erkannt. Es ist dabei egal, in welche Richtung und wie weit der Kanal betätigt wird. Wichtig ist nur, dass sich immer nur ein Kanal bewegt, andernfalls kann das System nicht erkennen, welcher Kanal nun zugewiesen werden soll. Die Zuweisung kann bei jedem Punkt beliebig oft wiederholt oder geändert werden, gespeichert wird immer der zuletzt erkannte Kanal.
Drücke dann zum Speichern der Zuweisung auf den Knopf, dann springt das System zur nächsten Funktionszuweisung. Ein einmal eingelernter Kanal wird im Folgenden übrigens ignoriert. So können z.B. Pitch und Motor durch Bewegen des Pitchknüppels eingelernt werden, indem zuerst bei Punkt B der Motorkanal über den Hold - Schalter stillgelegt wird, und dann beim Einlernen der Motorfunktion bei Punkt G einfach wieder zugeschaltet wird. Der Pitchkanal wird dann ignoriert, weil er bei Punkt B schon für Pitch zugewiesen wurde!
Die ersten 6 Funktionen müssen zugewiesen werden, da sie für die grundlegende Flugsteuerung des Modells notwendig sind. Die anderen Funktionen sind nur optional und können ohne Zuweisung per Tastendruck übersprungen werden, wenn sie nicht benötigt werden oder nicht ausreichend Steuerkanäle zur Verfügung stehen.
- Die Ansteuerung vom Ausgang Aux [CH6] der zur Steuerung von Zusatzfunktionen wie Fahrwerk, Beleuchtung o.ä. verwendet werden kann, kann durch Tastendruck übersprungen werden, ohne einen Steuerkanal am Sender zu betätigen.
- Ebenso kann die Zuweisung für den internen Drehzahlregler übersprungen werden, wenn der Drehzahlregler nicht verwendet wird, der Drehzhalregler in einem Elektroheli verwendete wird, oder wenn Motor und Drehzahlregler allein über den Motorkanal kontrolliert werden soll.
- Schließlich kann auch Punkt J (nur zugänglich bei der PROEDITION Firmware) übersprungen werden, wenn die AttitudeControl ("Rettungsfunktion") nicht verwendet werden soll oder nicht über einen separaten Kanal geschaltet werden kann oder soll. Die Funktion steht dann nach wie vor zur Verfügung, wird dann aber entweder über die den Kanal für den Heckkreisel mit kontrolliert, oder kann über die Bankumschaltung fest einprogrammiert werden (nur über StudioX/StudioXm möglich!)
| Menu point | Function |
|---|---|
| B | Pitch |
| C | Roll |
| D | Nick |
| E | Heck |
| F | Heckkreisel Wirkstärke / Bankumschaltung |
| G | Motor [CH5] |
| H | Ausgang Aux [CH6] |
| I | Governor (Verbrenner) |
| J | AttitudeControl Wirkstärke |
Wenn die Status-LED beim Zuweisen rot leuchtet, dann wurden entweder zwei oder mehr Kanäle am Sender betätigt oder das Steuersignal vom Empfänger wurde ganz unterbrochen. Hier bitte nochmals genau die Sendereinstellung bzw. den Servomonitor am Sender prüfen.
Einstellpunkt N - Motor Failsafe
Bei Einstellpunkt N muss die Failsafe-Position für den Motorkanal hinterlegt werden. Sollte im späteren Betrieb das Summensignal unterbrochen werden, wird das Gasservo/der Motorsteller am Ausgang [CH5] automatisch auf diese Position gestellt. Dies ist insbesondere dann der Fall:
- wenn ein Empfänger verwendet wird, der im Falle einer Funkstörung die Übertragung des Summensignals unterbricht (z.B. bei Verwendung eines einzelnen Spektrum® Satellitenempfängers oder eines Graupner® HOTT Empfängers der auf den Modus "SUMDOF" eingestellt ist)
- wenn die Verbindung zwischen Empfänger und MICROBEAST PLUS im Betrieb mechanisch getrennt wird
- wenn der Sender beim Einschalten des MICROBEAST PLUS noch nicht eingeschaltet ist oder die Verbindung zwischen Sender und Empfänger beim Einschalten nicht schnell genug aufgebaut wird.
- wenn der Drehzahlregler in einem Elektromodell auf Autorotation geschaltet wird und die "Motor aus" Position größer ist als die Failsafe Position
Hinweis:
- Die Failsafefunktion kann nicht funktionieren, wenn der Empfänger Daten sendet obwohl die Funkverbindung zwischen Sender und Empfänger unterbrochen ist. In diesem Fall ist gegebenenfalls eine Failsafeposition im Sender oder Empfänger einzuprogrammieren.
- Um Unfälle zu vermeiden, muss der Motorkanal auf "aus" bzw. bei Modellen mit Verbrennungsmotor maximal auf "Leerlauf" programmiert werden. Die restlichen Steuerfunktionen werden bei Verbindungsabbruch grundsätzlich in den Zustand "Position halten" versetzt, hier ist keine gesonderte Failsafe-Position vorgesehen.
Bring den Motorkanal an der Fernsteuerung auf die gewünschte Position und drücke einmal kurz auf den Taster. Sollte am Ausgang [CH5] kein Servo oder Motorsteller angesteckt sein, so drücke ebenfalls auf den Taster um das Setup abzuschließen!

Setup with StudioX
When StudioX is started and your MICROBEAST PLUS was detected by StudioX, click the Control Setup tab to show the adjustment options of RECEIVER MENU. The options you see here are basically similar to the Menu Points you can change directly at the device. At the top of the screen you can see which type of input signal is selected at the moment. The rows below show what channels are assigned to which control functions. Finally, in the last row you can see the internal value for throttle failsafe position that is set at the moment.
<img class="ios" src=" ">
">
<img class="ios" src="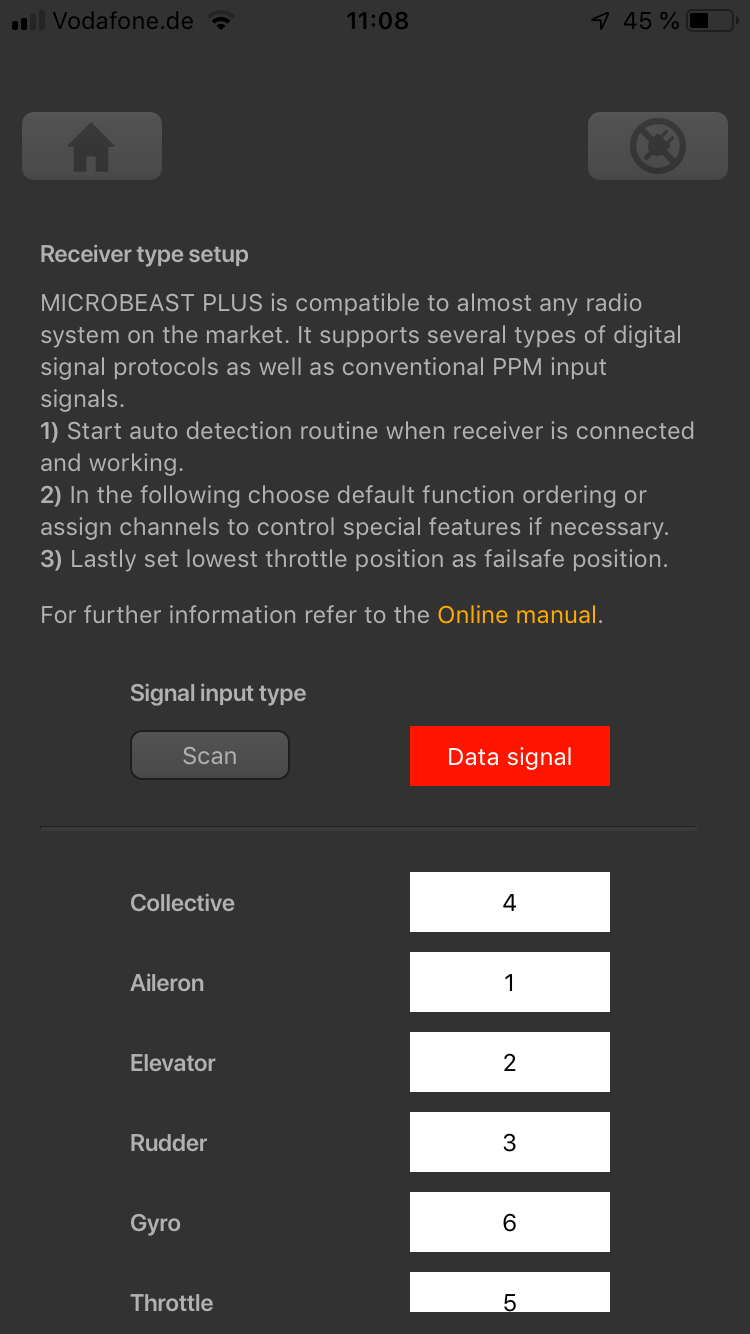 ">
">
Receiver type
In order to detect the connected receiver type make sure the receiver is bound to the transmitter and sending out signals. Also make sure the transmitter is setup correctly as shown in the chapter Radio System. Press the "Scan" button to start automatic receiver detection routine. The Status-LED on the device and the display will indicate which type the system is scanning for at the moment. When a valid input signal was detected the receiver type will be set automatically and a dialog will appear in case a single-line receiver is used. This asks how to proceed with function assignments. When a Standard receiver is used the system will restart directly and you can leave the setup screen as there . When detection fails once again make sure your receiver is connected properly to MICROBEAST PLUS, bound to the transmitter and sending out control signals and try again.
<img class="ios" src="">
<img class="ios" src="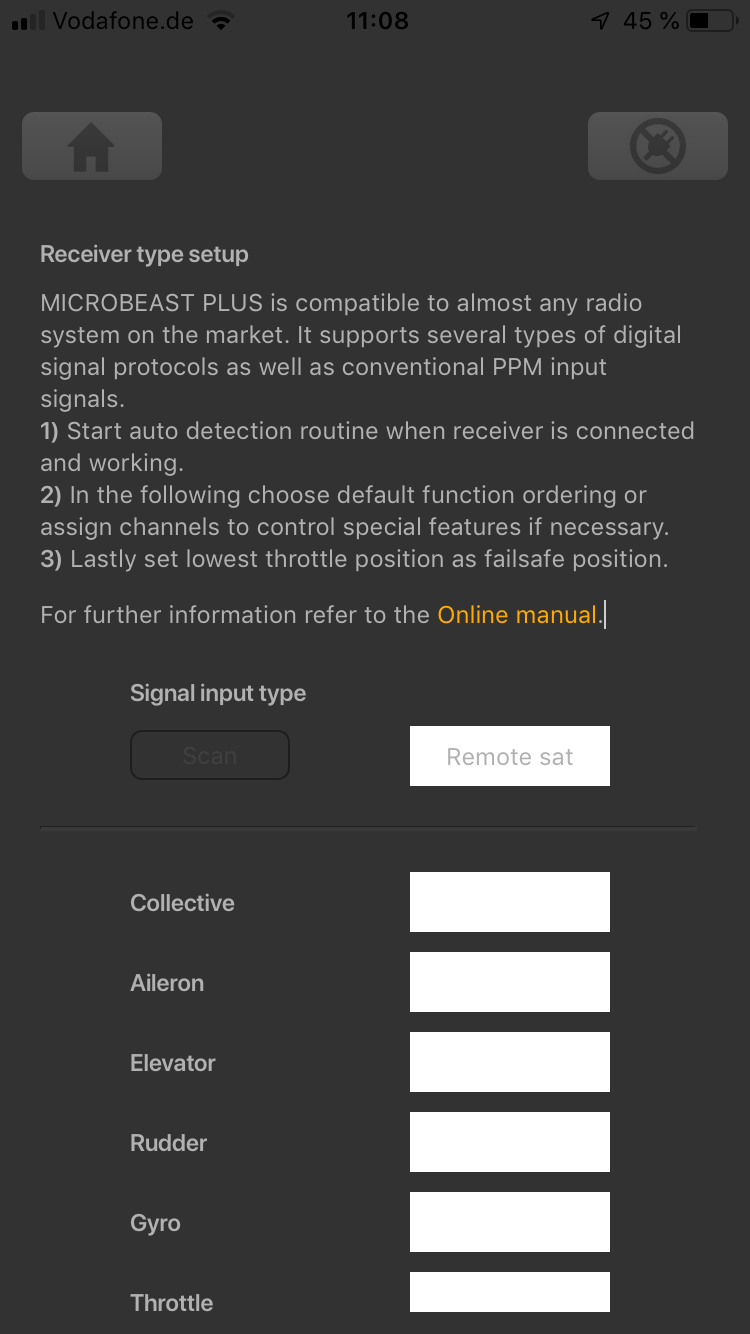 ">
">
<img class="ios" src="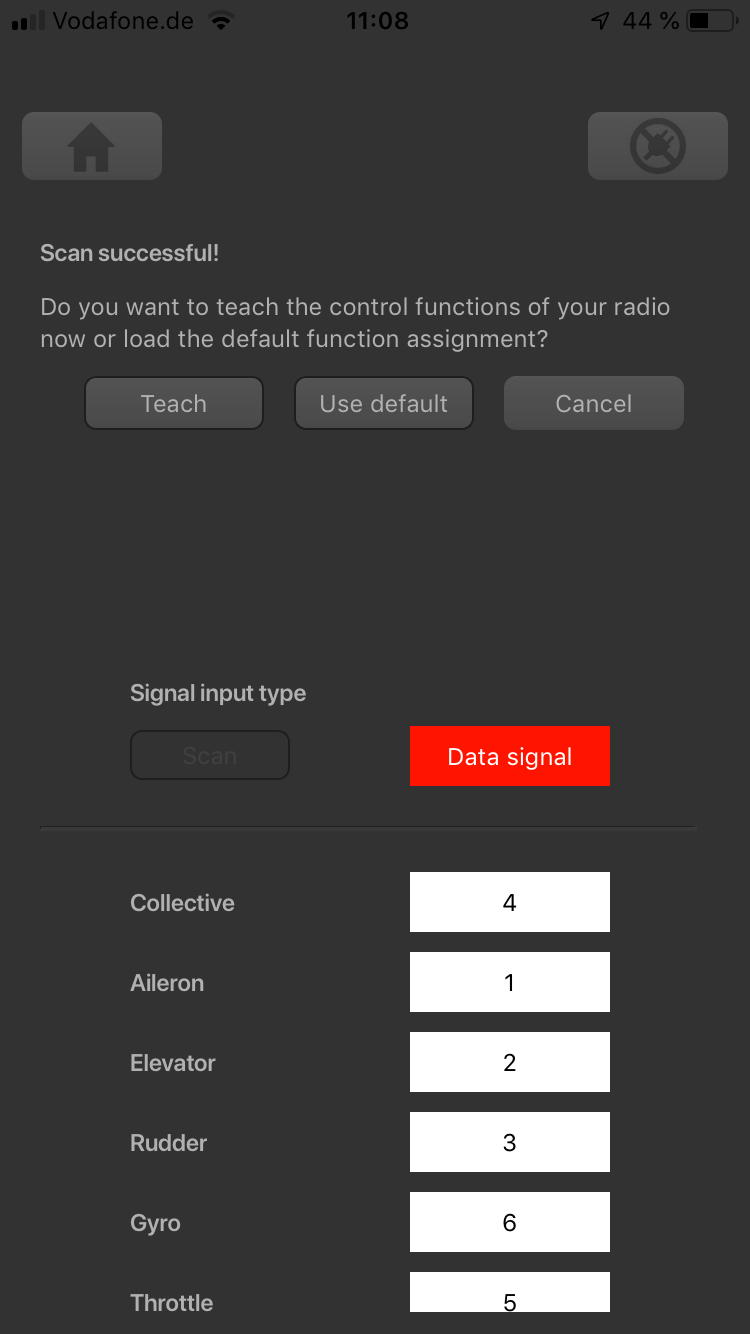 ">
">
Funktionszuordnung
Default function assignment
Refer to the tables above and identify the column that represents your receiver type. Check whether your radio transmits the channels in the given order, respectively each stick function on the radio is using the specified channel number on the left. To know the channel assignment of your transmitter you can check the user manual of the transmitter or look at the servo monitor of the transmitter. In order to load the preset assignment choose Load defaults from the "New receiver detected!" dialog. Immediately after that the "Failsafe" dailog will show up.
Manual function assignment
In case the channel to function ordering differs from the given tables above on your radio system, you have to manually assign the channel order step by step. This is done by simply actuating the appropriate channel function on your transmitter at each of the menu points B to I (PROEDITION: J). Each menu point represents one control function to assign. When you're ready click Teach in the "New receiver detected!" dialog and start with function allocation at Menu Point B. When you move the control stick/change the channel output on the transmitter, a blue flash of the Status-LED indicates that the channel has been detected. The setup will jump to the next menu point automatically. It does not matter how far or in what direction you move the stick or in what position the stick/switch was. The channel's value itself is not important, but the change of this value is. It is therefore important that only the requested function is activated and not by accident several simultaneously! Otherwise MICROBEAST PLUS may not recognize the allocated channel correctly. Once a channel was assigned, it is no longer available and is ignored by MICROBEAST PLUS for the remaining process. Thus, after learning of the collective pitch function (at Menu Point B) you can enable the throttle function (remove throttle hold or switch to a linear or V shape curve) and teach the throttle channel by re-operating the thrust stick at Menu Point G. Now the collective pitch channel is no longer considered as this channel has already been assigned previously and MICROBEAST PLUS will detect and use the throttle channel as actuator for throttle function!
<img class="ios" src="">
<img class="ios" src="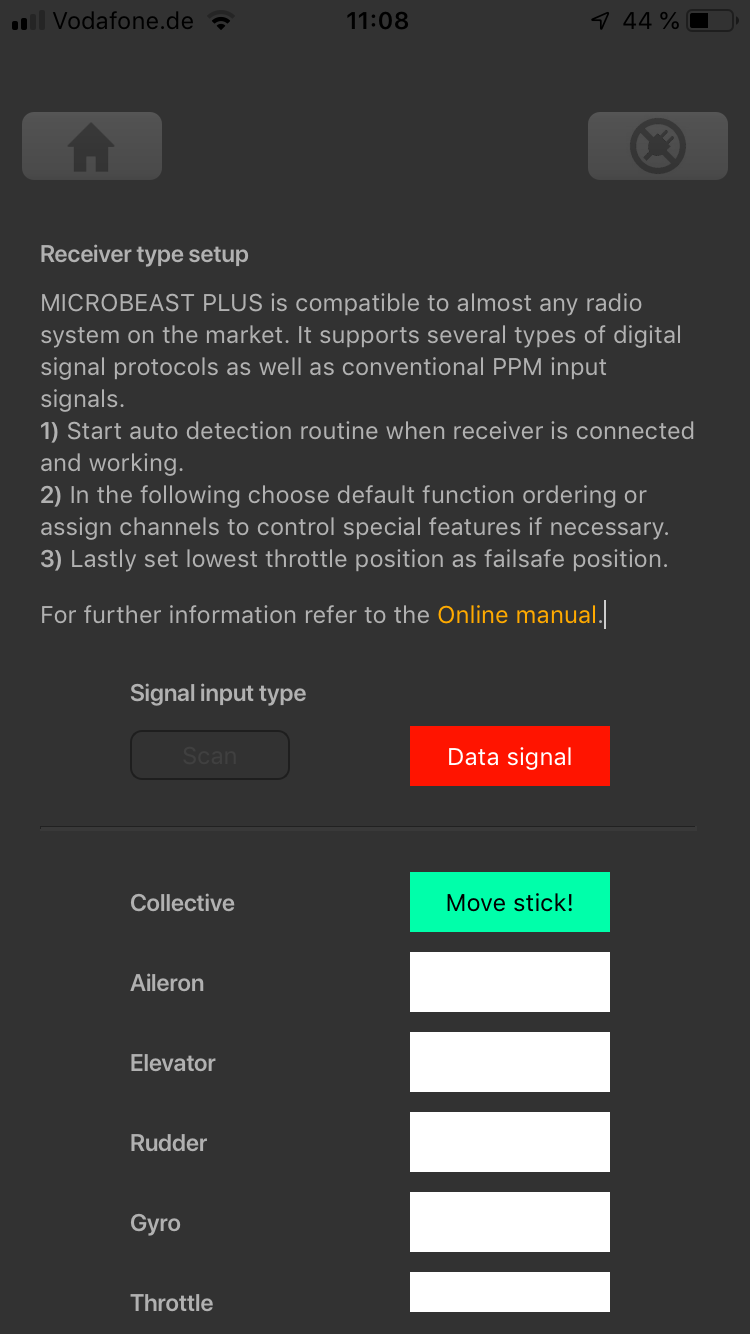 ">
">
<img class="ios" src="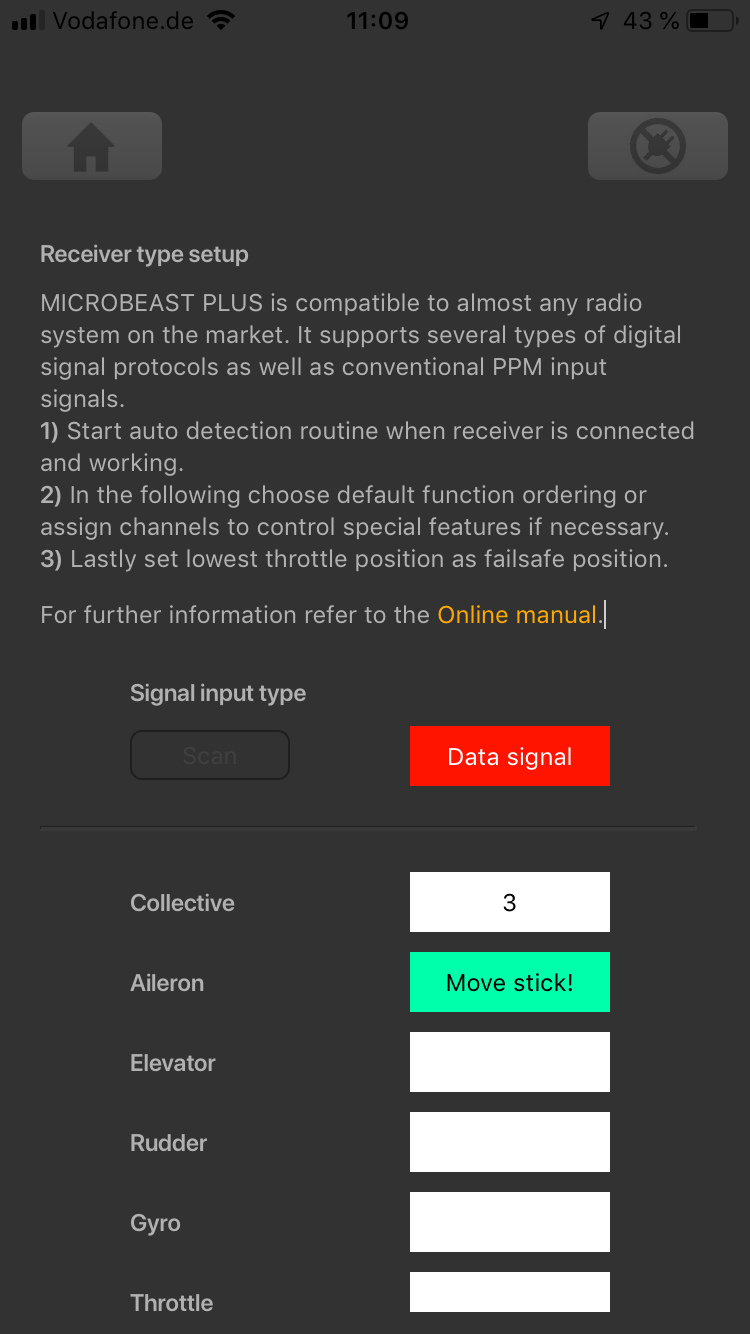 ">
">
<img class="ios" src="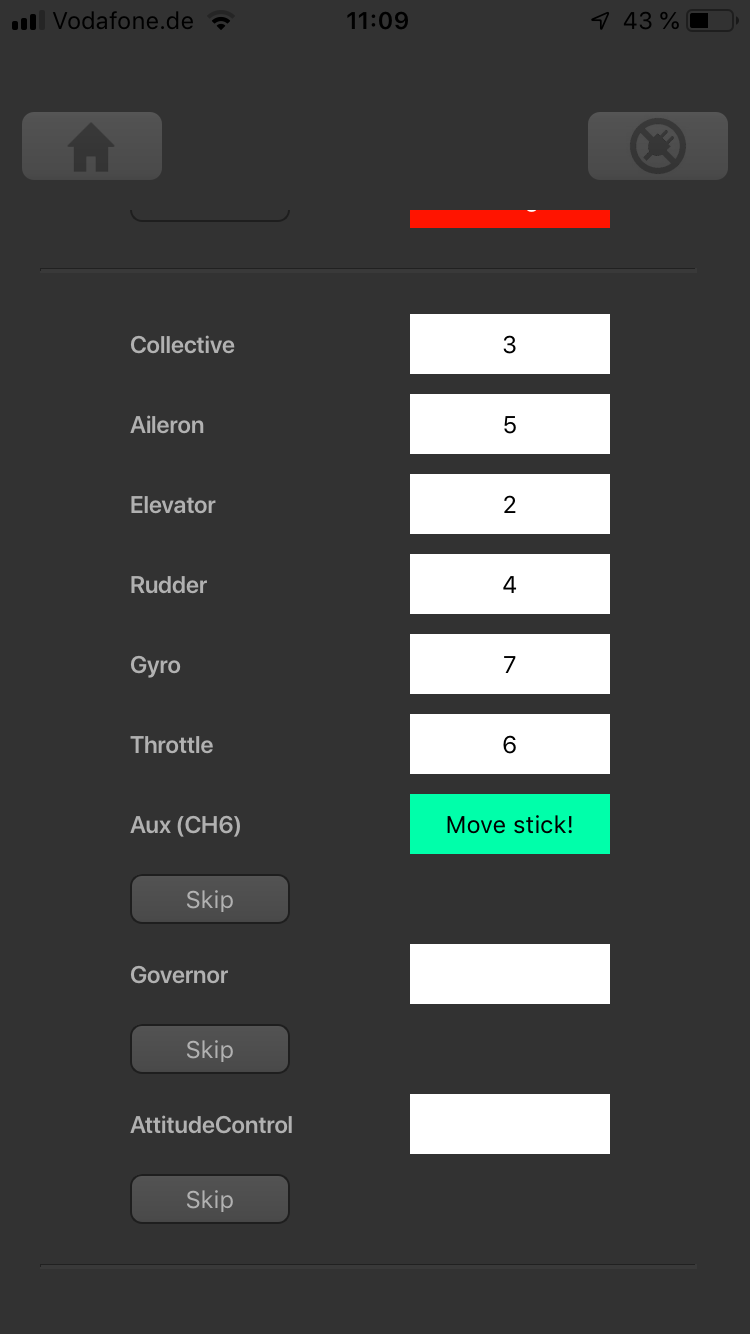 ">
">
<img class="ios" src="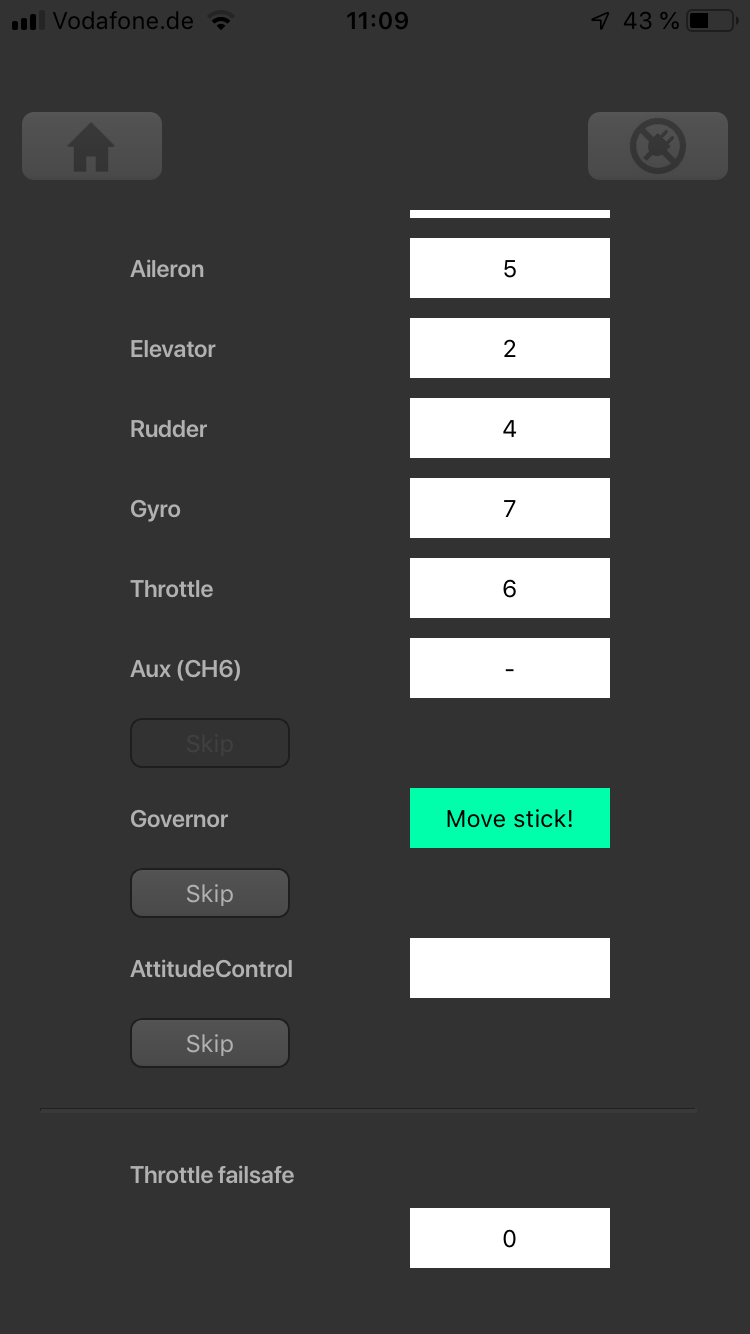 ">
">
The first 6 functions must be assigned as they are necessary for the basic flight control. The other functions are optional to assign and can be skipped. If special features like AttitudeControl or Headspeed Governor are not installed on your device, the specific menu points for assignment will not be shown at all.
- The assignment for Aux [CH6] Output can be skipped by pressing the "Skip" button without teaching a channel for this function in case it is not used.
- Likewise, the assignment of the channel for internal governor can be skipped in case it is not needed or if you don‘t want to control the governor with a separate channel, e. g. if your transmitter does not provide enough free channels. By skipping the assignment the internal governor function will use a different operating mode that allows to control it by the throttle channel if you like. When used in an electric model the internal governor is controlled by the throttle channel in general. In this case the assignment can be skipped anyway, as it will have no effect.
- Finally, you can assign the channel that is used to engage the AttitudeControl/rescue stabilization (only available you've installed the PROEDITION Upgrade on your device). Again this can be skipped if not needed or if you don‘t want to use a separate channel or in case you have no more free channels left). AttitudeControl can still be used then. In this case the channel for the tail gyro gain is used to engage AttitudeControl or can be enabled separately using the Bank Switch feature. Please see the section about using AttitudeControl for further details.
If the Status-LED lights in red color this means either there is no valid remote control signal available or that you did try to assign two or more channels to a function. So check if the receiver is connected and powered properly and that you're only moving one channel at a time when trying to do the manual function assignment.
Throttle failsafe
After you've set the control functions you will be asked to program the failsafe position for the throttle channel. In case the single-line signal is interrupted during operation, the throttle servo/speed controller connected to the [CH5] Output is automatically moved to this position. This particularly is the case:
- if using a single-line receiver that turns of the single-line signal in case of signal loss between receiver and transmitter (e.g. Spektrum® satellite receiver or Graupner® receiver in „SUMDOF“ mode)
- if the connection between MICROBEAST PLUS and receiver gets disconnected
- during initialization when the transmitter was not switched on before or was switched on too late and the radio link between transmitter and receiver is not established yet
Additionally the failsafe position is used by the internal Governor function in case you're using a helicopter with electric drive system. Here the throttle is moved to the stored failsafe position when you set the Governor to Autorotation bailout mode!
Note:
- The fail-safe function is not effective if the receiver continues sending data even if the radio link is interrupted. In this case the failsafe setting of the remote control system may take precedence.
- To avoid accidents, you should program electric motors to “off“ and reduce throttle on nitro helicopters to idle. The other control functions will be set to „position hold“ in case of signal interruption. For these setting a failsafe position is not provided.
To teach the failsafe position choose "Proceed" when asked to teach the failsafe position and set the throttle channel on your remote control to the desired position. Then press Set to save the position. If you did not connect a function to CH5 Output and don't need throttle failsafe, press Cancel to complete setup!
<img class="ios" src="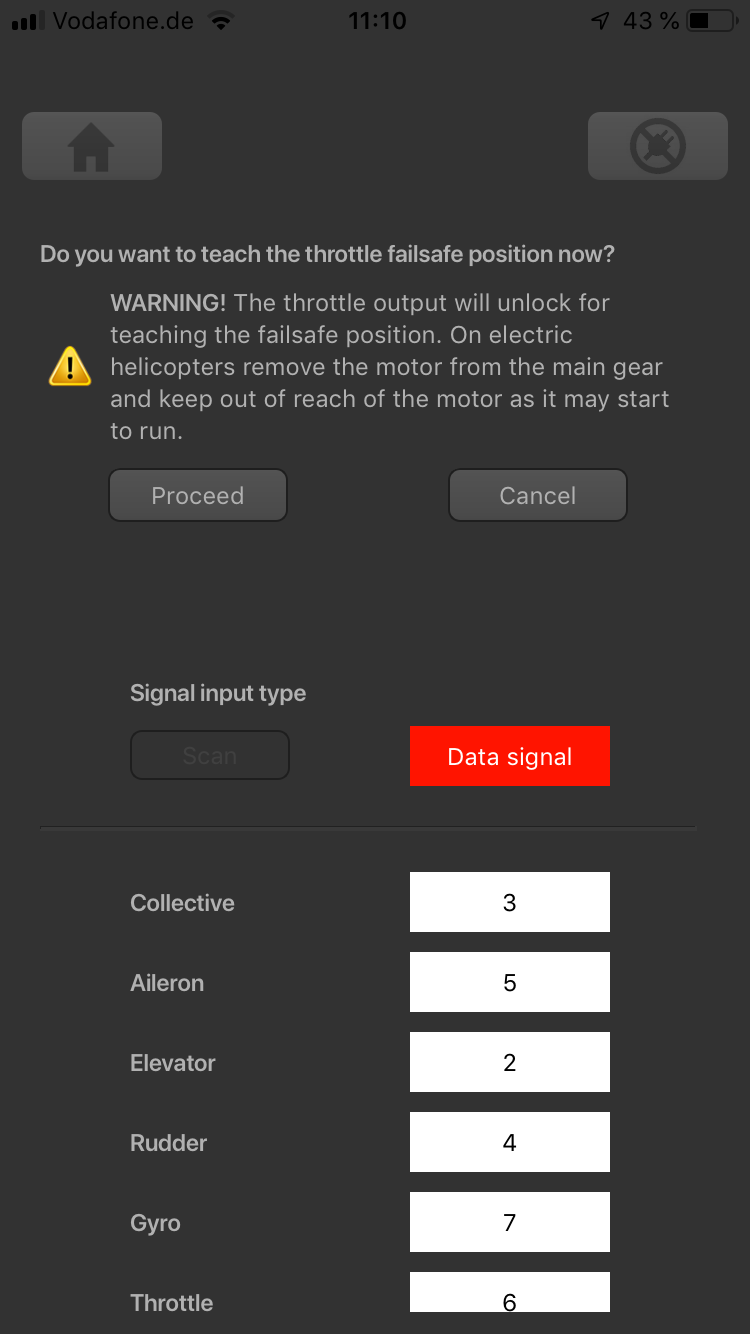 ">
">
<img class="ios" src=" ">
">
<img class="ios" src="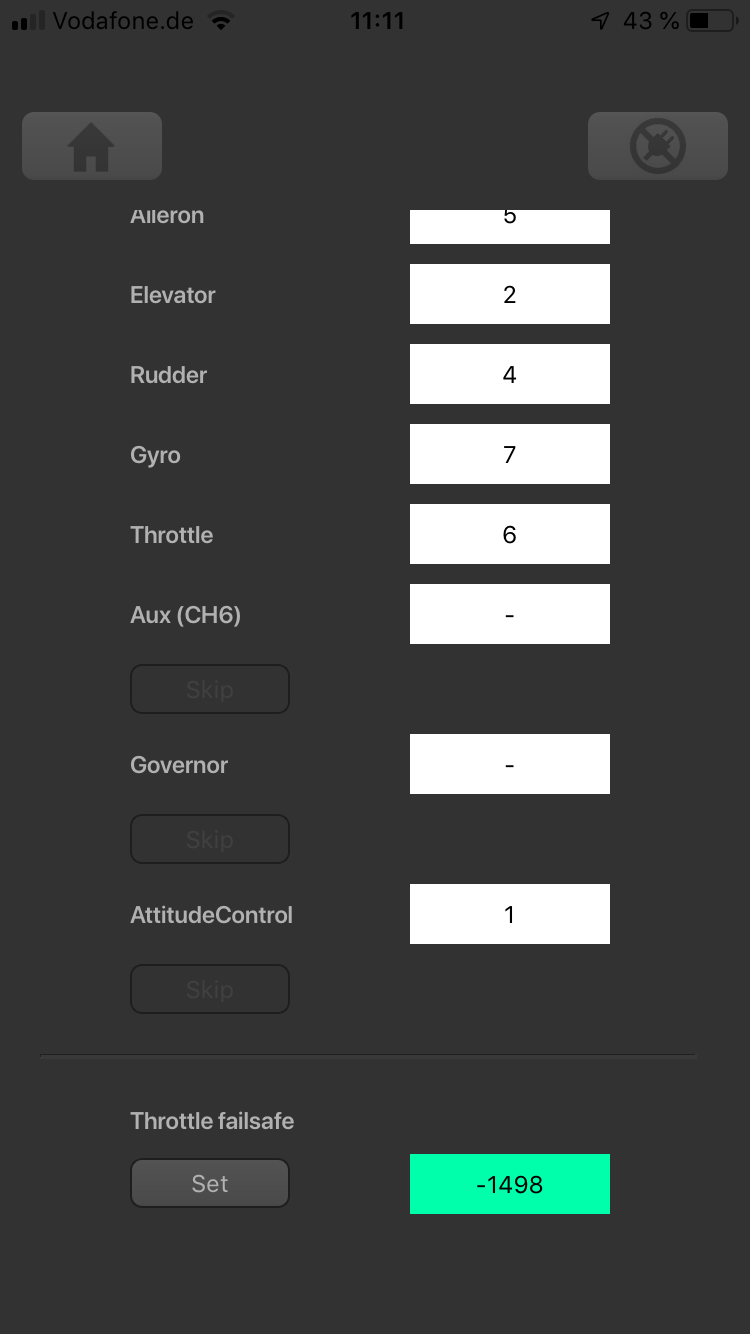 ">
">