Manuals:MBPlusFblV52:Setupmenu N/de: Difference between revisions
Shornstein (talk | contribs) Created page with "=Einstellung mit StudioX= Wähle auf der Übersichtsseite von StudioX '''Drehzahlregler'''. Bei ''Drehzahlregler Grundeinstellung'' - ''Regelmodus'' wähle entsprechend "Elekt..." |
Updating to match new version of source page |
||
| Line 3: | Line 3: | ||
<br /> | <br /> | ||
= | =Adjustment on the device= | ||
At first you have to enable the governor function at SETUP MENU point N. If not already done enter SETUP MENU by pushing an holding the button from operation mode for at least 2 seconds, then release when the Menu LED A lights solid (!). Then repeatedly press the button until the Menu LED N lights up. Here at SETUP MENU point N you can toggle between three different options by tapping the rudder stick. The Status LED indicates which option is currently active:<br /> | |||
<br /> | <br /> | ||
{|cellpadding="4" cellspacing="0" border="1" | {|cellpadding="4" cellspacing="0" border="1" | ||
!style="width:100px; text-align:center"|Status-LED !! | !style="width:100px; text-align:center"|Status-LED !! Governor mode | ||
|- | |- | ||
|style="color:white; text-align:center; background-color:black"{{!}}''' | |style="color:white; text-align:center; background-color:black"{{!}}'''off''' | ||
|style="width:800px;" | ''' | |style="width:800px;" | '''no governor''' - the RPM Governor is not used. All control commands on the throttle channel will be passed to [THR] output directly. | ||
|- | |- | ||
|style="color:white; text-align:center; background-color:#FF3300"{{!}}''' | |style="color:white; text-align:center; background-color:#FF3300"{{!}}'''red''' | ||
| ''' | | '''electric governor''' - select this option if your helicopter is powered by an electric motor and an electric speed controller is plugged into output [CH5] of MICROBEAST PLUS. The device reads the speed signal from the speed controller or a phase sensor and controls the rotor speed accordingly. Note that the speed controller itself must not be operated in a (heli specific) governor mode! The speed controller must process the incomming throttle signals and control the motor as direct and unfiltered as possible. | ||
|- | |- | ||
|style="color:white; text-align:center; background-color:#0066FF"{{!}}''' | |style="color:white; text-align:center; background-color:#0066FF"{{!}}'''blue''' | ||
|''' | |'''nitro governor''' - with this option the MICROBEAST PLUS can govern the rotor speed of a helicopter with nitro or gas engine. In this case the system controls the throttle servo which is connected to [THR] output and controls the carburetor of the engine. The motor speed will be read from a magnetic or optical sensor that captures the rotation of the crankshaft of the motor, the clutch bell or the main gear. | ||
|}<br /> | |}<br /> | ||
In order to enable the governor function choose <b style="color: red;">red</b> or <b style="color:blue;">blue</b> depending on the type of helicopter/drive system you're using. Then briefly press the button to skip to the GOVERNOR MENU (this will only appear when the governor function is used, in case the governor is disabled = Status LED off, you will directly exit SETUP MENU!).<br /> | |||
<br /> | <br /> | ||
<br /> | <br /> | ||
= | =Setup with StudioX= | ||
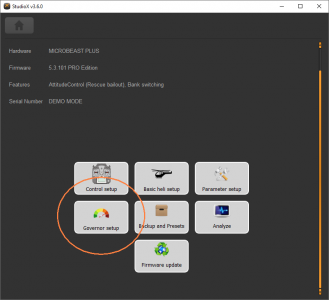
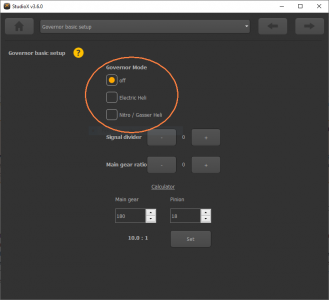
When StudioX/StudioXm has connected to your MICROBEAST PLUS, in the device overview main screen click the "Governor setup" button. Under "Governor Basic Setup" you can enable the governor function by choosing either "Electric" or "Nitro/Gas Heli depending on the type of helicopter/drive system you're using. When you choose "Governor mode off" on the other hand all control commands for the throttle channel will be passed to [CH5] output directly. In this case all the other settings of "Governor setup" menu will have no effect!<br /> | |||
<br /> | <br /> | ||
{| | |||
|- | |||
|[[File:Overview_gov.PNG|x300px]] | |||
|style="padding-left:50px;" |[[File:Govmenu_basic_setup_govtype.PNG|x300px]] | |||
|}<br /> | |||
<br /> | <br /> | ||
Revision as of 14:13, 27 April 2021
Adjustment on the device
At first you have to enable the governor function at SETUP MENU point N. If not already done enter SETUP MENU by pushing an holding the button from operation mode for at least 2 seconds, then release when the Menu LED A lights solid (!). Then repeatedly press the button until the Menu LED N lights up. Here at SETUP MENU point N you can toggle between three different options by tapping the rudder stick. The Status LED indicates which option is currently active:
| Status-LED | Governor mode |
|---|---|
| off | no governor - the RPM Governor is not used. All control commands on the throttle channel will be passed to [THR] output directly. |
| red | electric governor - select this option if your helicopter is powered by an electric motor and an electric speed controller is plugged into output [CH5] of MICROBEAST PLUS. The device reads the speed signal from the speed controller or a phase sensor and controls the rotor speed accordingly. Note that the speed controller itself must not be operated in a (heli specific) governor mode! The speed controller must process the incomming throttle signals and control the motor as direct and unfiltered as possible. |
| blue | nitro governor - with this option the MICROBEAST PLUS can govern the rotor speed of a helicopter with nitro or gas engine. In this case the system controls the throttle servo which is connected to [THR] output and controls the carburetor of the engine. The motor speed will be read from a magnetic or optical sensor that captures the rotation of the crankshaft of the motor, the clutch bell or the main gear. |
In order to enable the governor function choose red or blue depending on the type of helicopter/drive system you're using. Then briefly press the button to skip to the GOVERNOR MENU (this will only appear when the governor function is used, in case the governor is disabled = Status LED off, you will directly exit SETUP MENU!).
Setup with StudioX
When StudioX/StudioXm has connected to your MICROBEAST PLUS, in the device overview main screen click the "Governor setup" button. Under "Governor Basic Setup" you can enable the governor function by choosing either "Electric" or "Nitro/Gas Heli depending on the type of helicopter/drive system you're using. When you choose "Governor mode off" on the other hand all control commands for the throttle channel will be passed to [CH5] output directly. In this case all the other settings of "Governor setup" menu will have no effect!

|

|