Translations:StudioXm/14/en: Difference between revisions
Importing a new version from external source |
Importing a new version from external source |
||
| Line 1: | Line 1: | ||
==Windows installation== | ==Windows installation== | ||
The setup procedure is easy and works as usual. | The setup procedure is easy and works as usual. After installation of the StudioX software bundle, Windows should install the correct drivers automatically when the USB2SYS / SPMA3030 interface is plugged in the USB port for the first time. When using the RX2SIM Multi-Sim Adapter, drivers should install as soon as it is switched to USB2SYS emulation mode (push button repeatedly until LED lights yellow, see RX2SIM manual). Check the notifications of your Windows system: | ||
{|class="gallery" | |||
|[[File:Driver install.png|x50px|noframe|none]] | |||
|style="padding:10px 20px;"|[[File:Driver success.png|x50px|noframe|none]] | |||
|}<br /> | |||
<br /> | |||
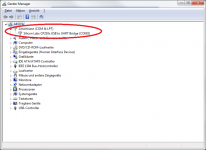
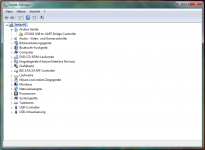
If you did not see any message popping up at all, check you Windows device manager if the interface driver has been installed correctly. To access the device manager under windows type devmgmt.msc in the Startmenu's search bar or simply enter '''Device manager'''. | |||
You must be able to find following entry:<br /> | |||
{|class="gallery" | |||
|width="180pt" style="padding:10px 20px;" align="center"|[[File:Step 4.png|x150px|noframe|none]] | |||
|width="180pt" style="padding:10px 20px;" align="center"|[[File:Device mgr failed.png|x150px|noframe|none]] | |||
|- style="font-size: x-small;" | |||
|width="180pt" style="padding:0px 20px;" align="center"| The name COM3 may be different on your PC. This entry must disappear when you disconnect the Interface from the PC and re-appear when you connect it again. | |||
|width="180pt" style="padding:0px 20px; vertical-align: top;" align="center" | If there is only an entry marked with an yellow "!" something went wrong and you have to install the driver files manually. | |||
|} | |||
<br /> | |||
In case the drivers did not install correctly please install the SiLabs CP210x VCP drivers from here: [https://studiox.beastx.com/download/win/CP210x_VCP_Windows.zip SiLabs driver package (Windows)]].<br /> | |||
<br /> | <br /> | ||
<br /> | <br /> | ||
Revision as of 12:47, 23 July 2023
Windows installation
The setup procedure is easy and works as usual. After installation of the StudioX software bundle, Windows should install the correct drivers automatically when the USB2SYS / SPMA3030 interface is plugged in the USB port for the first time. When using the RX2SIM Multi-Sim Adapter, drivers should install as soon as it is switched to USB2SYS emulation mode (push button repeatedly until LED lights yellow, see RX2SIM manual). Check the notifications of your Windows system:
 |
 |
If you did not see any message popping up at all, check you Windows device manager if the interface driver has been installed correctly. To access the device manager under windows type devmgmt.msc in the Startmenu's search bar or simply enter Device manager.
You must be able to find following entry:
In case the drivers did not install correctly please install the SiLabs CP210x VCP drivers from here: SiLabs driver package (Windows)].

