Manuals:MB Plus:Receiver Installation/en: Difference between revisions
Importing a new version from external source |
Importing a new version from external source |
||
| Line 15: | Line 15: | ||
Image:Futaba_RX.png | Image:Futaba_RX.png | ||
</gallery> | </gallery> | ||
The designation Spektrum®/Futaba® is only exemplary. You can use any radio system with at least 6 output channels to connect to MICROBEAST PLUS. For finding out how to connect the wires to MICROBEAST PLUS have a look at your radio's servo monitor and refer to the radio's instruction manual.< | <p> | ||
< | The designation Spektrum®/Futaba® is only exemplary. You can use any radio system with at least 6 output channels to connect to MICROBEAST PLUS. For finding out how to connect the wires to MICROBEAST PLUS have a look at your radio's servo monitor and refer to the radio's instruction manual.</p> | ||
{{QUOTE|[[Image:Warning.png|18px|sub]] Ensure a tight fit of the connectors. The pin board of MICROBEAST PLUS is designed so that the plugs firmly clamp each other when they are fully inserted. Anyhow, especially when using a single-line receiver, it is possible that connectors are plugged in with no adjacent neighbors. Such plugs should additionally be secured against loosening.}}< | <p> </p> | ||
<p> | |||
{{QUOTE|[[Image:Warning.png|18px|sub]] Ensure a tight fit of the connectors. The pin board of MICROBEAST PLUS is designed so that the plugs firmly clamp each other when they are fully inserted. Anyhow, especially when using a single-line receiver, it is possible that connectors are plugged in with no adjacent neighbors. Such plugs should additionally be secured against loosening.}} | |||
</p> | |||
<br /> | <br /> | ||
Revision as of 08:06, 2 July 2015
To control the MICROBEAST PLUS you have the opportunity to use different receiver types. Basically it is distinguished between (conventional) „Standard“ receivers and „Single-Line“ (or „sum signal“) receivers.
Standard receivers
A standard receiver is a receiver that is connected to MICROBEAST PLUS by using the single servo outputs of the receiver and connect them to the five control channels of MICROBEAST PLUS. The channel which determines the controlled function simply is selected by inserting each plug to the correct output at the receiver.


The designation Spektrum®/Futaba® is only exemplary. You can use any radio system with at least 6 output channels to connect to MICROBEAST PLUS. For finding out how to connect the wires to MICROBEAST PLUS have a look at your radio's servo monitor and refer to the radio's instruction manual.
Ensure a tight fit of the connectors. The pin board of MICROBEAST PLUS is designed so that the plugs firmly clamp each other when they are fully inserted. Anyhow, especially when using a single-line receiver, it is possible that connectors are plugged in with no adjacent neighbors. Such plugs should additionally be secured against loosening.
Single-Line receivers
With a single-line receiver all channels (control functions) are transmitted by one single connection line to MICROBEAST PLUS. This is done by packing all channel output data to a digital data paket or by chaining the servo signals to one output port. Because of this, it is not possible here to assign functions by inserting the appropriate plugs in the receiver. Instead you have to assign the function ordering by software in the MICROBEAST PLUS receiver setup menu, so that the unit "knows" what control function each incoming channel is used for.
There are single-line receivers available that supply additional single channel connectors/servo outputs similar to a standard receiver. In combination with MICROBEAST PLUS you only have to treat such receivers as single-line receivers if you really use the single-line function. If you connect the receiver by using the standard 5-plug layout, such receiver has to be considered as "standard" receiver in the following and as shown above.
In general the single-line connection wire is plugged into the [DI1] input of MICROBEAST PLUS. When using the signal of a single Spektrum® remote satellite you must connect the optional available Spektrum® satellite adapter (Order Nr. BXA76009) in between, in order to supply the remote satellite with the correct voltage level (figure 3).
The throttle servo or ESC is connected to the [CH5] output. When using a speed controller with BEC, from here the power will be distributed to receiver and servos. Alternatively or additionally you can connect a power supply/second BEC wire/buffering battery to the [SYS] port. Note that all plus and minus connectors are bridged on the MICROBEAST PLUS. Only at the triple input/output [AUX|PIT|RUD] you musn't connect any power source as this is not part of the power rail! When using a big heli with standard size servos it may be insufficient to only provide power at the [SYS] port! If there are no other ports left to (additionally) feed in power, we highly recommend using the MICROBEAST PLUS HD with separate high power input.
Using a single-line receiver with additional servo output ports you can choose between connecting throttle servo/ESC and additional devices to MICROBEAST PLUS (figure 1) or directly to the receiver (figure 2). But note that when connecting the power supply at the receiver, MICROBEAST PLUS and the servos will only be supplied over the small single-line connection. Especially on big helis with standard size servos this might not be sufficient! Here it is mandatory to connect some supply lines in parallel to other free ports, such as [SYS] or [CH5] or better connect the power supply (i.e. ESC with BEC supply) directly to the MICROBEAST PLUS as shown in figure 1.
-
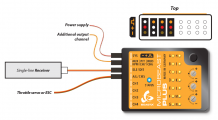 Figure 1 - Typical wiring layout for single-line receivers
 -
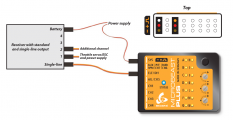 Figure 2 - Alternative wiring layout for single-line receiver with additional servo output channels
 -
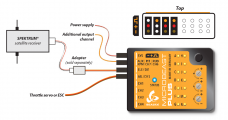 Figure 3 - Spektrum® remote satellite connection with power adapter


Receiver binding
Before using your receiver with MICROBEAST PLUS make sure that the receiver is bound to the transmitter and that it is sending output data on the servo outputs and/or single-line port. Please refer to the manual of your radio system to find out how binding procedure is performed with your specific system. Also check if there is the need to perform special settings to enable the single-line data output of the receiver in case you intend to use this output port in combination with MICROBEAST PLUS.
Only in the case of using a single Spektrum® satellite receiver that is directly connected to MICROBEAST PLUS, this is bound by the aid of MICROBEAST PLUS as there is no other option to enable binding procedure at the receiver. Even more, here it is very important to bind the receiver first before programming MICROBEAST PLUS and this step must be performed, even if the satellite was already in use elsewhere (e. g. in connection with a “Standard” Spektrum® receiver) and was already bound to the transmitter earlier.
Simultaneously with the binding process, the type of satellite receiver has to be set, i.e. whether it is a DSMX or DSM2 satellite (The actual selected signal protocol in the transmitter is not relevant!). It is very important to choose the correct type of satellite receiver here, since an improper setting may seem to work but can lead to radio interference or total loss of the link in the subsequent operation!
Insert a Spektrum® “Bind Plug” at the [SYS] port of MICROBEAST PLUS. In case the power is supplied exclusively at the [SYS] connection, to bind a Spektrum® satellite receiver the power supply must be provided temporarily through any of the other ports [CH1] - [CH5]. To select a DSM2 satellite and to enter bind mode, simply switch on the power supply now. The LED on the receiver and LED N on MICROBEAST PLUS will start to flash. You can bind the transmitter as usual (for more information refer to the instructions of your radio control system). To select and bind a DSMX satellite, hold down the button on MICROBEAST PLUS while switching on the power supply. Now the receiver‘s LED and LED H (!) on the MICROBEAST PLUS will flash and you can release the button and bind the receiver with your transmitter. After successful binding procedure the receiver‘s LED will stay solid. LED H respectively N flash alternately to all other LEDs. Now switch off the power supply and remove the bind plug. Continue with receiver type setup in the next step.

Note:
- Decisive for the selection alone is, which type of satellite receiver is plugged in! It is irrelevant which transmission method between the receiver and transmitter is actually used. Check carefully what type of receiver you have and what type you setup. An incorrect setting is not obvious but will lead to malfunction or failure of the radio link later in use.
- It makes no difference if you pull off the “Bind Plug” during the binding process or leave it connected as you would expect from some “standard” Spektrum® receivers!