Difference between revisions of "Manuals:BXFbl:Setupmenu B/de"
Shornstein (talk | contribs) (Created page with "{{TOC_BXFbl/de|Manuals:BXFbl:Setupmenu_A/de|Manuals:BXFbl:Setupmenu_C/de|SETUPMENU|}} __TOC__ <br />") |
Shornstein (talk | contribs) (Created page with "Punkt '''B''' vom SETUPMENÜ dient zur Auswahl der Ansteuerfrequenz (Pulsrate) der Taumelscheibenservos. Um die Leistung des MICROBEAST ULTRA zu optimieren, gilt die Regel: je...") |
||
| Line 3: | Line 3: | ||
<br /> | <br /> | ||
| − | + | Punkt '''B''' vom SETUPMENÜ dient zur Auswahl der Ansteuerfrequenz (Pulsrate) der Taumelscheibenservos. Um die Leistung des MICROBEAST ULTRA zu optimieren, gilt die Regel: je höher, desto besser! Mit einer hohen Frequenz berechnet das System Korrekturbewegungen häufiger und sendet infolgedessen öfter neue Befehle an die Servos. Dies ermöglicht eine wesentlich höhere Präzision bei der Steuerung und Stabilisierung. Das bedeutet aber auch, dass die Servos innerhalb eines bestimmten Zeitraums mehr Positionsänderungen durchführen müssen. Wenn Dein Servo nicht für diese Art von Anwendung ausgelegt ist, kann dies zu einem hohen Stromverbrauch der Servos führen und dazu, dass die Servos sehr heiß werden. Wenn dies passiert, reduziere die Frequenz sofort, um zu verhindern, dass Deine Servos beschädigt werden. Gehe nur so hoch, wie vom Servohersteller empfohlen, oder sogar niedriger, wenn der Servo nicht in der Lage ist, solch hohe Frequenzen unter Last zu bewältigen.<br /> | |
<br /> | <br /> | ||
| − | ''' | + | '''Hinweise:''' |
| − | * | + | * Wenn Du ein Servo verwendest, das eine höhere Frequenz erlaubt, als am MICROBEAST ULTRA einstellbar ist, oder das eine maximale Frequenz zulässt, die nicht ausgewählt werden kann, wähle bitte die nächst kleinere Frequenz oder stelle die genaue Frequenz über die StudioX-App ein. Die Verwendung einer niedrigeren Frequenz ist immer möglich. Nur zu hohe Frequenzen können das Servo beschädigen und/oder dazu führen, dass das Servo nicht ordnungsgemäß funktioniert. [[The_BEASTX_servo_list/de|Hier]] findest du eine Liste mit Parametern für die gängigsten Servos. Bitte beachte, dass wir nicht alle Servotypen auflisten können. Wir können auch nicht die Genauigkeit dieser Daten garantieren. Frage den Hersteller der Servos oder Deinen Servohändler nach detaillierten Informationen. |
| − | + | * Bei hohen Frequenzen laufen einige Servos ruckelig, insbesondere extrem schnelle und stellgenaue Servos mit Coreless oder Brushless Antrieb. Dies liegt an der hohen Aktualisierungsfrequenz, die das Servo erhält. Dies ist nicht kritisch und wirkt sich nicht auf die Flugleistung aus.<br /> | |
| − | * | ||
<br /> | <br /> | ||
| − | {{QUOTE|[[Image:Warning.png|18px|sub]] ''' | + | {{QUOTE|[[Image:Warning.png|18px|sub]] '''Wenn du nicht weißt, welche maximale Ansteuerfrequenz von deinen Servos toleriert wird, wähle nicht mehr als 50Hz aus.''' Eine zu hohe Ansteuerfrequenz kann zum Ausfall der Servos führen!<br /> |
}}<br /> | }}<br /> | ||
<br /> | <br /> | ||
Revision as of 13:22, 25 April 2024
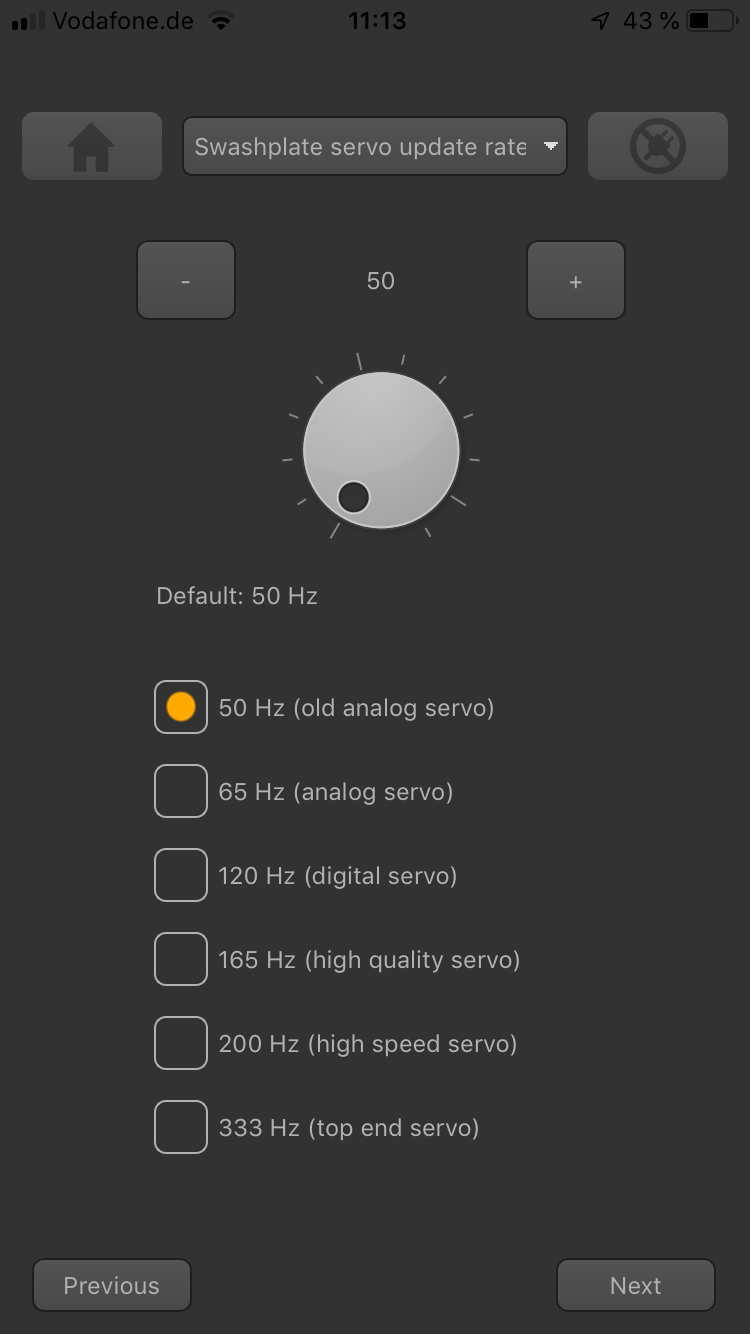
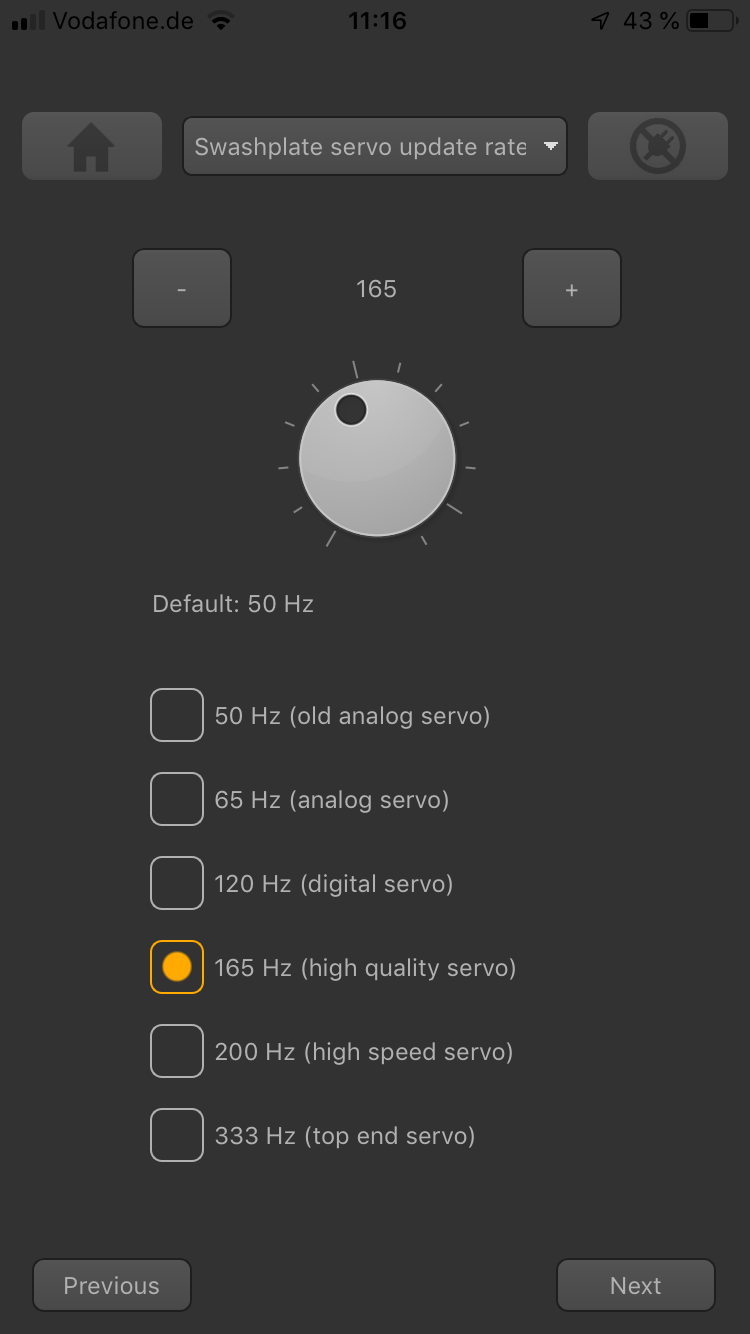
Punkt B vom SETUPMENÜ dient zur Auswahl der Ansteuerfrequenz (Pulsrate) der Taumelscheibenservos. Um die Leistung des MICROBEAST ULTRA zu optimieren, gilt die Regel: je höher, desto besser! Mit einer hohen Frequenz berechnet das System Korrekturbewegungen häufiger und sendet infolgedessen öfter neue Befehle an die Servos. Dies ermöglicht eine wesentlich höhere Präzision bei der Steuerung und Stabilisierung. Das bedeutet aber auch, dass die Servos innerhalb eines bestimmten Zeitraums mehr Positionsänderungen durchführen müssen. Wenn Dein Servo nicht für diese Art von Anwendung ausgelegt ist, kann dies zu einem hohen Stromverbrauch der Servos führen und dazu, dass die Servos sehr heiß werden. Wenn dies passiert, reduziere die Frequenz sofort, um zu verhindern, dass Deine Servos beschädigt werden. Gehe nur so hoch, wie vom Servohersteller empfohlen, oder sogar niedriger, wenn der Servo nicht in der Lage ist, solch hohe Frequenzen unter Last zu bewältigen.
Hinweise:
- Wenn Du ein Servo verwendest, das eine höhere Frequenz erlaubt, als am MICROBEAST ULTRA einstellbar ist, oder das eine maximale Frequenz zulässt, die nicht ausgewählt werden kann, wähle bitte die nächst kleinere Frequenz oder stelle die genaue Frequenz über die StudioX-App ein. Die Verwendung einer niedrigeren Frequenz ist immer möglich. Nur zu hohe Frequenzen können das Servo beschädigen und/oder dazu führen, dass das Servo nicht ordnungsgemäß funktioniert. Hier findest du eine Liste mit Parametern für die gängigsten Servos. Bitte beachte, dass wir nicht alle Servotypen auflisten können. Wir können auch nicht die Genauigkeit dieser Daten garantieren. Frage den Hersteller der Servos oder Deinen Servohändler nach detaillierten Informationen.
- Bei hohen Frequenzen laufen einige Servos ruckelig, insbesondere extrem schnelle und stellgenaue Servos mit Coreless oder Brushless Antrieb. Dies liegt an der hohen Aktualisierungsfrequenz, die das Servo erhält. Dies ist nicht kritisch und wirkt sich nicht auf die Flugleistung aus.
Wenn du nicht weißt, welche maximale Ansteuerfrequenz von deinen Servos toleriert wird, wähle nicht mehr als 50Hz aus. Eine zu hohe Ansteuerfrequenz kann zum Ausfall der Servos führen!
Adjustment on the device
To select the desired servo frequency move the rudder stick repeatedly in one direction until the Status-LED lights in the correct color at SETUP MENU point B:
| Status-LED | Swashplate servo frequency |
|---|---|
| purple | 50 Hz |
| red flashing | 65 Hz |
| red | 120 Hz |
| blue flashing | 165 Hz |
| blue | 200 Hz |
Note: When you set a different frequency using the StudioX App the Status LED will be off. You can switch back to a preset setting by tapping the rudder stick as described, but this will remove your custom setting!
Setup with StudioX app
Choose a preset frequency by clicking one of the provided buttons for menu point B (Swashplate frequency) or set a custom frequency by directly changing the value with the dial or buttons. Using a custom frequency you can go up to 300Hz frame rate for the swash plate servos. This is plenty enough even for the fastest servos on the market.
Servo connections
After setting the correct update frequency plug in the swashplate servos, but do not install the servo horns yet as the servos could bind and get damaged on first power up!
When you route the wire leads in your model make sure that there is no tension passed to the flybarless system. Make sure that the housing is able to move freely, so no vibrations get passed onto the unit by the wire leads. It is not recommended to bundle or tie down the leads close to the system. On the other hand the wires must be attached in a way that the wires won't move the flybarless system during the flight caused by g-force. In particular, do not use any shrink tubing or fabric hose to bundle or encase the wiring in close proximity to the point at which the cables are plugged into the BEASTX system. This makes the cables stiff and inflexible and can cause vibrations!
MICROBEAST PLUS / ULTRA
 |
 |
- The elevator servo is always plugged into [CH1] port.
- With electronic swashplate mixing the two aileron servos have to be connected to [CH2] (=left) and [CH3] (=right).
- With a mechanical mixed head (H1-mixing) the aileron servo connects to [CH2] and the collective pitch servo to [CH3].
- When using a scale helicopter with 90 degrees eCCPM, you can connect a second elevator servo to [CH6] output on the MICROBEAST ULTRA. Note that CH6 only is a signal output, so you must power the servo from elsewhere, i.e. by getting power from the [SYS]-port using a Y-adapter (for + and - only!). Anyhow, with large scale helicopters we recommend to use a separate power distribution unit to which you connect the servos. This will be the better option in regards to robust and fail safe power distribution.
NANOBEAST
- The elevator servo is always plugged into [CH3] port.
- With electronic swashplate mixing the two aileron servos have to be connected to [CH4] (=left) and [CH5] (=right).
- With a mechanical mixed head (H1-mixing) the aileron servo connects to [CH4] and the collective pitch servo to [CH5].