Grundeinstellung
Vor dem ersten Flug muss das BEASTX-System an die Mechanik des Helis und seine Komponenten angepasst werden. Dieser grundlegende Einrichtungsvorgang wird im SETUPMENÜ durchgeführt. Das geht nur mit Hilfe der Fernsteuerung und dem Einstellmenü am Gerät. Die Parameter werden über die LEDs am Gerät visualisiert. Falls Du eine Spektrum Fernsteuerung mit SRXL2 Telemetrie oder eine JETI Steuerung mit EXBUS Telemetrie verwendest, kanns Du zusätzlich die Einstellschritte am Display der Fernsteuerung anzeigen lassen.
Alternativ kannst Du die StudioX App auf Deinem Computer oder Smartphone in Kombination mit der optional erhältlichen USB2SYS- oder BLE2SYS-Schnittstelle nutzen. Hier bekommst Du direkte Anweisungen zur Einstellung in der App und erhältst weitergehende Einstellmöglichkeiten. Es ist aber kein Muss, die StudioX-App zu verwenden. Das System ist so konzipiert, dass alle grundlegenden Einrichtungsschritte über das Menü direkt am Gerät durchgeführt werden können.
In den folgenden Abschnitten beschreiben wir die nötigen Einstellungen im Detail. Vorher geben wir einen Überblick zu den Geräten und den unterschiedlichen Einstellmethoden.
Initialisierungssequenz
Wenn noch nicht geschehen, schalten jetzt die Steuerung und das System ein und warte Sie, bis die Initialisierungssequenz abgeschlossen ist:
Zunächst werden die Steuerfunktionen kalibriert. Bewege während dieser Zeit nicht die Steuerknüppel der Fernsteuerung, da das System die Mittelpositionen der Knüppel einlernt. Beim MICROBEAST PLUS / ULTRA wandern hierbei die Menü-LEDs H bis N auf und ab. Beim NANOBEAST blinkt während dieser Zeit die Status-LED langsam rot.
Im zweiten Schritt prüft das System, ob die Sensoren korrekt funktionieren und lernt die Ruhepositionen der Sensoren. Bewege den Helikopter während dieser Zeit nicht. Beim MICROBEAST PLUS/ULTRA wandern die Menü-LEDs A bis G auf und ab. Beim NANOBEAST leuchtet die Status-LED während dieser Zeit dauerhaft rot.
Wenn die Initialisierung abgeschlossen ist, wechselt die Status LED zu Blau oder Lila und zeigt damit den aktuellen Kreisel Modus an. Beim MICROBEAST PLUS / ULTRA leuchtet eine der Menü LEDs A bis N kurz auf und zeigt die aktuelle Höhe der Kreiselverstärkung oder die aktuelle Bank an. Beim NANOBEAST blinkt die Status LED in blauer oder violetter Farbe. Die Anzahl der Blinksignale zeigt die Höhe der Kreiselverstärkung an.
Wenn die Initialisierungssequenz nicht durchlaufen werden kann, weil die LEDs A-G oder die LEDs H-N nicht aufhören zu blinken (oder beim NANOBEAST die Status LED dauerhaft rot blinkt), lies bitte die FAQ. Beachte, dass das Drücken der Taste während der Initialisierung bei Verwendung von MICROBEAST PLUS/ULTRA keine wesentliche Auswirkung hat. Während der Initialisierungssequenz kann kein Menü aufgerufen wernde. Wenn die Initialisierung der Steuerkanäle nicht beendet wird, prüfe nochmal die Einstellungen an Empfänger und Fernsteuerung und wiederhole die Einstellung im EMPFÄNGERMENÜ.
Einstellung am Gerät
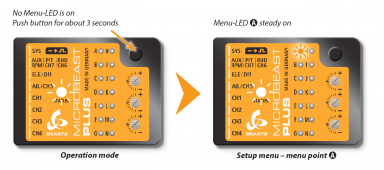
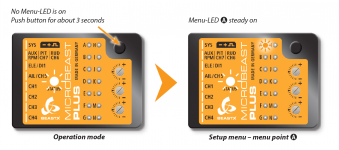
Wenn das System betriebsbereit ist, drücke und halte den Knopf für mindestens 3 Sekunden. Zuerst beginnt die Menü LED neben Punkt A zu blinken und leuchtet dann nach einer Weile dauerhaft. Jetzt, und nur jetzt, lass den Knopf wieder los.
Gehen Schritt für Schritt durch die verschiedenen Menüpunkte von A bis N und führe die Grundeinstellung wie auf den nächsten Seiten beschrieben durch. Durch kurzes Drücken der Taste auf dem Gerät kannst Du bei jedem Schritt die Einstellung speichern und zum nächsten Schritt springen.
Um das SETUPMENÜ zu verlassen, musst Du alle Menüpunkte durchlaufen! Nach Betätigung der Taste im letzten Menüpunkt wird das SETUPMENÜ verlassen und das System ist wieder im Betriebsmodus.
If you need to change some specific setting later onwards you can enter the SETUP MENU again as described above and skip menu points by only pressing the button without changing anything at these points. So you can navigate to the desired menu point by simply pressing the button several times until you reach this point. Then after you have finished the adjustment, again press the button repeatedly to proceed to the end of the menu and to get back into operation mode.
In SETUP MENU we use the sticks of the radio to change settings and interact with the menu. Most often the rudder stick is used to change a value or toggle between different options, i. e. choose the mounting direction, servo refresh rate or cycle between servos when adjusting center position or servo direction. Changing an opion is usually indicated by different Status LED colors. The aileron stick (roll) is used to adjust values or positions by pushing and holding the stick, i.e. to adjust servo trim or swashplate pitch. You don't have to remember this yet, we will mention which sticks needs to be moved in the following instructions!
Just for your info at this step: There is another menu called PARAMETER MENU. This is entered by just briefly pressing the button from operation mode. Here the Menu LEDs are flashing quickly. If you see this condition you've entered the wrong menu. Skip through the menu by repeatedly pressing the button until back in operation mode and then retry to enter SETUP MENU, this time holding the button longer so that Menu LED A lights solid!
Never fly when the system is in SETUP MENU or any other menu! In this condition the gyro control and the stick controls are disabled. When using MICROBEAST PLUS / ULTRA in operation mode no MENU LED is glowing! On NANOBEAST disconnect the button panel to exit the menu automatically.
When using a JETI radio with EXBUS receiver, it is possible to access the menu of your device from the radio by using the JETIBOX application on the radio. Use the menu buttons on the radio to navigate through the BEASTX menu. Adjustments in the menus are made using the sticks on the radio, similar to the button menu as shown above.
Using a Spektrum radio with SRXL2 telemetry you can display the menu settings by scrolling to the telemetry screen at the very end on the radio. As soon as you open the menu on your BEASTX device by pushing the button as descibed above, the display will appear on the radio. Accordingly the screen will disappear when you you exit the menu. Please note that you can't navigate through the menu from the radio. You will have to use the button of your BEASTX device. Here the radio only is used to visualize the menu settings.
StudioX app
When StudioX is started and your BEASTX system is connected to StudioX, choose Basic heli setup from the device overview page to enter the setup wizard. This will lead you through the basic setup procedure of the SETUP MENU. The options you see here are basically similar to the LED menu of the device, but there might be little differences because of the different nature of the interactive setup. The adjustment is made using the buttons and dials in the app, sometimes interaction with your radio transmitter is necessary. Click Next at the bottom of each setup step to skip to the following Menu Point. From the dropdown list at the top also you can directly access specific setup items if necessary, but for the first time setup it is recommended to proceed step-by-step beginning at Device Orientation and ending with Cyclic directions. Adjustment procedure is described at each step briefly. If necessary refer to this manual if you need further assistance. When the setup is finished click the Home button in the top left corner to get back to the overview screen or disconnect the device and deactivate the BLE2SYS module by clicking the Disconnect button in the top right corner when adjustment is finished completely.
You won't be able to access some menu options until the system did finish initialization sequence. So make sure the radio system is powered up and bound correctly and proceed with RECEIVER MENU adjustment first, if necessary!
Always disconnect your BLE2SYS from the app when you attempt to fly, in order to deactivate the module. Or disconnect it physically from your MICROBEAST ULTRA. When the module is active this can cause interference with your radio system as the BLE2SYS is also sending on the 2.4GHz band!
Also always make sure the system is in operation mode! When it is still in one of the adjustment menus the gyro control and the stick controls may be disabled and you will not be able to fully control your helicopter! By physically disconnecting your USB2SYS/BLE2SYS the system will automatically exit any open menu step and will get into operation mode.


