Manuals:MBPlusFblV52:Radio Setup/de: Difference between revisions
Shornstein (talk | contribs) Created page with "{{TOC_MBPlusV5|Manuals:MBPlusFblV52:Radio_System/de|Manuals:MBPlusFblV52:ReceiverType/de||2}} __TOC__ <br />" |
Shornstein (talk | contribs) No edit summary |
||
| (3 intermediate revisions by the same user not shown) | |||
| Line 1: | Line 1: | ||
__NOTOC__ | __NOTOC__ | ||
{{TOC_MBPlusV5|Manuals:MBPlusFblV52:Radio_System/de|Manuals:MBPlusFblV52:ReceiverType/de||2}} | {{TOC_MBPlusV5/de|Manuals:MBPlusFblV52:Radio_System/de|Manuals:MBPlusFblV52:ReceiverType/de||2}} | ||
__TOC__ | __TOC__ | ||
<br /> | <br /> | ||
= | =Einrichten der Fernsteuerung= | ||
Es kann nahezu jede Fernsteueranlage mit mindestens 6 Steuerkanälen verwendet werden. Grundsätzlich erfolgt die Bedienung des MICROBEAST PLUS über 5 Steuerkanäle (der 6. Kanal steuert den Motorsteller oder das Gasservo). Für die Verwendung der optionalen Zusatzfunktionen wie AttitudeControl oder Drehzahlregler für Verbrennerhelis können zusätzliche Steuerkanäle von Vorteil sein. Ausserdem können im Betrieb mit Summensignalempfängern weitere Servoausgänge z.B. für Beleuchtung oder Einziehfahrwerk angesteuert werden, sofern entsprechende Kanäle zur Verfügung stehen.<br /> | |||
{{NL}} | {{NL}} | ||
* | * Erstelle im Fernsteuersender einen neuen Modellspeicher für das Modell. | ||
<p> | <p> | ||
{|class="gallery" style="font-style: italic" | {|class="gallery" style="font-style: italic" | ||
| Line 16: | Line 16: | ||
|}<br /> | |}<br /> | ||
</p> | </p> | ||
* | * Verwende auf keinen Fall die elektronische Taumelscheibenmischung des Fernsteuersenders! Diese Aufgabe wird das MICROBEAST PLUS übernehmen. Wähle im Fernsteuersender '''immer''' eine mechanische Taumelscheibenmischung aus (oftmals mit „H1“, „1 Servo“ oder „Normal“ bezeichnet) bzw. deaktiviere jegliche Art von Mischung („No Mix“). | ||
<p> | <p> | ||
{|class="gallery" style="font-style: italic" | {|class="gallery" style="font-style: italic" | ||
| Line 23: | Line 23: | ||
|}<br /> | |}<br /> | ||
</p> | </p> | ||
* | * Stelle alle Trimmungen auf neutral und die Servowege auf 100%. Vergewissere Dich, dass keinerlei Mischfunktionen wie beispielsweise ein Drehmomentausgleich auf Heck aktiv sind und die Einstellungen und Trimmungen in allen Flugphasen gleich sind. Betrachte den Servomonitor des Fernsteuersenders: Jede Steuerknüppelfunktion darf nur genau einen Kanal betätigen (abgesehen vom Pitchknüppel, der üblicherweise auch den Motor mit ansteuert). Bei Knüppelmittenstellung müssen (in allen Flugphasen) die Kanäle in Mittenposition stehen. Denke daran, dass die Servos nicht direkt angesteuert werden, sondern nur per Steuerbefehl dem Gerät mitgeteilt wird, wie schnell der Heli um eine bestimmte Achse drehen soll. Jeder Steuerbefehl wird dabei über genau einen Kanal des Fernsteuersenders betätigt. | ||
<p> | <p> | ||
{|class="gallery" style="font-style: italic" | {|class="gallery" style="font-style: italic" | ||
| Line 30: | Line 30: | ||
|}<br /> | |}<br /> | ||
</p> | </p> | ||
* | * Ändere die Pitchkurven im Sender (noch) nicht, sondern lass sie wie Standardmäßig vorgegeben von -100% bis +100% (oder je nach Senderfabrikat von 0 bis 100%) verlaufen. | ||
<p> | <p> | ||
{|class="gallery" style="font-style: italic" | {|class="gallery" style="font-style: italic" | ||
| Line 39: | Line 39: | ||
|}<br /> | |}<br /> | ||
</p> | </p> | ||
* | * Andere Einstellungen wie z.B. für den Motor oder eventuelle Zusatzkanäle (Beleuchtung, Einziehfahrferwerk, ...) sind wie gewohnt an der Fernsteuerung vorzunehmen. Diese sind im Normalfall von der Einstellung des MICROBEAST PLUS unabhängig. Falls die interne Drehzahlreglerfunktion oder die AttitudeControl verwendet werden soll, so wird auf die Einstellung dieser Zusatzfunktionen an entsprechender Stelle dieser Anleitung eingegangen. | ||
<p> | <p> | ||
{|class="gallery" style="font-style: italic" | {|class="gallery" style="font-style: italic" | ||
| Line 46: | Line 46: | ||
|}<br /> | |}<br /> | ||
</p> | </p> | ||
{{QUOTE|[[File:Warning.png|18px|sub]] ''' | {{QUOTE|[[File:Warning.png|18px|sub]] '''Achte unbedingt darauf, dass bei Elektromodellen der Motor während der Einstellarbeiten nicht anlaufen kann!''' Stecke den Motor am besten vom Regler ab, falls der Antriebsakku zur Stromversorgung verwendet wird.}}<br /> | ||
<br /> | <br /> | ||
<br /> | <br /> | ||
=Spektrum® DSM2/DSMX | =Spektrum® DSM2/DSMX Satellitenempfänger binden= | ||
<p> | <p> | ||
Vor Verwendung des Empfängers mit MICROBEAST PLUS muss der Empfänger mit der Fernsteueranlage gebunden werden. Stelle sicher, dass der Empfänger auf Steuersignale des Senders reagiert und aktiviere bei Verwendung eines SingleLine-Empfängers die Ausgabe der Steuerdaten über den SingleLine-Anschluss, falls notwendig. (Wie diese Arbeiten durchzuführen sind ist der Anleitung der Fernsteueranlage oder des Empfängers zu entnehmen.)</p> | |||
<p> | <p> | ||
Eine Besonderheit besteht, falls ein einzelner Spektrum® DSM2/DSMX Satellit verwendet wird, der direkt mit MICROBEAST PLUS angesteckt ist. Hier muss der Bindevorgang durch das MICROBEAST PLUS angestoßen werden, da der Satellit selbst keine Möglichkeit bietet, den Bindevorgang zu starten. '''ACHTUNG: Der Satellit muss für die Verwendung mit MICROBEAST PLUS unbedingt gebunden werden, selbst wenn der Satellit schon in Verwendung war, z.B. in Verbindung mit einem Spektrum® Hauptempfänger!'''</p> | |||
<p> </p> | <p> </p> | ||
{{WARNING_QUOTE|''' | {{WARNING_QUOTE|'''Stecke bei einem Elektromodell den Motor vom Motorsteller ab oder entferne das Ritzel vom Motor, um zu verhindern, dass der Motor unbeabsichtigt anläuft und den Rotor antreibt.'''}} | ||
<p> </p> | <p> </p> | ||
<p> | <p> | ||
'''Gleichzeitig mit dem Bindevorgang wird die Art des Satellitenempfängers bestimmt, also ob es sich um einen DSMX oder einen DSM2 Satelliten handelt. Es ist sehr wichtig, hier den korrekten Satelliten-Typ zu wählen, da eine falsche Einstellung zu funktionieren scheint, im späteren Betrieb aber zu Funkstörungen oder kompletten Verlust der Verbindung führen kann! NICHT entscheidend ist dabei, welches Übertragungsverfahren tatsächlich im Fernsteuersender ausgewählt ist bzw. verwendet wird!'''</p> | |||
<p></p> | |||
<p> | <p> | ||
Um bei einem Spektrum® Einzelsatellit den Bindevorgang auszulösen, stecke den Bindestecker (Bind-Plug) an den SYS Anschluss. Wenn es sich um einen DSM2 Satellit handelt, drücke und halte den Taster bevor und während Du die Stromversorgung einschaltest. Am MICROBEAST PLUS blinkt die Menü LED N zusammen mit der LED am Satellit. Zum Binden eines DSMX Satelliten schalte nur die Stromversorgung ein, ohne den Taster zu drücken. In diesem Fall blinkt Menü LED H. Starte den Bindevorgang am Fernsteuersender. Entferne nach erfolgreichem Bindevorgang den Bindestecker.</p> | |||
{|cellspacing="20" | {|cellspacing="20" | ||
|[[File: | |[[File:Spektrum_bind_v5_DE.png|x400px]] | ||
|} | |} | ||
<p> | <p> | ||
''' | '''Hinweis:''' | ||
* | * Es macht übrigens keinen Unterschied (wie bei einigen „Standard“ Spektrum® Empfängern), ob die „Bind Plug“ schon während des Bindevorgangs abgezogen wird oder erst später. | ||
* Entscheidend für die Auswahl ist allein, welcher Typ von Satellitenempfänger angesteckt ist! Unerheblich ist, welches Übertragungsverfahren zwischen Empfänger und Sender tatsächlich genutzt wird. Prüfe sehr sorgfältig, von welchem Typ der verwendete Satellit ist. Eine falsche Einstellung ist nicht offensichtlich, wird aber später zu Fehlfunktionen oder Ausfall der Verbindung führen.</p> | |||
</p> | |||
Latest revision as of 09:55, 13 April 2021
Einrichten der Fernsteuerung
Es kann nahezu jede Fernsteueranlage mit mindestens 6 Steuerkanälen verwendet werden. Grundsätzlich erfolgt die Bedienung des MICROBEAST PLUS über 5 Steuerkanäle (der 6. Kanal steuert den Motorsteller oder das Gasservo). Für die Verwendung der optionalen Zusatzfunktionen wie AttitudeControl oder Drehzahlregler für Verbrennerhelis können zusätzliche Steuerkanäle von Vorteil sein. Ausserdem können im Betrieb mit Summensignalempfängern weitere Servoausgänge z.B. für Beleuchtung oder Einziehfahrwerk angesteuert werden, sofern entsprechende Kanäle zur Verfügung stehen.
- Erstelle im Fernsteuersender einen neuen Modellspeicher für das Modell.
 |
 |
 |
- Verwende auf keinen Fall die elektronische Taumelscheibenmischung des Fernsteuersenders! Diese Aufgabe wird das MICROBEAST PLUS übernehmen. Wähle im Fernsteuersender immer eine mechanische Taumelscheibenmischung aus (oftmals mit „H1“, „1 Servo“ oder „Normal“ bezeichnet) bzw. deaktiviere jegliche Art von Mischung („No Mix“).
 |
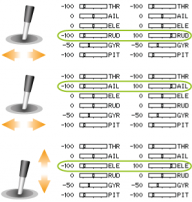
- Stelle alle Trimmungen auf neutral und die Servowege auf 100%. Vergewissere Dich, dass keinerlei Mischfunktionen wie beispielsweise ein Drehmomentausgleich auf Heck aktiv sind und die Einstellungen und Trimmungen in allen Flugphasen gleich sind. Betrachte den Servomonitor des Fernsteuersenders: Jede Steuerknüppelfunktion darf nur genau einen Kanal betätigen (abgesehen vom Pitchknüppel, der üblicherweise auch den Motor mit ansteuert). Bei Knüppelmittenstellung müssen (in allen Flugphasen) die Kanäle in Mittenposition stehen. Denke daran, dass die Servos nicht direkt angesteuert werden, sondern nur per Steuerbefehl dem Gerät mitgeteilt wird, wie schnell der Heli um eine bestimmte Achse drehen soll. Jeder Steuerbefehl wird dabei über genau einen Kanal des Fernsteuersenders betätigt.
 |
- Ändere die Pitchkurven im Sender (noch) nicht, sondern lass sie wie Standardmäßig vorgegeben von -100% bis +100% (oder je nach Senderfabrikat von 0 bis 100%) verlaufen.
 |
 |
 |
- Andere Einstellungen wie z.B. für den Motor oder eventuelle Zusatzkanäle (Beleuchtung, Einziehfahrferwerk, ...) sind wie gewohnt an der Fernsteuerung vorzunehmen. Diese sind im Normalfall von der Einstellung des MICROBEAST PLUS unabhängig. Falls die interne Drehzahlreglerfunktion oder die AttitudeControl verwendet werden soll, so wird auf die Einstellung dieser Zusatzfunktionen an entsprechender Stelle dieser Anleitung eingegangen.
 |
Achte unbedingt darauf, dass bei Elektromodellen der Motor während der Einstellarbeiten nicht anlaufen kann! Stecke den Motor am besten vom Regler ab, falls der Antriebsakku zur Stromversorgung verwendet wird.
Spektrum® DSM2/DSMX Satellitenempfänger binden
Vor Verwendung des Empfängers mit MICROBEAST PLUS muss der Empfänger mit der Fernsteueranlage gebunden werden. Stelle sicher, dass der Empfänger auf Steuersignale des Senders reagiert und aktiviere bei Verwendung eines SingleLine-Empfängers die Ausgabe der Steuerdaten über den SingleLine-Anschluss, falls notwendig. (Wie diese Arbeiten durchzuführen sind ist der Anleitung der Fernsteueranlage oder des Empfängers zu entnehmen.)
Eine Besonderheit besteht, falls ein einzelner Spektrum® DSM2/DSMX Satellit verwendet wird, der direkt mit MICROBEAST PLUS angesteckt ist. Hier muss der Bindevorgang durch das MICROBEAST PLUS angestoßen werden, da der Satellit selbst keine Möglichkeit bietet, den Bindevorgang zu starten. ACHTUNG: Der Satellit muss für die Verwendung mit MICROBEAST PLUS unbedingt gebunden werden, selbst wenn der Satellit schon in Verwendung war, z.B. in Verbindung mit einem Spektrum® Hauptempfänger!
Stecke bei einem Elektromodell den Motor vom Motorsteller ab oder entferne das Ritzel vom Motor, um zu verhindern, dass der Motor unbeabsichtigt anläuft und den Rotor antreibt.
Gleichzeitig mit dem Bindevorgang wird die Art des Satellitenempfängers bestimmt, also ob es sich um einen DSMX oder einen DSM2 Satelliten handelt. Es ist sehr wichtig, hier den korrekten Satelliten-Typ zu wählen, da eine falsche Einstellung zu funktionieren scheint, im späteren Betrieb aber zu Funkstörungen oder kompletten Verlust der Verbindung führen kann! NICHT entscheidend ist dabei, welches Übertragungsverfahren tatsächlich im Fernsteuersender ausgewählt ist bzw. verwendet wird!
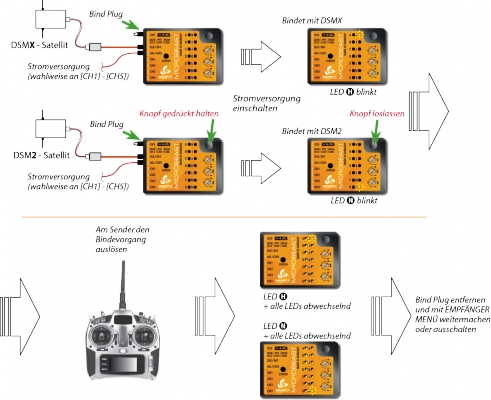
Um bei einem Spektrum® Einzelsatellit den Bindevorgang auszulösen, stecke den Bindestecker (Bind-Plug) an den SYS Anschluss. Wenn es sich um einen DSM2 Satellit handelt, drücke und halte den Taster bevor und während Du die Stromversorgung einschaltest. Am MICROBEAST PLUS blinkt die Menü LED N zusammen mit der LED am Satellit. Zum Binden eines DSMX Satelliten schalte nur die Stromversorgung ein, ohne den Taster zu drücken. In diesem Fall blinkt Menü LED H. Starte den Bindevorgang am Fernsteuersender. Entferne nach erfolgreichem Bindevorgang den Bindestecker.

|
Hinweis:
- Es macht übrigens keinen Unterschied (wie bei einigen „Standard“ Spektrum® Empfängern), ob die „Bind Plug“ schon während des Bindevorgangs abgezogen wird oder erst später.
- Entscheidend für die Auswahl ist allein, welcher Typ von Satellitenempfänger angesteckt ist! Unerheblich ist, welches Übertragungsverfahren zwischen Empfänger und Sender tatsächlich genutzt wird. Prüfe sehr sorgfältig, von welchem Typ der verwendete Satellit ist. Eine falsche Einstellung ist nicht offensichtlich, wird aber später zu Fehlfunktionen oder Ausfall der Verbindung führen.
