Fernsteueranlage
Preparing the transmitter
You can use nearly any transmitter that provides at least 6 channels. By default 5 channels are used for controlling MICROBEAST PLUS and one channel controls the motor. If using additional features like AttitudeControl or RPM Governor a receiver with single wire output and more channels may be useful to have, but this is not a must.
- Create a new model in your radio‘s model memory.
- Never enable your radio‘s eCCPM mixing function! Disable any mixing functions for the swashplate or rudder. Each function should be assigned to just one receiver channel. All the swashplate mixing will be done by MICROBEAST PLUS. Set your radio‘s swash mixer to mCCPM (mechanical mixing) which is often called “H1”, “1 servo” or “normal“ mixing or disable “swash mixing” if applicable.
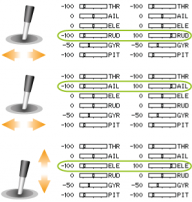
- Be sure that all trims and sub trims are disabled and that all servo travels are set to 100% in any flight mode. There mustn't be any active mixing functions (for example rudder revo-mixing). Have a look at the radio’s servo monitor: each stick has to control one channel/servo output (except for thrust stick which typically controls collective pitch and motor). Note when using MICROBEAST PLUS you do not directly control the servos of the helicopter. By moving a stick you give a control command to the system which then performs the necessary servo movements to move the helictoper in the commanded direction. Each control command is bound to one servo output channel of the transmitter.
- Also do not adjust the collective pitch curve at the moment. For the setup procedures it has to be set as a straight line reaching from -100% to +100% (or 0 to 100% depending on radio brand).
- Other functions such as throttle curves, ESC switches or auxiliary functions can be adjusted as usual. But especially for the throttle make sure you can disable the throttle channel and separate it from the collective stick movement for performing the setup. You can do this by using the HOLD switch on the radio or by setting the throttle curve to a flat 0% line. Also it is advisable to create different flight modes for different flight states/rotor headspeeds.
Make sure that the motor in electric models can not start when doing the adjustment work! If the drive battery is used as power supply for receiver, servos and MICROBEAST PLUS disconnect the motor from the ESC.
Einbau des Empfängers
Zur Ansteuerung des MICROBEAST PLUS kann eine Vielzahl unterschiedlicher Empfängertypen verwendet werden. Grundsätzlich wird zwischen (herkömmlichen) „Standard“ Empfängern und „Singleline“ (oder „Summensignal“) Empfängern unterschieden. Bei Letzteren werden Steuersignale über nur eine einzige Anschlussleitung vom Empfänger zum MICROBEAST PLUS übertragen werden. Je nachdem welche Art von Empfänger verwendet wird, kann die Anschlussbelegung am MICROBEAST anders sein. Nachfolgend werden sämtliche Anschlussmöglichkeiten und Arten von Empfängern gezeigt. Achte grundsätzlich immer darauf, dass die Stecker fest eingesteckt sind. Die Stiftleiste von MICROBEAST PLUS ist so ausgelegt, dass sich die Stecker gegenseitig aneinanderdrücken und so gegen selbstständiges Lösen gesichert sind. Prüfen aber dennoch, ob ein fester Sitz gegeben ist. Insbesondere bei der Verwendung von SingleLine-Empfängern ist dies oftmals nicht gegeben, da Stecker ohne direkte Nachbarn eingesteckt sein könnten. Solche Stecker sollten immer zusätzlich gegen unbeabsichtigtes Lösen gesichert werden, vor allem auch auf der Empfängerseite!
Standard receiver
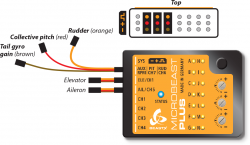
A conventional receiver with multiple servo output connectors is what we consider a "Standard receiver". Here you connect each servo output to one specific control function at the MICROBEAST PLUS using one connection wire for each function. You have these 5 input functions (wires): Aileron, Elevator, Rudder, Collective pitch and gyro gain. Simply connect each wire to the corresponding channel output port at the receiver which you like to use for the specific function. If you don't know which stick controls which channel have a look at your radio's servo monitor, refer to your radios instruction manual or simply connect a servo to each channel testwise!
|
Here we show connection layouts for two common radio brands. Note that this is only exemplary, the channel output of your transmitter can by different even when using a radio of this brand. And you can use any other radio system on the market together with MICROBEAST PLUS when using the servo output channels of the receiver, not only these two brands!

|

|
- The wires for rudder, pitch and gyro are signal wires. They must be placed on the same receiver side as the the both orange wires from aileron and elevator!
- You must connect all 5 functions/wires to the receiver. When you do not connect all wires the system will not finish initialization sequence!
- The throttle servo/speed controller is connected to the receiver's throttle output. Using the Governor function of MICROBEAST PLUS therefore is not possible in combination with a Standard receiver.
Receivers with single wire output (single-line receivers)
With a single-line receiver all channels (control functions) are transmitted by one single connection wire to MICROBEAST PLUS. This is done by packing all channel output data to a data paket or by chaining the servo signals to one output port. At the moment MICROBEAST PLUS supports the following systems: Multiplex® SRLX, Spektrum® SRXL, Futaba® SBus, JR® X-Bus(B), Jeti® UDI, Jeti® EXBus, ALIGN® iBus, FlySky® iBus, Graupner HOTT® SUMD, SPPM
There are single-line receivers available that supply additional single channel connectors/servo outputs. In combination with MICROBEAST PLUS you only have to treat such receivers as single-line receivers if you really use the single-line function. If you connect the receiver by using the standard 5-plug layout, such receiver has to be considered as Standard receiver in the following and as shown above.
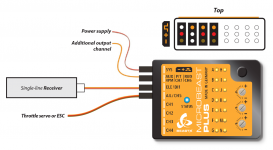
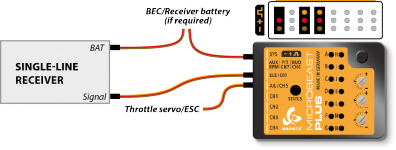
- The single-line connection wire is plugged into the [DI1] input of MICROBEAST PLUS
- The throttle servo or ESC is connected to the [CH5] output. When using a speed controller with BEC, from here the power will be distributed to receiver and servos.
- Alternatively or additionally you can connect a power supply/second BEC wire/buffering battery to the [SYS] port and to the receiver (in case this has additional servo or battery ports).
|
|
| Wiring layout for single-line receivers | Alternative wiring layout for single-line receiver with additional servo output channels |
When using a big heli with standard size servos it may be insufficient to only provide power at the [SYS] port or receiver. Note when only connecting power at the receiver, all the current has to flow over one thin wire to the servos! If there are no other ports left to (additionally) feed in power, we highly recommend using the MICROBEAST PLUS HD which has an additional high power input to reduce wiring resistance and to serve todays demands for a robust servo power supply.
Spektrum® DSM/JR® DMSS remote satellite
A special type of single-line receiver is the remote satellite. These receivers are usually used as additional receiving unit in combination with a (bigger) main receiver to provide a more robust and fail safe radio system. But also you can directly connect one of such receivers to MICROBEAST PLUS to achieve a small and light weight radio system to be used in small sized rc models. MICROBEAST PLUS supports the following systems: Spektrum® DSM2, Spektrum® DSMX, JR® DMSS. The remote receiver can be directly connected to the small sized white pin board at the side which will provide a stabilized voltage of 3.3 Volts which is necessary to power these receivers. Alternatively if you have the optional available Spektrum® satellite adapter (Order Nr. BXA76009) also you can connect the receiver at the front to the [DI1] port, just like any other single-wire receiver, so you can keep the pin board free for connecting a sensor.
Please note: MICROBEAST PLUS does not support connecting more than one remote satellite at a time!
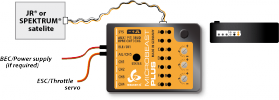
|
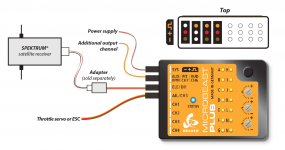
|
| JR®/Spektrum® remote satellite connected at side pin board | JR®/Spektrum® remote satellite connection with power adapter |
When using a speed controller with BEC, the power will be distributed from [CH5] input to receiver and servos. Alternatively or additionally you can connect a power supply/second BEC wire/buffering battery to the [SYS] port.
Using a remote satellite is only recommended for small rc modells like helicopters of 450 size or smaller. Due to the design one single receiving unit is more prone to radio interference and can result in reduced transmission range.
Empfänger binden
Vor Verwendung des Empfängers mit MICROBEAST PLUS muss der Empfänger mit der Fernsteueranlage gebunden werden. Stelle sicher, dass der Empfänger auf Steuersignale des Senders reagiert und aktiviere bei Verwendung eines SingleLine-Empfängers die Ausgabe der Steuerdaten über den SingleLine-Anschluss, falls notwendig. Wie diese Arbeiten durchzuführen sind ist der Anleitung der Fernsteueranlage oder des Empfängers zu entnehmen.
Eine Besonderheit besteht, falls ein einzelner Spektrum® Satellit verwendet wird, der direkt mit MICROBEAST PLUS angesteckt ist. Hier muss der Bindevorgang durch das MICROBEAST PLUS angestoßen werden, da der Satellit selbst keine Möglichkeit bietet, den Bindevorgang zu starten. ACHTUNG: der Satellit muss vor der Verwendung mit MICROBEAST PLUS unbedingt neu gebunden werden, selbst wenn der Satellit schon in Verwendung war, z.B. in Verbindung mit einem Spektrum® Hauptempfänger!
Wenn ein Elektromodell verwendet wird und ein Motorsteller mit BEC zur Stromversorgung der Empfangsanlage verwendet wird, stecke den Motor vom Motorsteller ab oder entferne das Ritzel vom Motor, um zu verhindern, dass der Motor unbeabsichtig anläuft und den Helikopter antreibt.
Gleichzeitig mit dem Bindevorgang wird die Art des Satellitenempfängers bestimmt, also ob es sich um einen DSMX oder einen DSM2 Satelliten handelt. Es ist sehr wichtig hier den korrekten Satelliten-Typ zu wählen, da eine falsche Einstellung vermeintlich zu funktionieren scheint, im späteren Betrieb aber zu Funkstörungen oder kompletten Verlust der Verbindung führen kann! Nicht entscheidend ist welches Übertragungsverfahren tatsächlich im Fernsteuersender ausgewählt ist bzw. verwendet wird!
Um bei einem Spektrum® Einzelsatellit den Bindevorgang auszulösen, stecke den Bindestecker (Bind-Plug) an den SYS Anschluss. Wenn es sich um einen DSM2 Satellit handelt, drücke und halte den Taster bevor und während Du die Stromversorgung einschaltest. Am MICROBEAST PLUS blinkt die Menü LED N zusammen mit der LED am Satellit. Zum Binden eines DSMX Satelliten schalte nur die Stromversorgung ein, ohne den Taster zu drücken. In diesem Fall blinkt Menü LED H. Starte den Bindevorgang am Fernsteuersender. Entferne nach erfolgreichem Bindevorgang den Bindestecker.
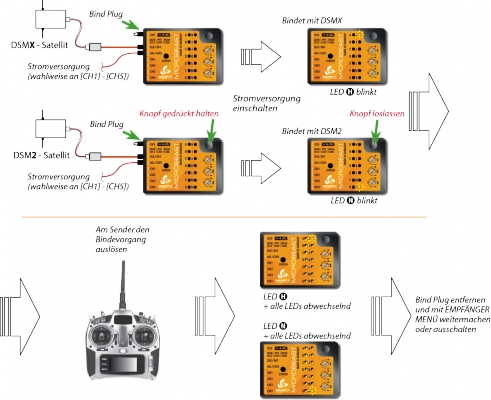
|
Hinweis:
- Es macht übrigens keinen Unterschied (wie bei einigen „Standard“ Spektrum® Empfängern), ob die „Bind Plug“ schon während des Bindevorgangs abgezogen wird oder erst später.
- Entscheidend für die Auswahl ist allein, welcher Typ von Satellitenempfänger angesteckt ist! Unerheblich ist, welches Übertragungsverfahren zwischen Empfänger und Sender tatsächlich genutzt wird. Prüfe sehr sorgfältig, von welchem Typ der verwendete Satellit ist. Eine falsche Einstellung ist nicht offensichtlich, wird aber später zu Fehlfunktionen oder Ausfall der Verbindung führen.


