Difference between revisions of "Manuals:MBPlusFblV5:Setupmenu A/de"
Jump to navigation
Jump to search
Shornstein (talk | contribs) |
Shornstein (talk | contribs) |
||
| (12 intermediate revisions by 2 users not shown) | |||
| Line 1: | Line 1: | ||
| − | + | {{TOC_MBPlusV5/de|Manuals:MBPlusFblV5:Setupmenu_intro/de|Manuals:MBPlusFblV5:Setupmenu_B/de|SETUPMENU}} | |
| − | {{ | + | __TOC__ |
| − | + | <br /> | |
| + | Das MICROBEAST PLUS kann in nahezu jeder Einbaulage am Heli montiert werden. Zu beachten ist nur, dass die Stecker der Anschlusskabel immer in oder gegen die Flugrichtung des Helikopters zeigen müssen und dass die Gehäusekanten des Geräts perfekt parallel zu den Drehachsen des Helis ausgerichtet sind.<br /> | ||
| + | <br /> | ||
| − | + | {|class="gallery" style="font-size:75%;" | |
| − | + | |- | |
| − | {|class="gallery" style="font-size: 75%; | + | | style="padding:20px 0px;" align="center" | [[File:Setupmenu_A_off.png|x100px]] <br />Status LED '''off''' |
| − | |- | + | | style="padding:0px 20px;" align="center" | [[File:Setupmenu_A_purple_flashing.png|x100px]] <br />Status LED <span style="color:#EE82EE">'''blinkt violett'''</span> |
| − | |style="padding: | + | | style="padding:0px 20px;" align="center" | [[File:Setupmenu_A_purple.png|x100px]] <br />Status LED <span style="color:#9400D3">'''violett'''</span> |
| − | |style="padding:0px | + | | style="padding:0px 20px;" align="center" | [[File:Setupmenu_A_flashing_red.png|x100px]] <br />Status LED <span style="color:#FA8072">'''blinkt rot'''</span> |
| − | |style="padding:0px 20px;" | [[File:Setupmenu_A_purple.png|x100px]]<br />Status LED <span style="color:# | ||
| − | |style="padding:0px 20px;" | [[File:Setupmenu_A_flashing_red.png|x100px]]<br />Status LED <span style="color:#FA8072">''' | ||
|- | |- | ||
| − | |style="padding:40px 0px;" | [[File:Setupmenu_A_red.png|x100px]]<br />Status LED <span style="color:#DC143C">''' | + | | style="padding:40px 0px;" align="center" | [[File:Setupmenu_A_red.png|x100px]] <br />Status LED <span style="color:#DC143C">'''rot'''</span> |
| − | |style="padding:0px | + | | style="padding:0px 20px;" align="center" | [[File:Setupmenu_A_flashing_blue.png|x100px]] <br />Status LED <span style="color:#87CEFA">'''blinkt blau'''</span> |
| − | |style="padding:0px | + | | style="padding:0px 20px;" align="center" | [[File:Setupmenu_A_blue.png|x100px]] <br />Status LED <span style="color:#4169E1">'''blau'''</span> |
| − | |style="padding:0px | + | | style="padding:0px 20px;" align="center" | [[File:Setupmenu_A_redblue.png|x100px]] <br />Status LED <span style="color:#DC143C">'''rot'''</span>/<span style="color:#4169E1">'''blau'''</span> |
|}<br /> | |}<br /> | ||
| − | |||
| − | = | + | =Einstellung am Gerät= |
| − | + | Jede Einbaulage wird bei Einstellpunkt A durch eine andere Farbe oder durch einen anderen Zustand der Status LED dargestellt. Wähle durch wiederholtes Antippen des Hecksteuerknüppels die Farbe aus, die zur gewählten Einbaulage passt:<br /> | |
<br /> | <br /> | ||
| − | {{ | + | {{TABLE_DE |
| − | | | + | |Einbaulage |
| − | | | + | |flach, Gehäusedeckel oben, Anschlussleiste zeigt in Flugrichtung |
| − | | | + | |hochkant, Taster ist oben, Anschlussleiste zeigt in Flugrichtung |
| − | | | + | |flach, Gehäusedeckel unten, Anschlussleiste zeigt in Flugrichtung |
| − | | | + | |hochkant, Taster ist unten, Anschlussleiste zeigt in Flugrichtung |
| − | | | + | |flach, Gehäusedeckel oben, Anschlussleiste zeigt zum Heck |
| − | | | + | |hochkant, Taster ist oben, Anschlussleiste zeigt zum Heck |
| − | | | + | |flach, Gehäusedeckel unten, Anschlussleiste zeigt zum Heck |
| − | | | + | |hochkant, Taster ist unten, Anschlussleiste zeigt zum Heck |
}}<br /> | }}<br /> | ||
| − | |||
| − | |||
| − | |||
| − | |||
| − | |||
| − | |||
| − | |||
| − | |||
<br /> | <br /> | ||
<br /> | <br /> | ||
| − | = | + | =Einstellung über StudioXm= |
| + | Wähle die Option in der App, die der tatsächlichen Einbaulage des Geräts am Heli entspricht und klicke unten auf '''weiter'''.<br /> | ||
<br /> | <br /> | ||
| + | <div class="iosgallery"> | ||
| + | <img class="ios" src="https://wiki.beastx.com/images/studiox/freakware%202019-07-09%20030.PNG"> | ||
| + | <div class="iostext"></div> | ||
| + | </div> | ||
<br /> | <br /> | ||
<br /> | <br /> | ||
| − | |||
Latest revision as of 19:28, 10 July 2019
Das MICROBEAST PLUS kann in nahezu jeder Einbaulage am Heli montiert werden. Zu beachten ist nur, dass die Stecker der Anschlusskabel immer in oder gegen die Flugrichtung des Helikopters zeigen müssen und dass die Gehäusekanten des Geräts perfekt parallel zu den Drehachsen des Helis ausgerichtet sind.
 Status LED off |
 Status LED blinkt violett |
 Status LED violett |
 Status LED blinkt rot |
 Status LED rot |
 Status LED blinkt blau |
 Status LED blau |
 Status LED rot/blau |
Einstellung am Gerät
Jede Einbaulage wird bei Einstellpunkt A durch eine andere Farbe oder durch einen anderen Zustand der Status LED dargestellt. Wähle durch wiederholtes Antippen des Hecksteuerknüppels die Farbe aus, die zur gewählten Einbaulage passt:
| Status LED | Einbaulage |
|---|---|
| aus | flach, Gehäusedeckel oben, Anschlussleiste zeigt in Flugrichtung |
| violett blinkend | hochkant, Taster ist oben, Anschlussleiste zeigt in Flugrichtung |
| violett | flach, Gehäusedeckel unten, Anschlussleiste zeigt in Flugrichtung |
| rot blinkend | hochkant, Taster ist unten, Anschlussleiste zeigt in Flugrichtung |
| rot | flach, Gehäusedeckel oben, Anschlussleiste zeigt zum Heck |
| blau blinkend | hochkant, Taster ist oben, Anschlussleiste zeigt zum Heck |
| blau | flach, Gehäusedeckel unten, Anschlussleiste zeigt zum Heck |
| rot/blau | hochkant, Taster ist unten, Anschlussleiste zeigt zum Heck |
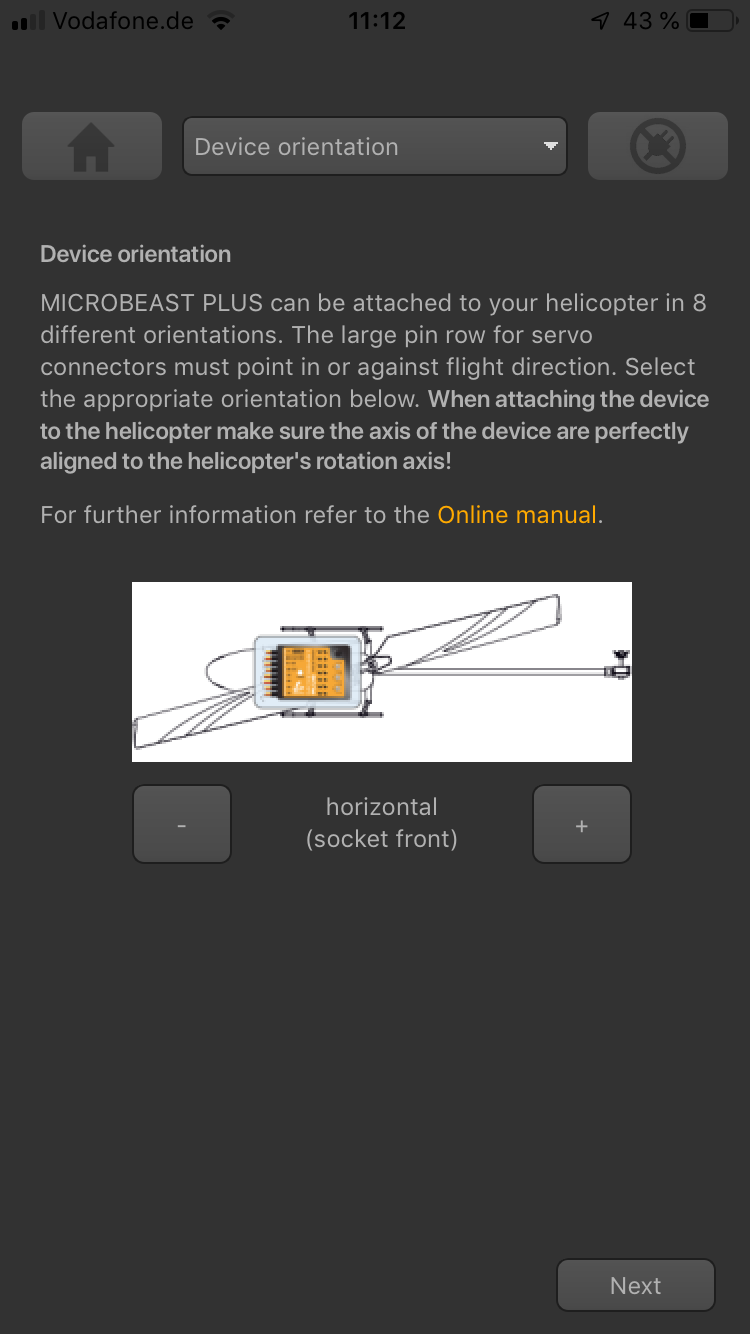
Einstellung über StudioXm
Wähle die Option in der App, die der tatsächlichen Einbaulage des Geräts am Heli entspricht und klicke unten auf weiter.