SETUPMENÜ E & F - Hecksteuerung
Next we have to setup the rudder gyro. For this we set the limits of the tail pitch control and the control directions, so the gyro will not move the servo further than allowed and in correct direction. In first line the rudder limits are necessary to prevent the gyro from moving the servo over the mechanical limits and damaging the servo. But when adjusting the limits please note that the optimum throw is not necessarily determined by the maximum possible control travel of the tail pitch slider. When the tail mechanics allow a very high range of pitch it may be advisable to adjust the limits based on the maximum allowed angle of attack of the tail rotor blades that will not lead to an aerodynamic stall of the blades. Such stalls can cause very bad stopping behavior like overshooting of the tail when stopping from rotation and can also cause bad tail response to rudder stick input when performing directional changes. Keep this in mind when adjusting the tail rotor endpoints. Check the helicopter‘s manual to find out how much tail pitch is useful and where to set end points.
Mechanische Einstellung
Im Laufe der Einstellprozedur muss das Heckservo am Anschluss [CH4] vom MICROBEAST PLUS angesteckt werden. Achte dabei auf korrekte Polarität, das schwarze oder braune Kabel für den Minus-Pol muss unten liegen:

Montiere dann das Ruderhorn/Servokreuz möglichst in einem 90° Winkel zum Heckanlenkgestänge. Justiere das Anlenkgestänge so, dass die Heckschiebehülse mechanisch korrekt positioniert ist. Idealerweise sollte sie in 90° Position des Servos mittig auf der Heckrotorwelle stehen und die Heckrotorblätter sollten in dieser Position etwas positiven Anstellwinkel entgegen dem Rotordrehmoment haben (z.B. 5° nach rechts bei einem Heli mit rechtsdrehendem Rotor).

Dieser mechanische Vorlauf der Rotorblätter bei Neutralstellung des Servos ist vor allem wichtig, wenn der Heckkreisel im Normal-Modus betrieben wird. Stimmt hier der Vorlauf nicht exakt, so wird der Helikopter im Schwebeflug auf der Hochachse driften. Bei ausschließlicher Verwendung des Heckkreisels im HeadingLock Modus hat diese mechanische Anpassung weniger Bedeutung. Hier wird der Kreisel stets aktiv den Heckrotor ansteuern damit sich der Helikopter nicht dreht, wenn der Hecksteuerknüppel in Mittenposition ist. Für optimale Performance des Heckkreisels empfiehlt es sich aber auch für diesen Modus, die mechanische Abstimmung so genau wie möglich durchzuführen.
Einstellung am Gerät
Die Heckeinstellung gliedert sich in zwei Punkte: Bei Punkt E werden zuerst die maximal erlaubten Endpositionen des Heckrotors/Heckservos eingestellt, bei Punkt F stellen wir dann die Steuerrichtungen von Heckservo und Heckkreisel ein. Stecke jetzt wie oben beschrieben das Servo am Ausgang [CH4] vom MICROBEAST PLUS ein und justiere die Mechanik wie oben beschrieben.
SETUP MENU E - Rudder limits
To adjust the servo limits move the rudder stick in one direction until the servo reaches the maximum endpoint without any binding or stall. Release the rudder stick when correct position is reached. If you moved the servo too far you can steer the stick to the opposite direction and move the pitch slider a short way back. Also you can tap the stick briefly to only make minor adjustments. Once the correct endpoint has been found, don‘t move the rudder stick anymore and wait a second for the Status-LED to flash. This will indicate that the new position was stored. (If necessary you can change position as often as you want, but always wait until the Status-LED flashes when finished and proceeding to the next step!)
Now adjust the opposite direction. For this again use the rudder stick and hold it to move the servo/tail pitch slider into the other direction. Proceed as described to set the maximum endpoint and again wait until the position has been indicated with the flashing Status LED.
When both positions have been set skip to the next Menu Point F by pushing the button on the device briefly.
SETUP MENU F - Rudder control direction
1. Move the rudder stick and check the rudder direction on the helicopter. If the stick is moving the servo into the wrong direction use the servo reverse function of your transmitter and reverse the rudder channel to set stick control direction correctly.
2. Now set the rudder direction of the MICROBEAST PLUS gyro: When you move the rudder stick to the right, the Status LED must light up or flash in blue color. When you move the rudder stick to the left, the Status LED must light up or flash in red color. When the display is inverted (red = right and blue = left) reverse the display (internal control direction) by tapping the aileron(!) stick once.
3. Optional: When you move the rudder stick to full deflection, the Status LED should light solid, not just flash. If this is not the case, increase the servo throw/endpoint of the rudder channel in the transmitter just as far so that the Status LED changes from flashing to solid when the rudder stick reaches the end position. (Note: Do not increase the endpoint too much in the transmitter. We need an exact match of full stick position and stick end position. So the Status LED should just change from flashing to solid when raching the end position.)
Always set servo direction in the transmitter first, then check the display on the MICROBEAST PLUS or in the software and change the internal control direction if it does not match the real direction. Do not change the internal direction in order to change the servo direction! This is only used for telling the gyro in which direction it must move the servo. Be very conscientious when doing this setup step, as wrong gyro direction will cause loss of control during takeoff and you probably crash the helicopter!
In addition you can check the gyro direction by turning the helicopter by hand around its vertical axis. When turning the heli the gyro must move the servo so that the rotor will produce a counter action agains the turn direction. So later in flight the gyro will stop the helicopter from unwanted movement. Here the LED will light up in blue color when you turn the helicopter to the right and light up in red when you turn it to the left. So you can get a little reminder when you do not know which is the correct stick direction to setup, when you need to do the setup later on the field!
Setup with StudioX
To activate the rudder adjustments click the Adjust button in the corresponding table row (when using the Wizard function this will be done automatically when you click the Next button after adjusting Menu Point D).

1. When you move the rudder stick to full deflection, the Status LED on the MICROBEAST PLUS should light solid and the label right or left should change the color accordingly. If the stick is not moving far enough, you will see the message "Move stick to max. position! Check Status LED." In this case increase the servo throw/endpoint of the rudder channel in the transmitter just as far so that the Status LED changes from flashing to solid when the rudder stick reaches the end position and the label will disappear in the software. (Note: Do not increase the endpoint too much in the transmitter. We need an exact match of full stick position and stick end position. So the Status LED should just change from flashing to solid when reaching the end position.)
2. Now connect the rudder servo to [CH4] port of MICROBEAST PLUS as described above. When you move the rudder stick check the rudder direction on the helicopter. If the stick is moving the servo into the wrong direction use the servo reverse function of your transmitter and reverse the rudder channel to set stick control direction correctly. Now when the servo is moving correctly set the rudder direction of the MICROBEAST PLUS gyro: When you move the rudder stick/servo to the right, the Status LED must light up or flash in blue color. When you move the rudder stick to the left, the Status LED must light up or flash in red color. When the display is inverted (red = right and blue = left), reverse the display (internal control direction) by choosing either normal or inverted in the software.
3. Finally adjust the servo limit by changing the values in the two adjustment boxes for each direction. To do so, carefully use the rudder stick to move the servo to the endpoint (watch out to not jam the servo) and increase/decrease the endpoint as necessary.
Always set servo direction in the transmitter first, then check the display on the MICROBEAST PLUS or in the software and change the internal control direction if it does not match the real direction. Do not change the internal direction in order to change the servo direction! This is only used for telling the gyro in which direction it must move the servo. Be very conscientious when doing this setup step as wrong gyro direction will cause loss of control during takeoff and you probably crash the helicopter!
In addition you can check the gyro direction by turning the helicopter by hand around its vertical axis. When turning the heli the gyro must move the servo so that the rotor will produce a counter action agains the turn direction. So later in flight the gyro will stop the helicopter from unwanted movement.
Setup with StudioXm
x250px
1. When you move the rudder stick to full deflection, the Status LED on the MICROBEAST PLUS should light solid and the label right or left should change the color accordingly. If the stick is not moving far enough, you will see the message "Increase!" In this case increase the servo throw/endpoint of the rudder channel in the transmitter just as far so that the Status LED changes from flashing to solid when the rudder stick reaches the end position and the label will disappear in the software. (Note: Do not increase the endpoint too much in the transmitter. We need an exact match of full stick position and stick end position. So the Status LED should just change from flashing to solid when raching the end position.)
2. Now connect the rudder servo to [CH4] port of MICROBEAST PLUS as described above and check the rudder direction on the helicopter. If the stick is moving the servo into the wrong direction use the servo reverse function of your transmitter and reverse the rudder channel to set stick control direction correctly. Now when the servo is moving correctly set the rudder direction of the MICROBEAST PLUS gyro: When you move the rudder stick/servo to the right, the Status LED must light up or flash in blue color. When you move the rudder stick to the left, the Status LED must light up or flash in red color. When the display is inverted (red = right and blue = left), reverse the display (internal control direction) by choosing either normal or inverted in the software.
3. Finally adjust the servo limit by changing the values in the two adjustment boxes for each direction. To do so, carefully use the rudder stick to move the servo to the endpoint (watch out to not jam the servo) and increase/decrease the endpoint as necessary.
Always set servo direction in the transmitter first, then check the display on the MICROBEAST PLUS or in the app and change the internal control direction if it does not match the real direction. Do not change the internal direction in order to change the servo direction! This is only used for telling the gyro in which direction it must move the servo. Be very conscientious when doing this setup step, as wrong gyro direction will cause loss of control during takeoff and you probably crash the helicopter!
In addition you can check the gyro direction by turning the helicopter by hand around its vertical axis. When turning the heli the gyro must move the servo so that the rotor will produce a counter action agains the turn direction. So later in flight the gyro will stop the helicopter from unwanted movement.
Extra info: Why setting stick endpoints?
This ensures that control range of the radio system matches the internal range of MICROBEAST PLUS. Later when setting the control style you can adjust how fast your helicopter should turn around the vertical axis. To get reproducable results you have to match your radio to the system!
Extra info: How the gyro works!
The gyro always tries to steer in the opposite direction of the rotation that is applied to the helicopter. If you move the helicopter by hand around its vertical axis, the gyro must actuate a rudder servo movement to compensate this rotation. If for example you move the nose of the helicopter to the left (tail moving to the right), the gyro has to steer right the same way as you would steer right with the rudder stick, so that the tail is pushed back to the left.}}
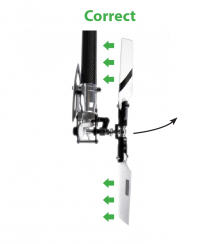
When moving the tail to the right by hand (nose of the heli to the left), the gyro will steer to the right, so the tail is pushed back to the left.
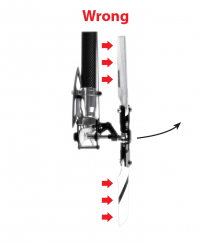
When moving the tail to the right by hand (nose of the heli to the left), the gyro steers to the left and so the tail will move even further!


Please note: This only shows an example for the ALIGN T-Rex 500 helicopter. Actually the tail pitch slider may move to a different position on your helicopter. This mainly depends on how the tail blade grips are controlled and how the tail mechanics is constructed in general. Check the manual of your helicopter to find out which directions the rudder must move on your helicopter.