Setup menu point D
As with the swashplate servos at Setup menu point B you can select at Setup menu point D the update frequency for the rudder servo. For best tail gyro performance, the rule is the higher the better! A good rudder servo should be capable of running at least 270Hz. Nevertheless if you experience an unusually high power consumption of the receiver power supply or if the servo gets hot, you should reduce this frequency. When using a servo that allows a higher frequency as MICROBEAST PLUS offers or that allows a maximum frequency which is not choosable, please select the next lower frequency that is closest to the given frequency. Using a lower frequency is always possible. Only too high frequencies can damage the servo and/or will cause the servo to not work properly. Here you can find a list of parameters for the most common servos. Please understand that we can not list all servo types. We also can not guarantee the accuracy of this data. Ask the manufacturer of the servos or your local dealer for detailed information.
If you do not know what the maximum pulse rate tolerated by your servos is, do not select more than 50Hz driving frequency. A higher driving frequency can lead to failure of the servos!
Please note that depending on the rudder servo center position pulse length chosen at Setup menu point C, you may not be able to choose a frequency higher than 333Hz. This also applies to the “user defined“ setting which might be limited to 333Hz (Setup menu point C).
To select the desired servo frequency, move the rudder stick repeatedly in one direction until the Status-LED lights in the correct color:
| Status-LED | Rudder servo frequency |
|---|---|
| purple | 50 Hz |
| red flashing | 165 Hz |
| red | 270 Hz |
| blue flashing | 333 Hz |
| blue | 560 Hz |
| off | user defined |
The option “user defined” allows you to choose your own setting that can be edited by using the StudioX software bundle and the separately available USB2SYS interface.
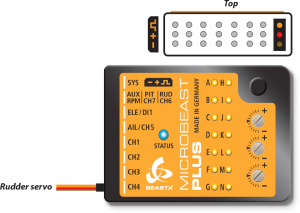
Now connect the rudder servo to [CH4] port of MICROBEAST PLUS:
Attach a servo horn to the rudder servo in such a way that the tail linkage rod forms a 90 degree angle to the servo horn (or as close as possible). Then adjust the linkage rod as described in the manual for your helicopter. For most helicopters the tail pitch slider should be centred and the tail rotor blades will then have some positive pitch to compensate for the torque of the main rotor. This mechanical adjustment especially is important when using the tail gyro in Normal-Rate mode. If the adjustment was not done properly the helicopter will constantly drift to one side or the other on the rudder axis. When using the tail gyro only in HeadingLock mode this adjustment is not so critical. Here the gyro will actively control the rudder so the helicopter does exactly follow the commands of the rudder stick. For optimum performance it is nevertheless recommended to perform the mechanical adjustment as good as possible.
Note: This menu item will not be left automatically after 4 minutes, so you have plenty of time to adjust the mechanical setup!
Push the button to save the configuration and to proceed to Setup menu point E.

