Basic functionality
Connecting a device to StudioX
StudioX can be used to work with serveral types of hardware from BEASTX and RCWARE. Connection to the devices is usually established using the USB port of your computer.
Connecting a BEASTX gyro to the computer
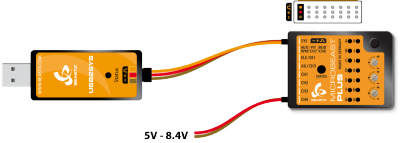
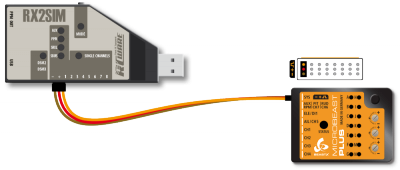
All BEASTX gyros come with a serial communication port which typically is marked with the letters SYS. Connect the servo wire coming from your USB interface to this port. Make sure to connect the wire in correct polarity on both sides! When using the USB2SYS interface you have to power the device with a separate power supply, i.e. receiver battery or BEC of the R/C model. It will not be powered from the USB port.
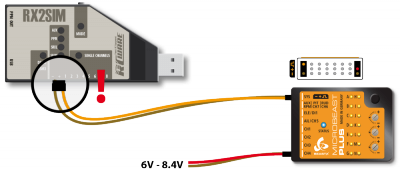
Also you can use a RX2SIM Wireless Multi-Sim Adapter instead of the USB2SYS interface. For this you can switch the RX2SIM into an USB2SYS emulation mode (push button on the RX2SIM several times until the LED lights up in orange color). In this configuration the BEASTX gyro will be powered from the USB port. Anyhow, this only will work when receiver and servos are not connected to the gyro! Otherwise the power of the USB port will not be sufficient to supply all consumers. In this case you have to power the device from the receiver battery as well. But here when using more than 6 Volts (i. e. using a 2s Lipo battery as receiver power supply) you must disconnect the red wire (plus pole) from the servo wire going to the interface. Otherwise you will damage the RX2SIM and/or USB port of your computer!
 |
 |
Connecting the RX2SIM Wireless Multi-Sim Adapter
When RX2SIM is used as USB2SYS interface emulator to connect your BEASTX device (MICROBEAST / SPEKTRUM AR7xxxBX) as mentioned above, StudioX will not recognize the RX2SIM itself. To control it with StudioX as Stand-Alone device, i.e. for updating the firmware of the RX2SIM you must push and hold the button on the RX2SIM before and while connecting it to the computer. Then it will start in bootloader mode and StudioX will open the RX2SIM Plugin. You can see that bootloader mode is active when both blue LEDs AUX and PPM light up solid.
Connecting the BLE2SYS bluetooth LE adapter
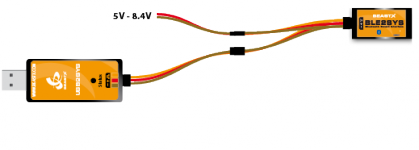
To configure and update your BLE2SYS bluetooth LE adapter with StudioX connect it with the USB2SYS interface or RX2SIM wireless simulator interface to the computer. Using the USB2SYS you must power the device with an external power supply connected to a Y-harness. Watch out for correct polarity!
 |
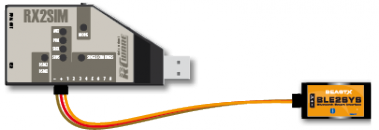 |
When using the RX2SIM Wireless Multi-Sim Adapter make sure it is set to USB2SYS emulation mode (push button on the RX2SIM several times until the LED lights up in orange color)!
The freakware Network
The freakware Network is our online network which is used to keep in touch with our customers and which is used to distribute firmware updates and other online content for our hardware devices. To solely change settings and configure your device neither you need an internet connection nor do you need to login to the freakware Network or create a freakware network Account.
freakware Network Account
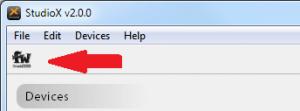
A freakware Network user account is mandatory to use functions like online manuals and firmware updates. You can create your own account very easily by opening the freakware Network connector dialog by clicking the fw button in the top left corner of StudioX:
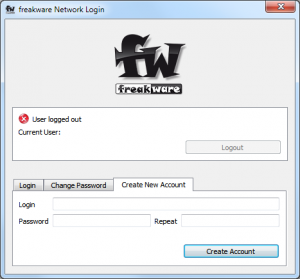
From there open the Create New Account tab, and use your eMail address as login and select a secure password:
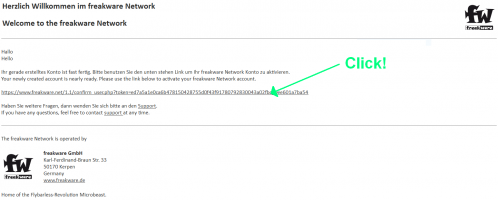
A confirmation mail will be sent to this address. Once your account is confirmed, you can log in using the Login tab.
The address you provide will also be used to recover your password or get in touch with you if needed, i.e. when urgent firmware updates are required.
Therefore we strongly recommend to use a real address and not a one-time email provider.
If you don't get the confirmation mail please check your account's SPAM folder. As this is an automatic email it is likely that some mail providers consider the mail as spam mail.
Registering Devices
freakware Network Common Data like .pdf manuals and other general information is available when you're logged in.
To access Custom Data like firmware update you need to register your device what means that you permanently link the device to your user account.
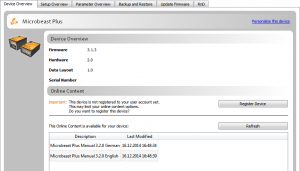
If you connect your device you should see something like this (as an example we will use a Microbeast Plus here):
Click the "Register Device" button to link your device to your freakware Network account.
After this the message should be gone, and the "Update Firmware" tab should offer you something.
Updating Devices
A firmware with the status "available" can be requested, and will be generated server-sided on the fly.
Once done the status will show "done" and you can update to this firmware.
If you don't see anything in the list, then you haven't registered this device yet. Please check accordingly.
Have a look at General questions about the product to see which are the latest firmwares at the moment.
StudioX options
You can edit some global options for the StudioX software when clicking "Edit" and choosing "Preferences..." from the menu bar.
Check for Updates automatically
If your PC is connected to the internet this option makes sure that your StudioX installation is up-to-date. All 7 days the update dialog is shown automatically, showing whether an update is available or not.
Updating StudioX is simple and straight forward.
From the "Update StudioX" dialog, you can press the "Download" button if an update is available.
Execute the downloaded package and follow the instructions given.
Make sure you closed the application before trying to install a newer version.
Language Selection
If the "Auto" option is selected, StudioX will use the language detected from the system's settings. Otherwise you can force on of the following languages:
- English
- German
Attention: Switching the language may require a restart of the StudioX Application.
