Difference between revisions of "StudioXm:Overview/en"
(Updating to match new version of source page) |
(Importing a new version from external source) |
||
| Line 5: | Line 5: | ||
= BEASTX flybarless system = | = BEASTX flybarless system = | ||
| − | When connection to your BEASTX device is established wait until the data is loaded from the device and initialization sequence is finished. At first the system will calibrate to the radio system, Menu LEDs H to N will cycle up and down at the device (MICROBEAST PLUS/AR7210BX) and you can read | + | ==Connecting to device== |
| + | If not already done start StudioX now. When the USB2SYS is connected to the computer, make sure the corresponding port is selected in the selection box in the middle of the screen. If you have connected it after starting the software, click the RESCAN button above to refresh the port list, usually the correct port will be selected automatically then. If you don't know which port is the right one, also you can disconnect the USB2SYS once again, click RESCAN to clear the port list, connect the USB2SYS, wait a few seconds and click RESCAN once more. Now the port should be selected.<br /> | ||
| + | <br /> | ||
| + | With the BLE2SYS in combination with a smartphone/tablet the BLE2SYS device should appear automatically when starting the app after powering up your flybarless device and BLE2SYS. If this is not the case, click the slection box and choose "BLE2SYS". If nothing's there, click the RESCAN button above to search for new devices. This can take from a few seconds up to a few minutes. If the scan process finishes immediately and the box stays empty it is very likely the bluetooth function is switched off on your phone or the app has no rights to access the bluetooth connection! So check your phone settings in this case.<br /> | ||
| + | <br /> | ||
| + | Then connect the USB2SYS interface to the [SYS] port of your BEASTX device and power it up. Click CONNECT to load the data from your device and to enter configuration menus.<br /> | ||
| + | <br /> | ||
| + | <div class="iosgallery"> | ||
| + | <img class="ios" src="https://wiki.beastx.com/images/studiox/freakware%202019-07-09%20006.PNG"> | ||
| + | <div class="iostext"></div> | ||
| + | </div> | ||
| + | <div class="iosgallery"> | ||
| + | <img class="ios" src="https://wiki.beastx.com/images/studiox/freakware%202019-07-09%20007.PNG"> | ||
| + | <div class="iostext"></div> | ||
| + | </div><br /> | ||
| + | <br /> | ||
| + | {{QUOTE|When connection fails, on the computer once again check driver installation and port configuration as shown in [[StudioXm/en|the beginning]]. When your BLE2SYS is not found, check that it is operating properly. The blue LED must flash in short intervals. Note that by default the interface will switch off automatically after 30 seconds. So if you need too long time to initiate connection it may have been disabled. Disconnect it or cylce power and try again.<br /> | ||
| + | <br /> | ||
| + | Also note that the device name can be different! By default it's "BLE2SYS", but as it's possible to change the bluetooth id, it maybe different. (The automatic deactivation time as well as the bluetooth id can be changed in the configuration menu by clicking the BLE2SYS button above the device selection box.)}}<br /> | ||
| + | <br /> | ||
| + | ==Overview screen== | ||
| + | When connection to your BEASTX device is established, wait until the data is loaded from the device and initialization sequence is finished. At first the system will calibrate to the radio system, Menu LEDs H to N will cycle up and down at the device (MICROBEAST PLUS/AR7210BX) and you can read '''Radio init''' in the opening overview screen. During this time '''do not move the sticks on your radio''' as the system is learning the stick mid positions! In the second step the device checks if the sensors are working correctly and learns the sensor rest positions. Here Menu LEDs A to G will cycle up and down (MICROBEAST PLUS/AR7210BX) and you can read '''Sensor init''' in the opening overview screen. During this time '''do not move the helicopter!''' When initialization is completed, the Status LED will change to blue or purple color indicating the current gyro mode and you can read the gyro gain and mode in the app.<br /> | ||
| + | <br /> | ||
| + | <div class="iosgallery"> | ||
| + | <img class="ios" src="https://wiki.beastx.com/images/studiox/freakware%202019-07-09%20008.PNG"> | ||
| + | <div class="iostext" style= "font-size: x-small;">To be able to access all settings wait until your device has passed initialization sequence. If it doesn't, probably receiver setting is wrong. So start with the CONTROL SETUP.</div> | ||
| + | </div><br /> | ||
| + | <br /> | ||
| + | {{QUOTE|If you can't get through the initialization sequence either because LEDs A-G or LEDs H-N don't stop cycling, please read [[Help:FAQ:Powerup/en|the FAQ]] and do the CONTROL SETUP first (see manual of your device for further instructions).}}<br /> | ||
<br /> | <br /> | ||
<br /> | <br /> | ||
Revision as of 08:52, 12 July 2019
BEASTX flybarless system
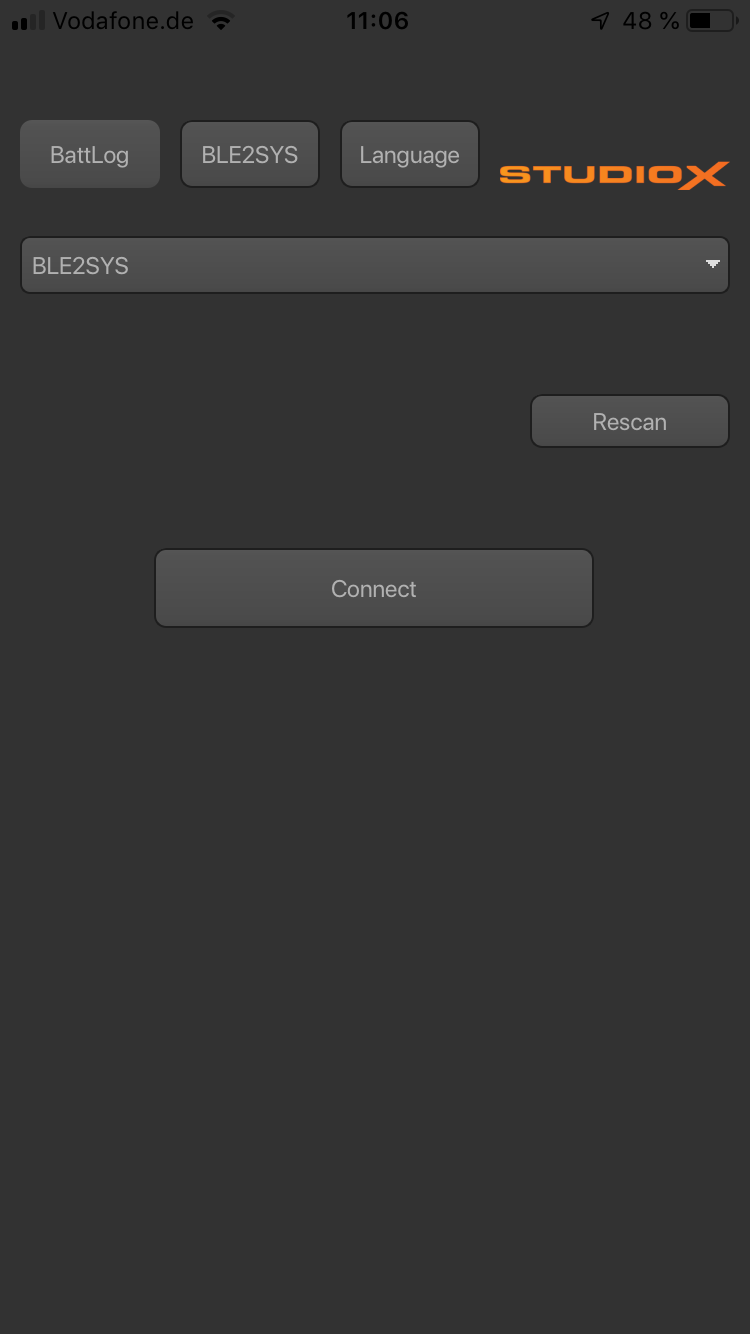
Connecting to device
If not already done start StudioX now. When the USB2SYS is connected to the computer, make sure the corresponding port is selected in the selection box in the middle of the screen. If you have connected it after starting the software, click the RESCAN button above to refresh the port list, usually the correct port will be selected automatically then. If you don't know which port is the right one, also you can disconnect the USB2SYS once again, click RESCAN to clear the port list, connect the USB2SYS, wait a few seconds and click RESCAN once more. Now the port should be selected.
With the BLE2SYS in combination with a smartphone/tablet the BLE2SYS device should appear automatically when starting the app after powering up your flybarless device and BLE2SYS. If this is not the case, click the slection box and choose "BLE2SYS". If nothing's there, click the RESCAN button above to search for new devices. This can take from a few seconds up to a few minutes. If the scan process finishes immediately and the box stays empty it is very likely the bluetooth function is switched off on your phone or the app has no rights to access the bluetooth connection! So check your phone settings in this case.
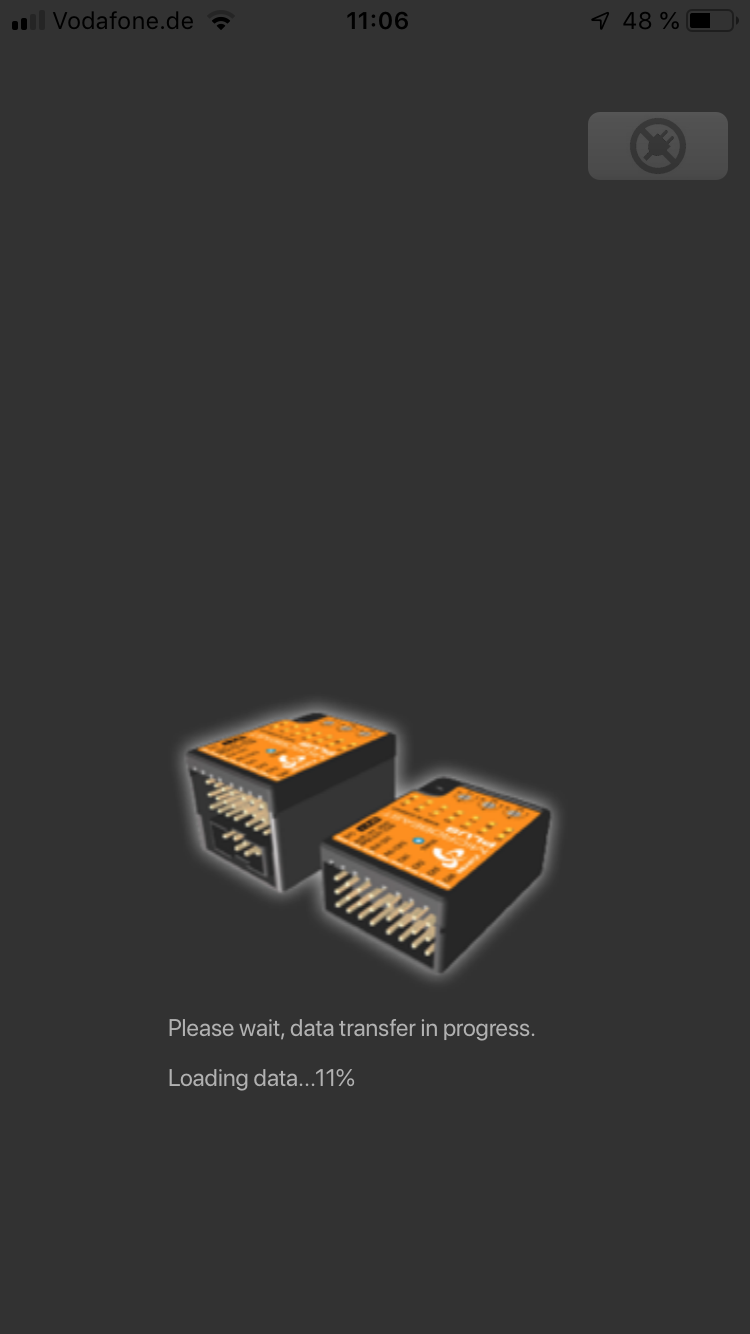
Then connect the USB2SYS interface to the [SYS] port of your BEASTX device and power it up. Click CONNECT to load the data from your device and to enter configuration menus.
When connection fails, on the computer once again check driver installation and port configuration as shown in the beginning. When your BLE2SYS is not found, check that it is operating properly. The blue LED must flash in short intervals. Note that by default the interface will switch off automatically after 30 seconds. So if you need too long time to initiate connection it may have been disabled. Disconnect it or cylce power and try again.
Also note that the device name can be different! By default it's "BLE2SYS", but as it's possible to change the bluetooth id, it maybe different. (The automatic deactivation time as well as the bluetooth id can be changed in the configuration menu by clicking the BLE2SYS button above the device selection box.)
Overview screen
When connection to your BEASTX device is established, wait until the data is loaded from the device and initialization sequence is finished. At first the system will calibrate to the radio system, Menu LEDs H to N will cycle up and down at the device (MICROBEAST PLUS/AR7210BX) and you can read Radio init in the opening overview screen. During this time do not move the sticks on your radio as the system is learning the stick mid positions! In the second step the device checks if the sensors are working correctly and learns the sensor rest positions. Here Menu LEDs A to G will cycle up and down (MICROBEAST PLUS/AR7210BX) and you can read Sensor init in the opening overview screen. During this time do not move the helicopter! When initialization is completed, the Status LED will change to blue or purple color indicating the current gyro mode and you can read the gyro gain and mode in the app.

If you can't get through the initialization sequence either because LEDs A-G or LEDs H-N don't stop cycling, please read the FAQ and do the CONTROL SETUP first (see manual of your device for further instructions).
BLE2SYS Configuration
When using an iOS or Android smartphone/tablet you can configure the BLE2SYS device by tapping the BLE2SYS button on top of the main window. This will open a configuration screen (or you will be asked to enter the pin code for the bluetooth device first). Also you can configure your BLE2SYS by the help of a PC/mac. In this case you have to connect the BLE2SYS to a USB2SYS computer interface using a Y-harness and powering with a receiver battery over the second line (as shown earlier). Then just click "Connect" and open the com port as you would connect to a BEASTX gyro.
There are several options you can change for the BLE2SYS bluetooth interface:
Device Name
You can set a custom device name (maximum length 11 digits) by changing the name in the line on top of the screen, i. e. by entering the name of your helicopter. Then this name will be the bluetooth identifier. Please note when chaging the name you may have to restart the StudioX app as well as the BLE2SYS device in order to see the new name in the main window.
Automatic deactivation
Never ever fly your helicopter when the bluetooth device is active! The bluetooth signal is sent on the 2.4GHz band and may interfer with your radio signal. For your convenience you can set an automatic deactivation timeout here, so the device will power off automatically after the given amount of time when no connection is requested. So you can leave the module plugged into your BEASTX device when flying the helicopter and when not using the app. When you set the timeout to 0 the device will be active all time.
Warning: When you deactivate the timeout never leave your BLE2SYS connected when flying your helicopter! This can lead to radio signal loss and cause severe injury or damage!
Change pin code
If necessary you can change the pin code for connecting to the BLE2SYS. We highly recommend to do this as the default pin "1111" is known to everyone, so it may be very likely that some moron tries to fool you and connects to your device when on the flying field or even when you intend to fly!
Firmware update
When you are using a computer (PC/mac) to configure your BLE2SYS, you will additionaly see a "Firmware Update" button. So obviously when you click that button you will be able to upload latest firmware updates to your BLE2YS interface (if necessary). The update procedure is not different to any other BEASTX device and is described in the section firmware update.