Difference between revisions of "Studiox microbeast plus plugin/de"
Shornstein (talk | contribs) (Created page with "=Setupmenü Übersicht (Setup Overview)= Die Setupmenü Übersicht ist genauso strukturiert wie die Einstellreihenfolge im MICROBEAST PLUS und das Layout ist an die Übersicht...") |
Shornstein (talk | contribs) (Created page with "== Benutzerdefinierte Vorgaben (Custom presets) == Neben den vordefinierten Einstellwerten erlaubt MICROBEAST PLUS auch eigene benutzerdefinierte Werte im Gerät zu hinterlege...") |
||
| Line 39: | Line 39: | ||
Fahren Sie mit dem Mauszeiger über die Überschrift eines Listeneintrags um eine kurze Information darüber zu erhalten, wofür eine Einstellung im einzelnen benötigt wird. Für eine detailierte Beschreibung zu den einzelnen Menüpunkten lesen Sie bitte in der entsprechenden MICROBEAST PLUS Bedienungsanleitung nach, die zur Firmwareversion Ihres Geräts passt.<br /> | Fahren Sie mit dem Mauszeiger über die Überschrift eines Listeneintrags um eine kurze Information darüber zu erhalten, wofür eine Einstellung im einzelnen benötigt wird. Für eine detailierte Beschreibung zu den einzelnen Menüpunkten lesen Sie bitte in der entsprechenden MICROBEAST PLUS Bedienungsanleitung nach, die zur Firmwareversion Ihres Geräts passt.<br /> | ||
| − | == Custom | + | == Benutzerdefinierte Vorgaben (Custom presets) == |
| − | + | Neben den vordefinierten Einstellwerten erlaubt MICROBEAST PLUS auch eigene benutzerdefinierte Werte im Gerät zu hinterlegen, z.B. um einen Zwischenwert zwischen den vorgegebenen Einstellwerten verwenden zu können. Beachten Sie, dass es nicht ausreichend ist über StudioX den benutzerdefinierten Wert einzustellen! Sie müssen am jeweiligen Setupmenü Einstellpunkt auch tatsächlich die Verwendung der benutzerdefinierten Vorgabe wählen.<br /> | |
<br /> | <br /> | ||
| − | + | Um die benutzerdefinierte Taumelscheibenmischung auszuwählen klicken Sie bei Setupmenü Einstellpunkt '''H''' auf den "Custom" Link. Es öffnet sich dann ein eigenes Fenster in dem sämtliche für eine Taumelscheibenmischung notwendigen Parameter editiert werden können.<br /> | |
<br /> | <br /> | ||
Revision as of 13:59, 17 November 2015
Allgemeines
Das MICROBEAST PLUS Plug-In wird automatisch geladen when ein MICROBEAST PLUS/MICROBEAST PLUS HD mit StudioX verbunden wird. Bitte beachten Sie, dass das Plug-In nur eingeschränkte Funktion bietet, wenn die Geräte Firmware Version kleiner als V3.1.3 ist. In diesem fall empfehlen wir ein Firmwareupdate durchzuführen.
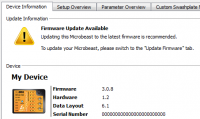
Geräteübersicht (Device Information)
Hier werden grundlegende Informationen zu dem angeschlossenen MICROBEAST PLUS angezeigt wie
- neu erhältliche Firmware
- aktuelle Firmwareversion des Geräts
- Hardwareversion des Geräts
- Versionsnummer des Datenlayouts
- Seriennummer
Wenn das Gerät zum ersten mal mit StudioX verbunden wird, werden Sie aufgefordert eine beliebige Bezeichnung für das Gerät anzugeben (optional). Dadurch können Sie unterschiedliche Geräte besser unterscheiden, z.B. wenn sie Sicherungen verschiedener Geräte erstellen. Ausserdem können Sie Notizen zu dem Gerät hinterlegen sowie ein beliebiges Bild zu dem Gerät abspeichern, wie z.B. ein Foto von dem Modell in dem das MICROBEAST PLUS verbaut ist.
Im unteren Abschnitt werden sämtliche Anleitungen und weiteres Infomaterial passend zu dem Gerät angezeigt. Wenn Sie über StudioX im freakware Network eingeloggt sind und das MICROBEAST PLUS auf diesen Account registriert ist, sehen Sie ausserdem alle verfügbaren Firmwaredateien und Upgrademöglichkeiten. Um eine Update-/Upgradedatei anzufordern klicken Sie einfach auf den gewüschten Eintrag, damit die Datei von unserem Server generiert wird. Wenn die Datei zum hochladen bereit ist (markiert mit "DONE") klicken Sie nochmals auf den Listeneintrag und der Updatevorgang startet automatisch.
Änderungen manuell/automatisch abspeichern
Geänderte Einstellungen werden nicht sofort auf dem Gerät gespeichert. Allerdings wenn die Schaltfläche "Save changes manually" im unteren Bereich der Anzeige NICHT markiert ist, werden alle geänderten Einstellungen nach einer kurzen Wartezeit an das MICROBEAST PLUS geschickt, wenn zwischenzeitlich nichts mehr verändert wird. Wählen Sie "Save changes manually" hingegen aus, dann werden sämtliche Änderungen im Hintergrund erfasst und Sie können genau bestimmen ob und wann die Daten im MICROBEAST PLUS überschrieben werden sollen, indem Sie auf die "Save now" Schaltfläche klicken. Über "Undo" button können Sie Änderungen auch wieder rückgängig machen, solange diese noch nicht geschrieben wurden.
Wenn Änderungen durchgeführt aber noch nicht auf das MICROBEAST PLUS geschrieben wurden
- werden die neu gewählten Werte mit hellblauem Hintergrund dargestellt
- erscheinen im unteren Bereich die Meldung "Unsaved Settings" (nichtgespeicherte Änderungen) und die Anzahl der Änderungen
Setupmenü Übersicht (Setup Overview)
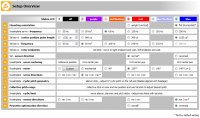
Die Setupmenü Übersicht ist genauso strukturiert wie die Einstellreihenfolge im MICROBEAST PLUS und das Layout ist an die Übersichtskarte angelehnt, die dem MICROBEAST PLUS beiliegt. So erhalten Sie einen guten Überblick und können Sie die Einstellungen leicht prüfen.
Derzeit lassen sich nur statische Parameter über StudioX einstellen. Einstellungen wie die "Heckservo Wegbegrenzung" oder "Weganpassung der Taumelscheibe" die eine Interaktion am Heli oder mit dem Fernsteuersender erfordern lassen sich nicht ändern.
Fahren Sie mit dem Mauszeiger über die Überschrift eines Listeneintrags um eine kurze Information darüber zu erhalten, wofür eine Einstellung im einzelnen benötigt wird. Für eine detailierte Beschreibung zu den einzelnen Menüpunkten lesen Sie bitte in der entsprechenden MICROBEAST PLUS Bedienungsanleitung nach, die zur Firmwareversion Ihres Geräts passt.
Benutzerdefinierte Vorgaben (Custom presets)
Neben den vordefinierten Einstellwerten erlaubt MICROBEAST PLUS auch eigene benutzerdefinierte Werte im Gerät zu hinterlegen, z.B. um einen Zwischenwert zwischen den vorgegebenen Einstellwerten verwenden zu können. Beachten Sie, dass es nicht ausreichend ist über StudioX den benutzerdefinierten Wert einzustellen! Sie müssen am jeweiligen Setupmenü Einstellpunkt auch tatsächlich die Verwendung der benutzerdefinierten Vorgabe wählen.
Um die benutzerdefinierte Taumelscheibenmischung auszuwählen klicken Sie bei Setupmenü Einstellpunkt H auf den "Custom" Link. Es öffnet sich dann ein eigenes Fenster in dem sämtliche für eine Taumelscheibenmischung notwendigen Parameter editiert werden können.
Custom Swashplate Mixer
The Custom Swashplate Mixer allows you to use any geometry as long as you are able to define it.
Make sure that the custom preset is selected as swashplate mixing type (dialog's header shows "Active") if you want to see any changes reflected on your model in real-time.
Basic Swashplate Settings
If you are having a scale heli and need phasing for your rotor head you can normally start using a preset swash mixing type from the "Basic Settings" in the upper section:
- Mechanical
- 90°
- 120°
- 140°
- 140° (1=1)
Then only rotate the swash phasing as necessary. Note these presets have nothing to do with the predefined presets of the Swashplate mixing setup menu point. These are only presets for creating your custom swash mixing more easily as you don't have to enter angles and distances separately as it can by done in the section below! Also when rotating the swashphasing by the rotation box in reality this will change the swash angles as you can see in the fields below. So in fact there is no difference between the Basic Settings and the Expert Settings, both will change the same values. It's just a different style of setup.
Expert Swashplate Settings
If the presets do not cover what you are looking for you can freely define your swashplate geometry using the "Expert Settings".
How to setup swash phasing
As this is asked very often we will give a brief explanation here what you are intended to do when setting up of swash phasing is necessary for your scale helicopter. Please note that for setup you have to make sure that your helicopter control is basically working already, i.e. make sure that servo directions have been setup correctly at Setup menu point I and that you stick control on the radio are moving the swashplate into correct directions (forwards, backwards, left and right). For this you may choose one of the predefined Swashplate mixing types at Setup menu point H before which matches your swashplate mixing type best. Also you may go through Setup menu completely and also adjust the rest of the menu points but note that Setup menu points J, K and L will have to be readjusted after setting the swashplate phasing!
- 1. Activate the custom preset as your Swashplate mixing type at Setup menu point H
- 2. Choose the type of swashplate mixing that is required for your helicopter either by selecting a preset under "Basic Setting" or by entering the angles and bolt distances manually under "Expert Setting"
- 3. Align one of the rotorblades in parallel to the helicopters tail boom. Preferably set your thrust stick to 0 degrees of collective pitch
- 4. Now when giving elevator stick input the specific rotorblade mustn't change its pitch. It is only allowed to change pitch when giving aileron input
- 5. Adjust the swash phasing until 4 is fulfilled
- 6. Make sure that you have turned the phasing into the correct direction: If you give right aileron input the rotorblade must change pitch so that the heli will roll to the right. When aligning one of the rotorblades perpendicular to the tail boom this rotorblade must produce a tilt forwards when pushing the elevator stick forwards. If the phasing is inverted by 180° degrees the rotorblades will not steer the heli in the correct direction! in this case repeat 5
Parameter Overview
The layout of the Parameter Overview tab is based on the Parameter menu structure of MICROBEAST PLUS and looks quite similar to the Quick Reference Card which you did get with your device. This makes it easy to check and modify the flight parameters.
For a detailed explanation of the parameter adjustment please consult the MICROBEAST PLUS instruction manual that matches the firmware version of your device. If you hover the mouse cursor over the name of a parameter you will get a brief information what this parameter does. Also you can see which numbers are hidden behind specific designations (like "sport", "normal", "high", ...) when you keep the mouse cursor over these parameter points for a short moment. So you can find out which value you should start with when you want to create a custom preset.
Custom preset
Besides of the predefined presets MICROBEAST PLUS allows to create a custom preset which you can choose instead of the predefined parameter presets, i.e. if you need to set a value which is not offered by the existing presets. Please note that it is not sufficient to adjust the preset value! You also must choose the custom preset in the menu structure so MICROBEAST PLUS will use this value instead of one of the predefined presets. This might sound complicated first but note that this allows to easily switch back to one of the predefined presets on the flying field in case you find out the custom preset is not working well for you.
To edit the custom presets for Control style or Torque precompensation please click on the "Custom" link at these menu points. Then an additional window will open where you can specifically adjust all values necessary for defining the custom preset.
Custom Control style
Setup your custom Control style here. Make sure that the custom preset is selected as Control style preset (dialog's header shows "Active") in order to enable the custom setup.
You can define roll rate and expo for each roation axis. Positive expo values will tame down reaction to stick inputs around the stick center position, negative expo values will intensify the reaction around center position. Please be careful when reducing expo and/or increasing roll rate as this can make the helicopter uncontrollable for you. As a starting point for setup please see what is hidden behind the predefined presets by hovering with the mouse cursor of the different preset values in the "Parameter Overview".
Custom Torque precompensation
Setup your custom Torque precompensation and tail gain asymmetry here. Make sure that the custom preset is selected as Torque precompensation preset (dialog's header shows "Active") in order to enable the custom setup and to see any changes reflected on your model in real-time.
For a detailed explanation of Torque precompensation please consult the MICROBEAST PLUS instruction manual. The parameter "Asymmetry" intensifies the tail gain into torque direction. This can be used if the tail gyro system reacts differently depending on the direction the rudder is moved, i.e. when the tail does stop properly only from rotation into one direction but not from the other. Note the parameter "Direction" determines in which direction the tail gain will be intensified. So it is mandatory you setup the Torque precomensation and determine torque direction before using the "Asymmetry" parameter even if you don't want to use Torque precompensation (in this case simply set the cyclic and collective compensation to "0").
Backup/Restore
From time to time, it might be a good idea to save all the settings you made by clicking the "Create New RestorePoint..." button. Also you can create restore points for sharing your settings with other MICROBEAST PLUS users or with the BEASTX support in case you need assistance with your device.
You can revert your device to a formerly saved state by double-clicking on the entry in the list. Power-cycle your device after performing a complete restore!
Check out the other options by right-clicking on an entry in the list.
- "Export this RestorePoint to file..." can be used to save the restore point to some place on your hard disk for later reference or to give it away
- "Delete this RestorePoint" will remove the RestorePoint from registry
- To edit the comment for a restore point simply click the comment field on the most right side.
Please note that in the lower right corner you can filter the restore point view according to only show restore points for a specific device or specific firmware. If restore points seem to be missing probably they are just not showing due to this filter!
Update Firmware
If you did get a firmware file from the BEASTX support you can open and upload this firmware file to your device here. Usually you don't need to get here when you want to perform a firmware update as update files offered on the "Device Overview" tab can directly be uploaded to your device by clicking on them.
Advanced plugin configuration
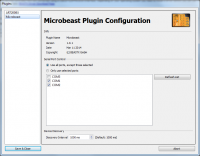
From the StudioX main menu, open "Edit" then "Configure plugins..." to show the plugin Configuration dialog.
Select "MICROBEAST PLUS" from the list:
Serial Port Control
By default the MICROBEAST PLUS plugin will continuously try to query all serial interfaces (the USB2SYS/SPMA3030-Interface is a serial interface) to check if a MICROBEAST PLUS is connected somewhere.
Sometimes it is useful to limit the ports that the plugin is trying to query, i.e. in case a port is blocking the plugin. Therefore you can choose from one of the following options:
- Use all ports, except those selected
- Only use selected ports
Use the entries in the list below to refine your selection. The plugin will only try to query ports which match the selected rule.
Device Discovery
This specifies the interval time which is used to try identifying newly connected devices. This should not be modified if the mechanism is working properly.


