Difference between revisions of "Translations:Manuals:MBPlusFblV5:ReceiverType/9/en"
Jump to navigation
Jump to search
(Importing a new version from external source) |
(Importing a new version from external source) |
||
| (One intermediate revision by the same user not shown) | |||
| Line 1: | Line 1: | ||
=Setup with StudioX= | =Setup with StudioX= | ||
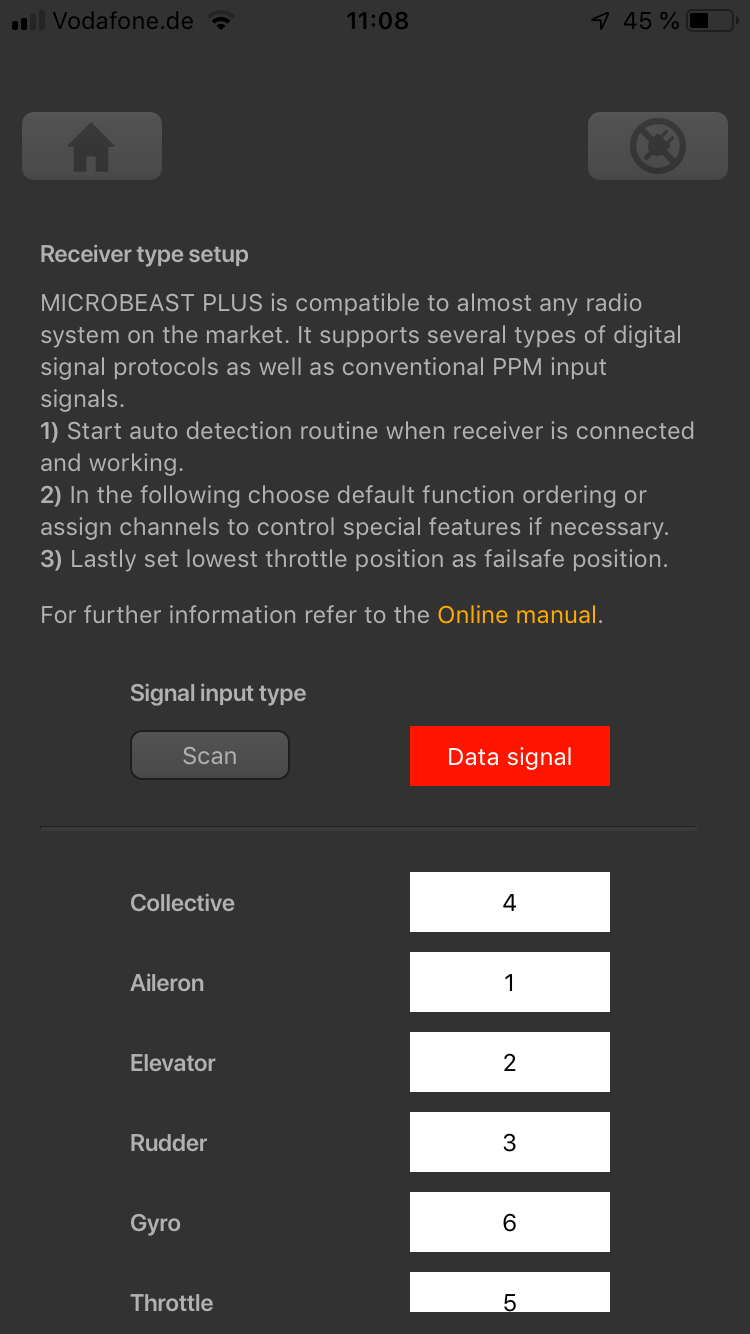
| − | When StudioX is started and your MICROBEAST PLUS was detected by StudioX click the Control Setup tab to show the adjustment options of RECEIVER MENU. The options you see here are basically similar to the Menu Points you can change directly at the device. | + | When StudioX is started and your MICROBEAST PLUS was detected by StudioX, click the Control Setup tab to show the adjustment options of RECEIVER MENU. The options you see here are basically similar to the Menu Points you can change directly at the device. At the top of the screen you can see which type of input signal is selected at the moment. The rows below show what channels are assigned to which control functions. Finally, in the last row you can see the internal value for throttle failsafe position that is set at the moment.<br /> |
| + | <br /> | ||
| + | <div class="iosgallery"> | ||
| + | <img class="ios" src="https://wiki.beastx.com/images/studiox/freakware%202019-07-09%20008.PNG"> | ||
| + | <div>Choose <b>Control setup</b></div> | ||
| + | </div> | ||
| + | <div class="iosgallery"> | ||
| + | <img class="ios" src="https://wiki.beastx.com/images/studiox/freakware%202019-07-09%20011.PNG"> | ||
| + | <div class="iostext">Here you can see current receiver system, function assignment and failsafe setting</div> | ||
| + | </div> | ||
<br /> | <br /> | ||
| − | |||
| − | |||
| − | |||
| − | |||
<br /> | <br /> | ||
Latest revision as of 17:05, 10 July 2019
Setup with StudioX
When StudioX is started and your MICROBEAST PLUS was detected by StudioX, click the Control Setup tab to show the adjustment options of RECEIVER MENU. The options you see here are basically similar to the Menu Points you can change directly at the device. At the top of the screen you can see which type of input signal is selected at the moment. The rows below show what channels are assigned to which control functions. Finally, in the last row you can see the internal value for throttle failsafe position that is set at the moment.

Choose Control setup
Here you can see current receiver system, function assignment and failsafe setting