Difference between revisions of "Manuals:BXFbl:Receiver B/de"
Shornstein (talk | contribs) (Created page with "Nach dem Einlernen jeder Funktion drücke kurz die Taste, um die Zuordnung zu speichern und zur nächsten Funktion zu wechseln. Sobald ein Kanal zugewiesen wurde, ist er nicht...") |
Shornstein (talk | contribs) (Created page with "{| class="wikitable" id="overview" style="text-align: center; background-color: #F9DDCC; border: solid #F18308 2px;" !Menü || Funktion |- | align="center" style="color:white;...") |
||
| Line 28: | Line 28: | ||
{| class="wikitable" id="overview" style="text-align: center; background-color: #F9DDCC; border: solid #F18308 2px;" | {| class="wikitable" id="overview" style="text-align: center; background-color: #F9DDCC; border: solid #F18308 2px;" | ||
| − | ! | + | !Menü || Funktion |
|- | |- | ||
| − | |align="center" style="color:white; background-color:rgb(244,150,0);" width="80px" | '''B''' || | + | | align="center" style="color:white; background-color:rgb(244,150,0);" width="80px" | '''B''' || Pitch |
|- | |- | ||
| − | |align="center" style="color:white; background-color:rgb(244,150,0);" | '''C''' || Roll/ | + | | align="center" style="color:white; background-color:rgb(244,150,0);" | '''C''' || Roll/Querruder |
|- | |- | ||
| − | |align="center" style="color:white; background-color:rgb(244,150,0);" | '''D''' || | + | | align="center" style="color:white; background-color:rgb(244,150,0);" | '''D''' || Nick/Höhenruder |
|- | |- | ||
| − | |align="center" style="color:white; background-color:rgb(244,150,0);" | '''E''' || | + | | align="center" style="color:white; background-color:rgb(244,150,0);" | '''E''' || Heck |
|- | |- | ||
| − | |align="center" style="color:white; background-color:rgb(244,150,0);" | '''F''' || | + | | align="center" style="color:white; background-color:rgb(244,150,0);" | '''F''' || Heckkreisel/Bankumschaltung |
|- | |- | ||
| − | |align="center" style="color:white; background-color:rgb(244,150,0);" | '''G''' || | + | | align="center" style="color:white; background-color:rgb(244,150,0);" | '''G''' || Gas |
|- | |- | ||
| − | |align="center" style="color:white; background-color:rgb(244,150,0);" | '''H''' || Aux | + | | align="center" style="color:white; background-color:rgb(244,150,0);" | '''H''' || Aux-Ausgang |
|- | |- | ||
| − | |align="center" style="color:white; background-color:rgb(244,150,0);" | '''I''' || Governor | + | | align="center" style="color:white; background-color:rgb(244,150,0);" | '''I''' || Governor |
|- | |- | ||
| − | |align="center" style="color:white; background-color:rgb(244,150,0);" | '''J''' || | + | | align="center" style="color:white; background-color:rgb(244,150,0);" | '''J''' || Rettung/Stabilisierung |
|}<br /> | |}<br /> | ||
Revision as of 11:44, 18 June 2024
Da es so viele verschiedene Fernsteuerungen und Empfängertypen gibt, ist es zwingend erforderlich, die Funktionszuweisung für die Empfängerausgangskanäle zu definieren. Vergleiche bitte die voreingestellten Funktionszuweisungen im Abschnitt RADIO SETUP und prüfe, ob die Funktionen bei Deiner Fernsteuerung den gleichen Kanälen zugewiesen sind (z. B. über Servomonitor der Fernsteuerung). MICROBEAST/NANOBEAST wird mit voreingestellten Zuweisungen für jeden Empfänger-/Fernsteuertyp geliefert. Die Zuweisungen können jedoch unterschiedlich sein, z. B. wenn eine JETI-Steuerung und -Empfänger mit Futaba SBUS-Signalausgang verwendet wird. In diesem Fall würde das BEASTX-System eine Futaba Fernsteuerung erwarten, sodass die Zuweisungen zur JETI Steuerung abweichen. In diesem Fall musst Du dem BEASTX System die Zuweisung in den folgenden Menüschritten beibringen. Andernfalls kannst Du diesen Abschnitt überspringen und die voreingestellte Konfiguration durch langes Drücken der Taste laden.
Einstellung am Gerät
Falls noch nicht geschehen, starte das EMPFÄNGERMENÜ und starte die automatische suche bei Menüpunkt A. Anschließend springt das Setup wetier zu Menüpunkt B. Um hier die voreingestellte Kanalbelegung zu laden, halte die Taste mindestens 4 Sekunden gedrückt und lasse sie wieder los. Die gelbe Menü-LED springt dann sofort weiter zu Menüpunkt L oder einem der nachfolgenden Punkte (abhängig von verwendetem Fernsteuertyp und installierter Firmware).
Weicht die Funktionszuordnung Deiner Fernsteuerung von der voreingestellten Belegung ab, müssen Sie die Kanäle/Funktionen schrittweise manuell eingelernt werden. Dies geschieht durch einfaches Betätigen der entsprechenden Funktion/des Steuerknüppels bei den Menüpunkten B, C, D usw. Jeder Menüpunkt stellt eine Steuerfunktion dar.
| Hinweis: NANOBEAST zeigt den aktuellen Menüpunkt durch die Anzahl der LED-Blinkvorgänge an, d. h. beim Menüpunkt B blinkt die LED zweimal, usw. |
Wenn du den Knüppel/den Kanal am Sender bewegst, blinkt die Status-LED blau, um anzuzeigen, dass der Kanal erkannt wurde. Es ist wichtig, dass sich nur ein Kanal am Sender bewegt, wenn die gewünschte Funktion aktiviert ist. Andernfalls kann das Gerät die Kanalbewegung nicht erkennen. Die Status-LED blinkt in diesem Fall rot! Wenn du den falschen Knüppel/Schalter bewegt hast, bewege anschließend einfach den richtigen. Das BEASTX-System merkt sich nur die letzte Funktion, die betätigt und mit einer blinkenden blauen Status-LED bestätigt wurde!
 |
| Bewege den Pitchhebel bei Menüpunkt B und drücke dann die Taste, wenn die Status-LED blinkt. |
Nach dem Einlernen jeder Funktion drücke kurz die Taste, um die Zuordnung zu speichern und zur nächsten Funktion zu wechseln. Sobald ein Kanal zugewiesen wurde, ist er nicht mehr verfügbar und wird von deinem BEASTX-System für den verbleibenden Prozess ignoriert! Nachdem du somit die Pitch-Funktion bei Menüpunkt B gelernt hast, kannst du die Gasfunktion aktivieren (Throttle Hold entfernen) und den Gaskanal bei Punkt G einlernen, indem du dort wieder den Gashebel betätigst. Der Pitch-Kanal wird nicht mehr berücksichtigt, da dieser Kanal bereits zuvor zugewiesen wurde.
| Menü | Funktion |
|---|---|
| B | Pitch |
| C | Roll/Querruder |
| D | Nick/Höhenruder |
| E | Heck |
| F | Heckkreisel/Bankumschaltung |
| G | Gas |
| H | Aux-Ausgang |
| I | Governor |
| J | Rettung/Stabilisierung |
- The first 6 functions must be assigned as they are necessary for the basic flight control and the button remains locked until you operate a new control function. The other functions are optional to assign and can be skipped. If special features like Rescue/AttitudeControl are not installed on your device, the specific menu points for assignment will not be accessible at all!
- The assignment for Aux Output at Menu Point H can be skipped by pressing the button without teaching a channel for this function in case it is not used. Aux may then be used for a 4th swash plate servo if necessary (only MICROBEAST PLUS / ULTRA).
- Likewise, the assignment of the channel for the Governor can be skipped in case it is not needed or if you don‘t want to control the governor with a separate channel, e. g. if your transmitter does not provide enough free channels. If needed, the Governor function is then controlled from the throttle channel. When used in an electric model the Governor always is controlled by the throttle channel. Here you can skip Menu Point I, as an assignment will have no effect.
- Finally at Menu Point J you have to assign the channel that is used to engage the AttitudeControl/rescue stabilization (only when you've installed the this feature on your device). Again, this can be skipped if not needed, if you don‘t want to use a separate channel, or in case you haven't enough free channels left. Please see the section about using AttitudeControl for further details.
Setup with StudioX
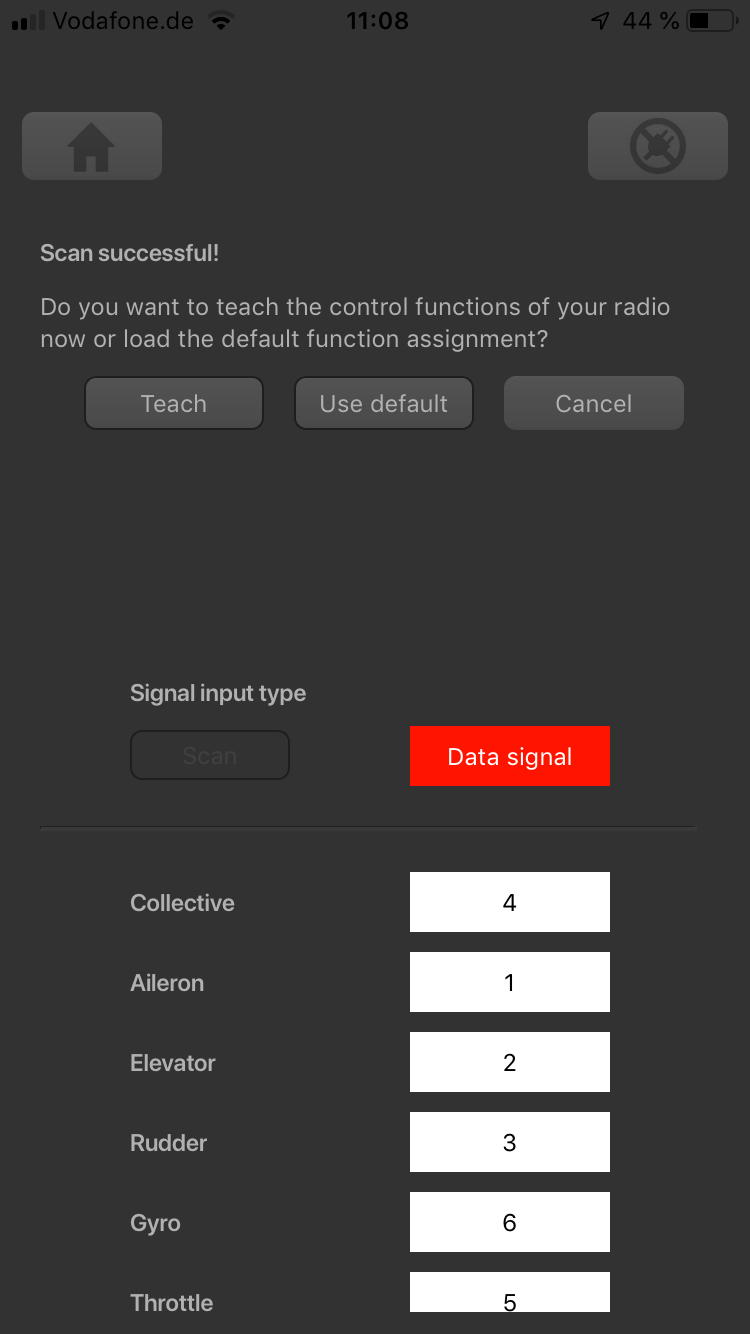
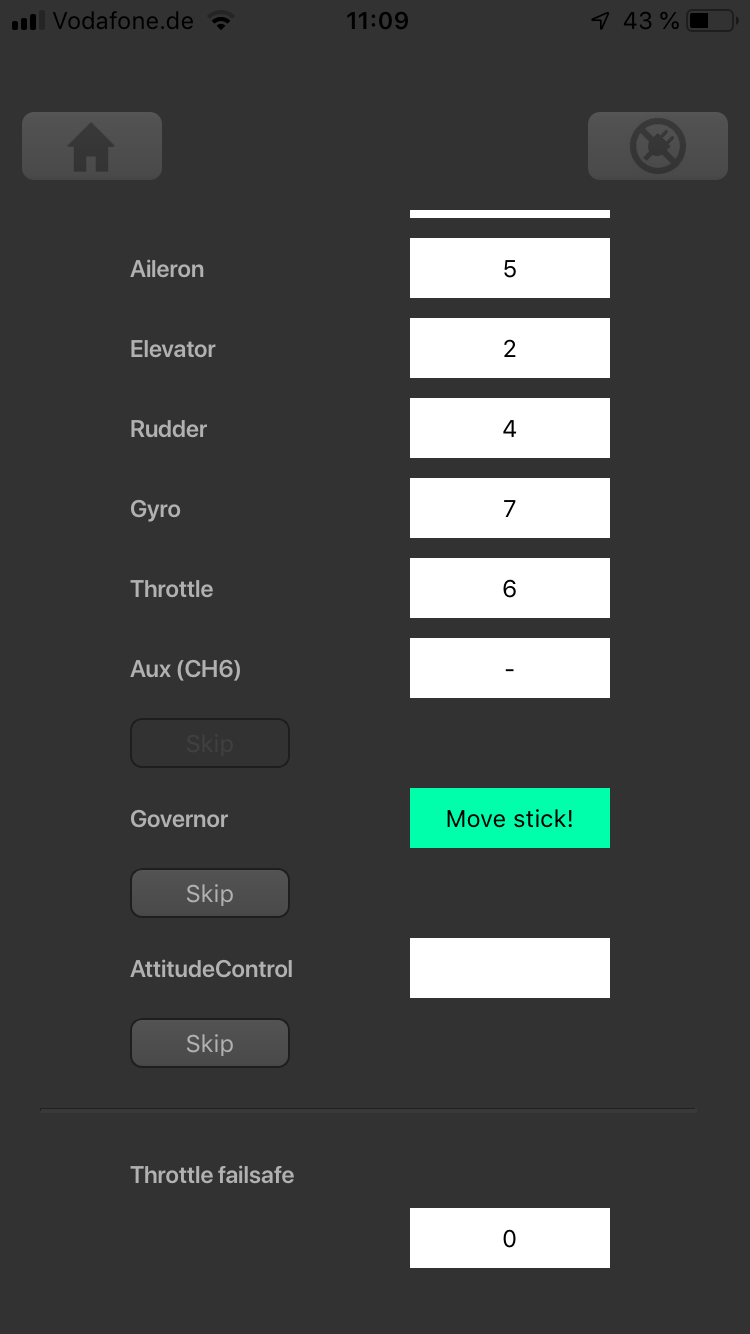
In StudioX open Control Setup and start the receiver Scan. When this was successful a dialog will appear asking for what to do next.
If the assignment on your radio matches the preset functions, simply choose Use default from the dialog.
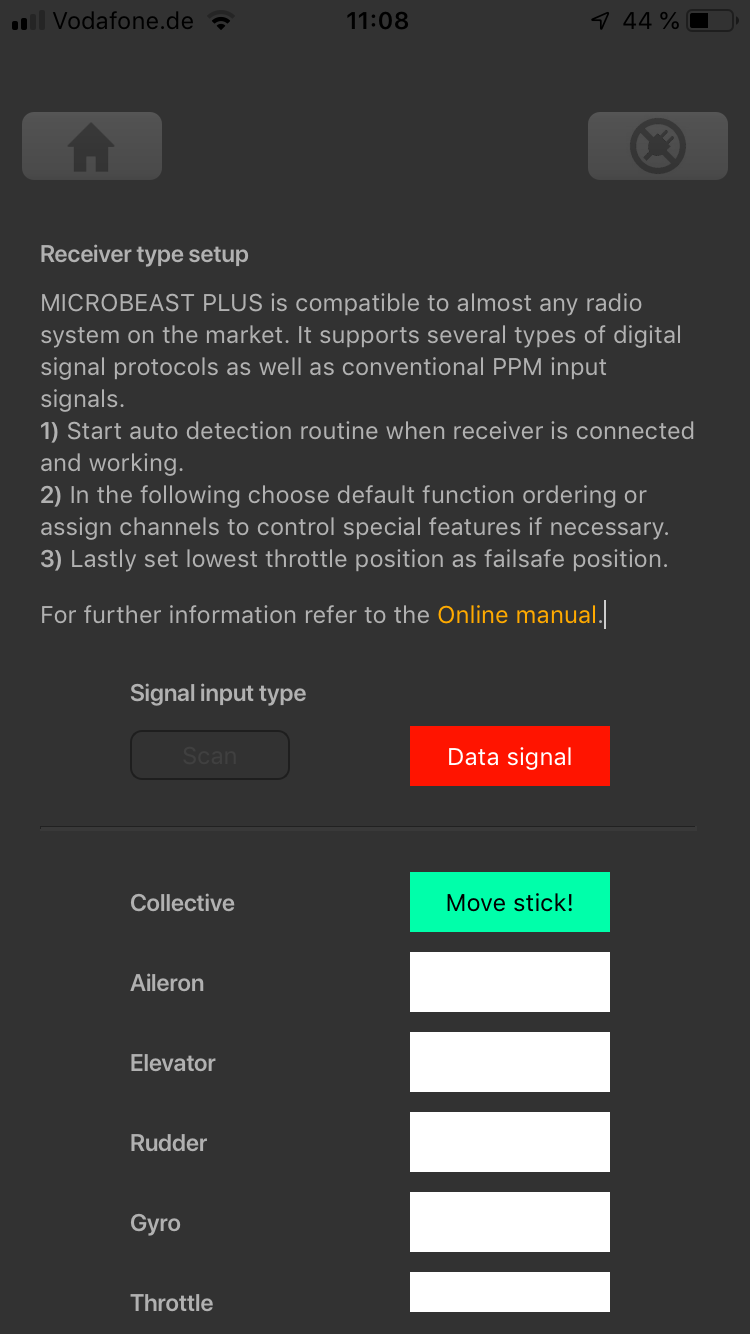
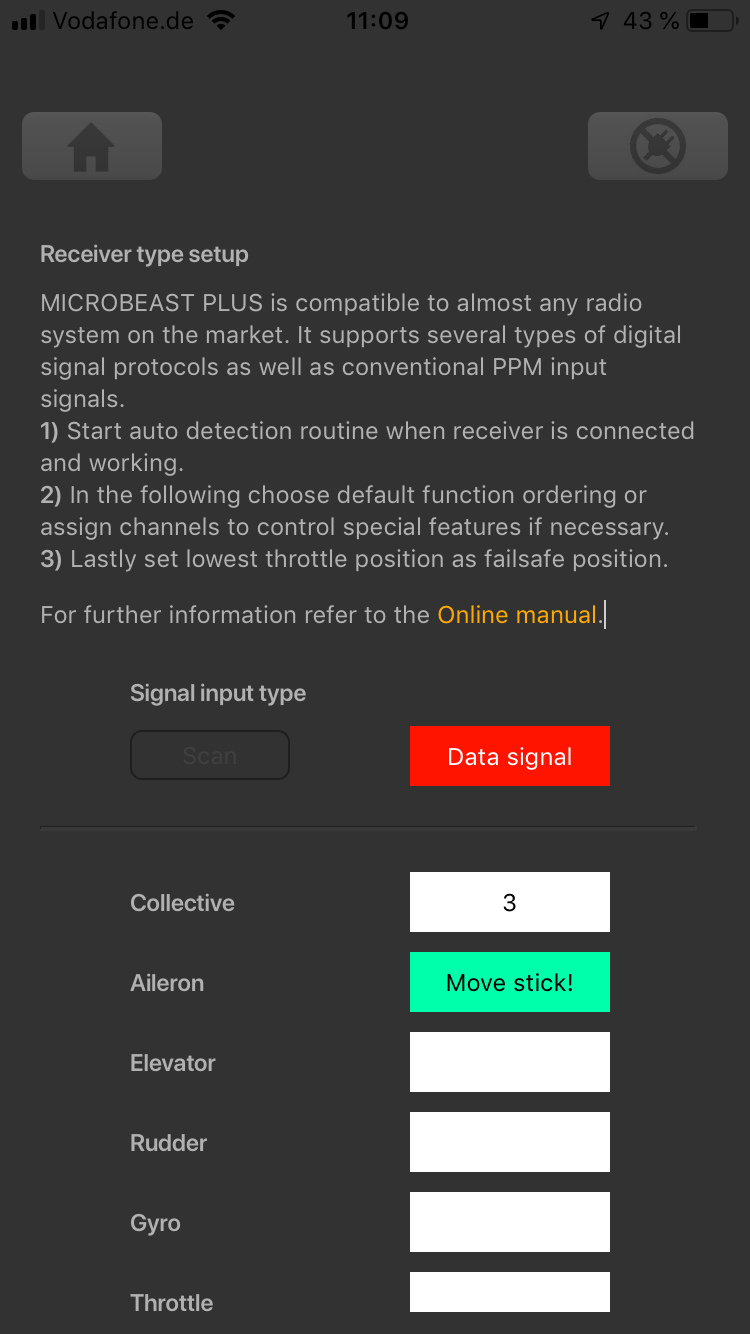
In case the function ordering of your radio system differs from the given tables below, you have to manually assign the channels/functions step by step. This is done by simply actuating the appropriate function on your transmitter at each of the Menu Points B, C, D and so on. Each menu point represents one control function. When you're ready, click Teach in the "New receiver detected!" dialog and start with function assignment at Menu Point B.
- When you move the control stick/change the channel output on the transmitter, the Status LED will flash in blue color when the channel has been detected and the channel number will appear in the display. The setup procedure will jump to the next function assignment immediately.
- It is important that only one channel moves on the radio when the requested function is activated. Otherwise the system can't recognize the movement. The Status LED will flash red in this case!
- Once a channel was assigned, it is no longer available and is ignored by the device for the remaining process. So after learning the collective pitch function at Menu Point B, you can enable the throttle function (remove throttle hold) to teach the throttle channel at Menu Point G with the thrust stick. The collective pitch channel will no longer be considered as this channel has been assigned already.
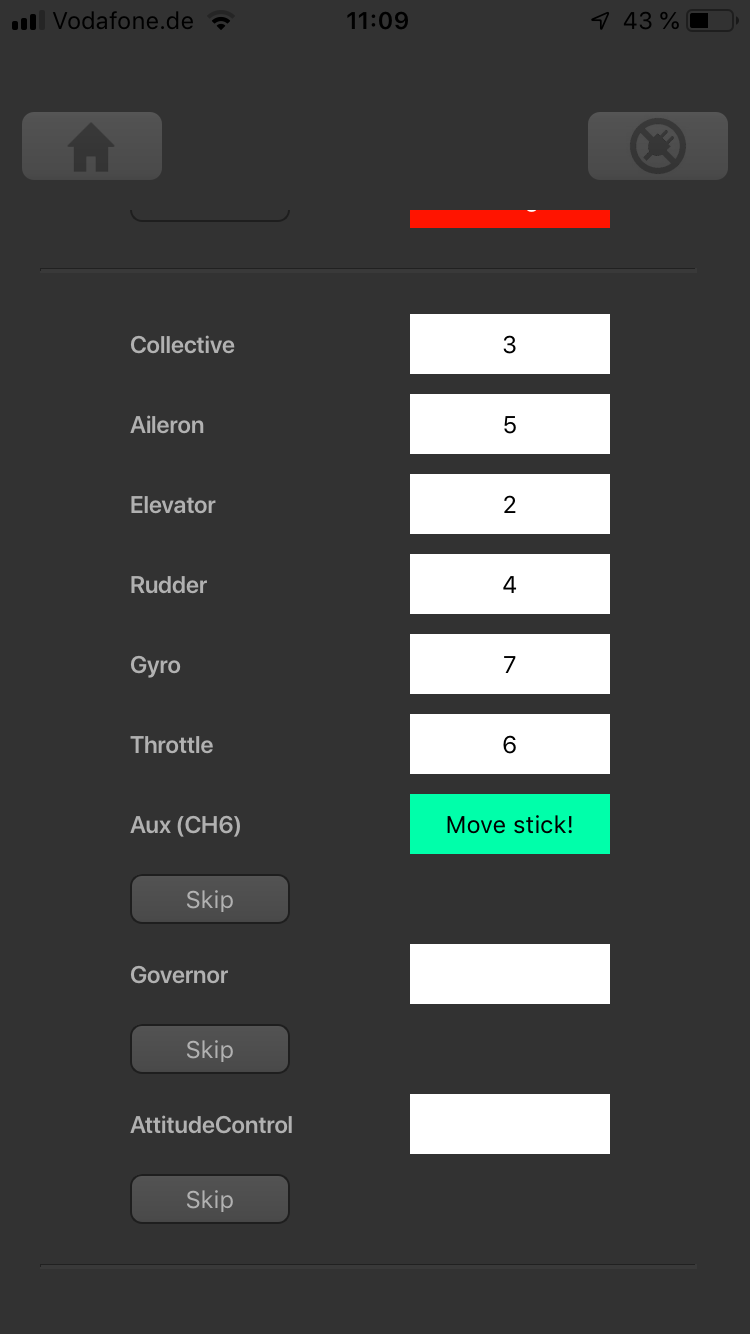
- The first 6 functions must be assigned as theses are necessary for the basic flight control. The other functions are optional and can be skipped. If special features like AttitudeControl/Rescue are not installed on your device, the specific Menu Points will not be shown at all.
- The assignment for Aux Output can be skipped by pressing the "Skip" button without teaching a channel for this function in case it is not used. The Aux may then be used for a 4th swash plate servo if necessary (only MICROBEAST PLUS / ULTRA).
- Likewise, the assignment of the channel for the Governor can be skipped in case it is not needed or if you don‘t want to control the governor with a separate channel, e. g. if your transmitter does not provide enough free channels. If needed, the Governor function is then controlled from the throttle channel. When used in an electric model the Governor always is controlled by the throttle channel. Here you can skip Menu Point I, as an assignment will have no effect.
- Finally, you can assign the channel that is used to engage the AttitudeControl/rescue stabilization (only available you've installed the PROEDITION Upgrade on your device). Again, this can be skipped if not needed, if you don‘t want to use a separate channel, or in case you haven't enough free channels left. Please see the section about using AttitudeControl for further details.