Rettungsfunktion verwenden
Bitte beachte, dass die Rettungsfunktion (AttitudeControl ) ein optionales Feature ist. Die zugehörigen Menüpunkte können nur ausgewählt und aktiviert werden, wenn die MICROBEAST ULTRA ProEdition Firmware auf dem Gerät installiert ist. Dieses optionale Update kann über den freakware Webshop gekauft und dann mit der StudioX App auf das Gerät aufgespielt werden.
AttitudeControl während des Flugs zuschalten
Separate channel
Usually we use a separate free channel on the transmitter to activate/deactivate the AttitudeControl during operation. When this channel is moved into one direction, the AttitudeControl is off, when you switch it into the other direction the AttitudeControl will be activated and your helicopter will be leveled when you release the aileron and elevator stick(s). The amount of deflection of the switch channel determines how strong the system reacts and how hard it tries to keep the helicopter in level position (and in consequence how hard it is to control the heli against).
So what you need on transmitter side is a switch that controls the Attitude channel (the channel number is setup when doing the function assignments in RECEIVER MENU!).
- In "OFF"-Position the channel is moved into one direction, i.e. to -100% throw
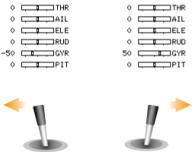
- When you flip the switch in order to activate AttitudeControl, the channel is moved into the other direction, i.e. to +50%. In this case the AttitudeControl will activate with a gain of 50%.
- The LED display on the MICROBEAST ULTRA shows if AttitudeControl is active and how high the gain is. When the switch channel is moved into the OFF direction the Menu-LED A will light up and flash. In this case AttitudeControl is deactivated. When activating AttitudeControl and the throw of the channel is 100%, the LED N will light up. Adjust the deflection of this channel, i.e. by reducing the servo throw in the transmitter, so that the Menu-LEDs lights up next to point G lights up (usually at 50% as described above).
| Menu-LED | A (flashing) | B | C | D | E | F | G | H | I | J | K | L | M | N | |||||||||||||
|---|---|---|---|---|---|---|---|---|---|---|---|---|---|---|---|---|---|---|---|---|---|---|---|---|---|---|---|
| AttitudeControl gain | - | 8% | 16% | 24% | 32% | 40% | 48% | 56% | 64% | 72% | 80% | 88% | 96% | 100% | |||||||||||||
| Auxiliary channel | -100 | -96 | -88 | -80 | -72 | -64 | -56 | -48 | -40 | -32 | -24 | -16 | -8 | 0 | 8 | 16 | 24 | 32 | 40 | 48 | 56 | 64 | 72 | 80 | 88 | 96 | 100 |
| AttitudeControl Status | off | on | |||||||||||||||||||||||||
Programming example Spektrum radio
Gyro channel (combined switch mode)
As an alternative to using a separate channel for activating the AttitudeControl you can also use the gyro gain channel, i.e. when you only have a 6-channel transmitter or when using a receiver with standard wiring (here we simply can't connect an additional channel physically).
The activation of AttitudeControl is quite similar to the separate switch channel:
- Moving the gyro gain channel into one direction will activate the AttitudeControl, the amount of deflection of the channel determines the stabilization gain
- When moving the gyro channel into the other direction the leveling is disabled.
- Additionaly the gyro gain channel also adjusts the tail gyro gain. Precisely this happens when the channel is moved in the direction where the leveling is disabled. Here the amount of deflection adjusts the gyro gain and sets the gyro into heading lock mode.
So for example you would assign a switch to the gyro gain channel and adjust the throw into one direction to let's say -50% and in the other direction to +60%, resulting in a tail gyro gain of 50% and an attitude gain of 60%. By flipping the switch you can activate/deactivate the AttitudeControl (instead of toggling the tail gyro between "Normal-Rate" and "HeadingLock" mode). The gyro gain value of -50% will stay fixed when switching into positive direction.
| Menu-LED | N | M | L | K | J | I | H | G | F | E | D | C | B | A | B | C | D | E | F | G | H | I | J | K | L | M | N |
|---|---|---|---|---|---|---|---|---|---|---|---|---|---|---|---|---|---|---|---|---|---|---|---|---|---|---|---|
| Tail gyro gain | 100% | 96% | 88% | 80% | 72% | 64% | 56% | 48% | 40% | 32% | 24% | 16% | 8% | 0% | last value | ||||||||||||
| AttitudeControl gain | - | 8% | 16% | 24% | 32% | 40% | 48% | 56% | 64% | 72% | 80% | 88% | 96% | 100% | |||||||||||||
| Auxiliary channel | -100 | -96 | -88 | -80 | -72 | -64 | -56 | -48 | -40 | -32 | -24 | -16 | -8 | 0 | 8 | 16 | 24 | 32 | 40 | 48 | 56 | 64 | 72 | 80 | 88 | 96 | 100 |
| AttitudeControl Status | off | on | |||||||||||||||||||||||||
Programming example Spektrum radio
When using AttitudeControl with combined switch channel make sure AttitudeControl is at least deactivated once before take off. Otherwise the tail gyro gain would be minimal as the system would not have been able to determine your tail gain adjustment after initialization!
Also note that in this mode it is absolutely necessary to use a switch that changes the control directions directly and without intermediate steps. In particular, do not use a slider on the radio! Otherwise, when you activate AttitudeControl the tail gyro sensitivity would be decreased to 0% before the system turns on the AttitudeControl. So you would have 0% of tail gyro gain when AttitudeControl is active.
Bank switching
A third alternative is to use the bank switching feature and set the attitude gains fixed for each flight mode. In this case the AttitudeControl will be active as long as the flight mode is selected and the Attitude gain is greater than 0%. So you could use one flight mode for hovering and sports flying, one flight mode for 3D aerobatics and a third one with active angular stabilization for hover training. You can switch between modes using a 3-position switch.
Please note that due to the complexity of this feature configuring and enabling bank switching is only possible with the StudioX app!
Ground testing
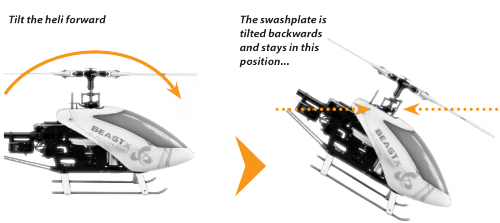
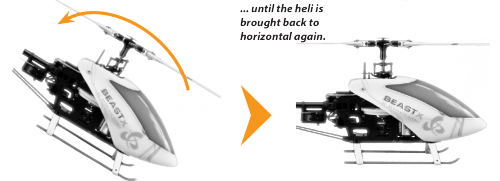
When activating AttitudeControl you should be able to see an immediate impact on the swashplate control: If the heli is tilted to one side, MICROBEAST ULTRA permanently steers the swashplate opposed to the inclination. In the region around horizontal position the swashplate will always stay nearly horizontal to the ground (note: by default the the heli will be rolled by 4 degrees to the right, this is to compensate the tail rotor thrust when hovering!). The system constantly tries to bring the helicopter back to the horizontal position as long as the helicopter is oblique.
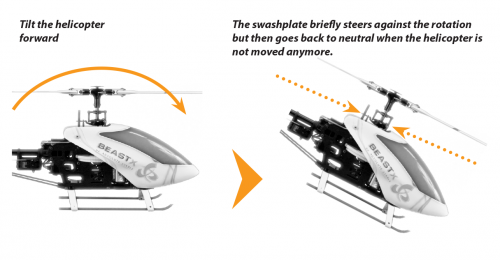
When AttitudeControl is deactivated on the other hand, the swashplate will always be moved back to neutral position (perpendicular to main rotor shaft) as soon as the helicopter is standing still for a few seconds, independant of the current leveling. Here the system only corrects currently occurring rotational movements, but does not regulate the absolute deviation from horizontal position.

In the modes rescue bailout and 3D - Mode the system will also control the collective pitch when it tries to rotate the heli back into level position. Here the maximum amount of pitch is determined by the setting AttitudeControl Pitch in PARAMETER MENU (Point M). When using the mode "rescue bailout with pitch" or "3D - Mode with pitch", additionally it will keep this pitch angle when level position is reached. Then the pilot only can add collective pitch in the same direction, but not in the opposite direction. Check to see if this works correctly and whether the control directions are correct. If the helicopter is kept in hovering position, some positive collective pitch must be applied by AttitudeControl and you can use the thrust stick to add more positive pitch, but not less. Analogous this must work when the heli is in inverted hovering position if using the "3D - Mode with pitch". Here AttitudeControl will apply some negative collective pitch and you can only add more negative pitch, but not positive.
Flying
If not done already, for the first flight keep AttitudeControl deactivated and adjust all flight parameters like tail gyro gain, cyclic gain and so on as described in this manual.
If the heli is set up well you can familiarize yourself with the effect of AttitudeControl. For this we suggest to use the "Bail out rescue mode". Fly the helicopter in a sufficient amount of height in a stable hover and activate the AttitudeControl by using the appropriate switch. The helicopter should continue to hover in approximately the same position. Now give some aileron or elevator stick input and release the stick when the helicopter reached some oblique position. AttitudeControl should bring the helicopter back to the horizontal position more or less rapidly.
Deactivate AttitudeControl and again tilt the helicopter by giving some stick input. Now the helicopter will stay tilted if you release the stick. Only when AttitudeControl is activated by flipping the switch again, the helicopter will be rotated back to horizontal position as before.
If using an AttitudeControl operation mode with collective pitch control, moving the thrust stick does not have any effect in some area as AttitudeControl takes over collective pitch control as long as the thrust stick is in this area and AttitudeControl is activated. Therefore make sure the thrust stick is in a position that will roughly produce the same amount of collective pitch, before and while deactivating AttitudeControl. Otherwise when deactivating AttitudeControl the helicopter would make a leap down, if the thrust stick controls a smaller pitch angle than AttitudeControl.
For safety reason you should never take off or land with activated AttitudeControl. As AttitudeControl actively gives control commands to the control loop of MICROBEAST ULTRA, the swashplate may tilt to one side if the helicopter is not placed perfectly level on the ground. This may cause the helicopter to tilt and crash when trying to take off or when the motor is switched off and the main rotor is running out.
Fine tuning
- The amount of gain/channel deflection must be tuned to your liking later when flying, 50 is usually a good starting point. If you don't want so hard reaction of the system, i.e. when you want to fly while the 3D mode is active for a longer time, you will lower the gain to maybe 30. If you need a very quick and instant turn around, you may raise the value to 60. Just don't go too high from the beginning as this can cause a very hard and abrupt reaction of the system, maybe harder than your helicopter likes!
- If the effect of AttitudeControl is too low resp. the heli rotates back to horizontal position too slowly, increase the AttitudeControl gain by increasing the deflection of the AttitudeControl channel (i.e. by using the servo throw adjustment for this channel in the transmitter). If on the other hand the heli overshoots after reaching neutral position and bobs briefly, maybe the AttitudeControl gain is set too high. Reduce the gain accordingly. In such case also make sure that cyclic gain and cyclic feed forward are well adjusted. It is recommended to adapt the AttitudeControl gain to the preferred application. If you would like to use AttitudeControl as emergency rescue then set the gain as high as possible. On the other hand when using AttitudeControl mainly as a training aid, for example in 3D - mode, then make the effect of AttitudeControl rather weak, so that the system does take over control gently.
- In case the helicopter is not aligned horizontally as desired with active AttitudeControl, i. e. drifts to one side in hovering, the artificial horizon can be readjusted. This is done in Quicktrim Menu at PARAMETER MENU point A or by changing the trim with the StudioX software or StudioXm app. When the positioning seems to vary randomly and the tilt gets a huge offset the longer you fly, this can be due to bad position measurement. The cause for this can be high frequent vibrations, fluctuations in temperature or misalignment of the device. On the other hand please note that minor deviations are inherent. When you feel the artifical horizon gets some little offset after some time let the heli stay in hover position for a few seconds without touching the sticks. Usually the horizon will recalibrate automatically then (as long as the vibration level is not too high).


