Rettungsfunktion verwenden
Bitte beachte, dass die Rettungsfunktion (AttitudeControl ) ein optionales Feature ist. Die zugehörigen Menüpunkte können nur ausgewählt und aktiviert werden, wenn die MICROBEAST ULTRA ProEdition Firmware auf dem Gerät installiert ist. Dieses optionale Update kann über den freakware Webshop gekauft und dann mit der StudioX App auf das Gerät aufgespielt werden.
AttitudeControl während des Flugs zuschalten
Separater Schaltkanal
Im Normalfall wird ein freier Schaltkanal am Fernsteuersender verwendet, um die Rettungsfunktion im Flug ein- und ausschalten zu können. Wird dieser Schaltkanal in eine Richtung bewegt/geschaltet, dann ist die Funktion aus, wird in die andere Richtung geschaltet, dann aktiviert sich die Rettungsfunktion /Lagestabilisierung. Die Höhe des Steuerausschlags bestimmt, wie stark das System versucht den Heli in die Neutrallage zu bringen und dort zu halten bzw. wie schnell sich der Heli in die Ausgangslage dreht und wie schwierig es ist, das System zu übersteuern. Auf Seiten der Fernsteuerung wird also ein Schalter benötigt, der einen freien Steuerkanal in beide Richtungen betätigen kann (welcher Kanal das ist, wird bei der Funktionszuweisung im EMPFÄNGERMENÜ bestimmt!):
- In der Schaltposition "Stabilisierung aus", macht der Steuerkanal einen negativen Ausschlag, z.B. -100%.
- Wenn Du den Schalter umlegst, wird der Kanal in die andere Richtung gesteuert wodurch die Rettung aktiviert wird. Hier sollte der Steuerkanal nicht den vollen Ausschlag machen, sondern nur z.B. 50%. Dann wird die AttitudeControl mit 50% Wirkstärke arbeiten.
- Immer wenn eine Änderung auf dem Steuerkanal für die AttitudeControl stattfindet, z.B. wenn diese ein- oder ausgeschaltet wird oder sich die Höhe des Steuerausschlags ändert, wird der Status der AtitudeControl über die Menü LEDs angezeigt. Zur Unterscheidung von der Heckgyro-Empfindlichkeit leuchtet während der Anzeige des aktuellen AttitudeControl-Status die Status LED rot. Wenn die AttitudeControl aus ist bzw. ausgeschaltet wird, so blinkt die Menü LED A. Falls eine der LEDs B – N aufleuchtet, dann ist die AttitudeControl eingeschaltet. Die einzelnen LEDs signalisieren dabei die Wirkstärke der AttitudeControl. Je größer der Ausschlag des Schaltgebers/Kanals für die AttitudeControl ist, umso weiter wird die Menü LED beim Verstellen in Richtung Punkt N wandern und desto stärker wird die Wirkung der AttitudeControl. Stell im Sender die Höhe des Steuerausschlags so hoch ein, dass die Menü LED neben Punkt G leuchtet, wenn der Schalter für die Rettung gezogen wird.
| Menu-LED | A (flashing) | B | C | D | E | F | G | H | I | J | K | L | M | N | |||||||||||||
|---|---|---|---|---|---|---|---|---|---|---|---|---|---|---|---|---|---|---|---|---|---|---|---|---|---|---|---|
| AttitudeControl gain | - | 8% | 16% | 24% | 32% | 40% | 48% | 56% | 64% | 72% | 80% | 88% | 96% | 100% | |||||||||||||
| Auxiliary channel | -100 | -96 | -88 | -80 | -72 | -64 | -56 | -48 | -40 | -32 | -24 | -16 | -8 | 0 | 8 | 16 | 24 | 32 | 40 | 48 | 56 | 64 | 72 | 80 | 88 | 96 | 100 |
| AttitudeControl Status | off | on | |||||||||||||||||||||||||
Programming example Spektrum radio
| Assign a switch to the AttitudeControl channel... | ... here we use switch H assigned to Aux2 (channel 7) | In the servo monitor you can see how the switch changes the output of gyro channel. +100% = AttitudeControl on |
| -100% = AttitudeControl off | If you like to inverse the switch direction just reverse the AttitudeControl channel in your transmitter | For the beginning reduce the output of the AttitudeControl channel to apprx. 50% in the direction where AttitudeControl is activated. This will set attitude gain to 50%. |
Gyro channel (combined switch mode)
As an alternative to using a separate channel for activating the AttitudeControl you can also use the gyro gain channel, i.e. when you only have a 6-channel transmitter or when using a receiver with standard wiring (here we simply can't connect an additional channel physically).
The activation of AttitudeControl is quite similar to the separate switch channel:
- Moving the gyro gain channel into one direction will activate the AttitudeControl, the amount of deflection of the channel determines the stabilization gain
- When moving the gyro channel into the other direction the leveling is disabled.
- Additionaly the gyro gain channel also adjusts the tail gyro gain. Precisely this happens when the channel is moved in the direction where the leveling is disabled. Here the amount of deflection adjusts the gyro gain and sets the gyro into heading lock mode.
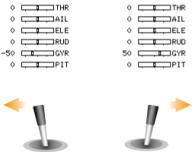
So for example you would assign a switch to the gyro gain channel and adjust the throw into one direction to let's say -50% and in the other direction to +60%, resulting in a tail gyro gain of 50% and an attitude gain of 60%. By flipping the switch you can activate/deactivate the AttitudeControl (instead of toggling the tail gyro between "Normal-Rate" and "HeadingLock" mode). The gyro gain value of -50% will stay fixed when switching into positive direction.
| Menu-LED | N | M | L | K | J | I | H | G | F | E | D | C | B | A | B | C | D | E | F | G | H | I | J | K | L | M | N |
|---|---|---|---|---|---|---|---|---|---|---|---|---|---|---|---|---|---|---|---|---|---|---|---|---|---|---|---|
| Tail gyro gain | 100% | 96% | 88% | 80% | 72% | 64% | 56% | 48% | 40% | 32% | 24% | 16% | 8% | 0% | last value | ||||||||||||
| AttitudeControl gain | - | 8% | 16% | 24% | 32% | 40% | 48% | 56% | 64% | 72% | 80% | 88% | 96% | 100% | |||||||||||||
| Auxiliary channel | -100 | -96 | -88 | -80 | -72 | -64 | -56 | -48 | -40 | -32 | -24 | -16 | -8 | 0 | 8 | 16 | 24 | 32 | 40 | 48 | 56 | 64 | 72 | 80 | 88 | 96 | 100 |
| AttitudeControl Status | off | on | |||||||||||||||||||||||||
Programming example Spektrum radio
| In the transmitter's gyro menu we assign a switch to control the gyro channel (channel 5). | When the switch is released we can set the tail gyro gain. As starting point we use 50% gain (=50% deflection). | When we pull the switch for AttitudeControl the channel is moved to the opposite direction. Here we set -50% deflection which sets the AttitudeControl gain to 50% as well. | Use the servo monitor to check if the gain channel is changing direction when actuating the "rescue switch". |
When using AttitudeControl with combined switch channel make sure AttitudeControl is at least deactivated once before take off. Otherwise the tail gyro gain would be minimal as the system would not have been able to determine your tail gain adjustment after initialization!
Also note that in this mode it is absolutely necessary to use a switch that changes the control directions directly and without intermediate steps. In particular, do not use a slider on the radio! Otherwise, when you activate AttitudeControl the tail gyro sensitivity would be decreased to 0% before the system turns on the AttitudeControl. So you would have 0% of tail gyro gain when AttitudeControl is active.
Bank switching
A third alternative is to use the bank switching feature and set the attitude gains fixed for each flight mode. In this case the AttitudeControl will be active as long as the flight mode is selected and the Attitude gain is greater than 0%. So you could use one flight mode for hovering and sports flying, one flight mode for 3D aerobatics and a third one with active angular stabilization for hover training. You can switch between modes using a 3-position switch.
Please note that due to the complexity of this feature configuring and enabling bank switching is only possible with the StudioX app!
Ground testing
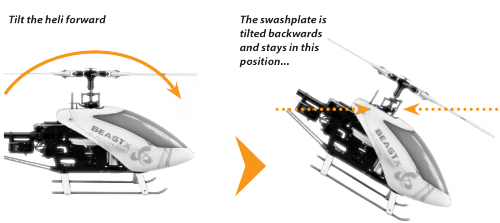
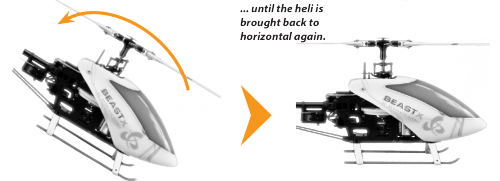
When activating AttitudeControl you should be able to see an immediate impact on the swashplate control: If the heli is tilted to one side, MICROBEAST ULTRA permanently steers the swashplate opposed to the inclination. In the region around horizontal position the swashplate will always stay nearly horizontal to the ground (note: by default the the heli will be rolled by 4 degrees to the right, this is to compensate the tail rotor thrust when hovering!). The system constantly tries to bring the helicopter back to the horizontal position as long as the helicopter is oblique.
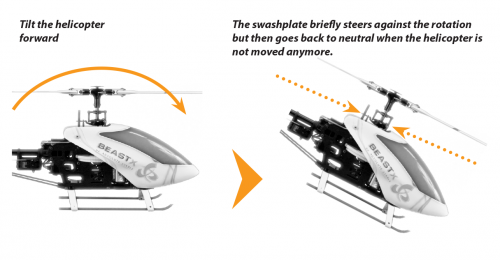
When AttitudeControl is deactivated on the other hand, the swashplate will always be moved back to neutral position (perpendicular to main rotor shaft) as soon as the helicopter is standing still for a few seconds, independant of the current leveling. Here the system only corrects currently occurring rotational movements, but does not regulate the absolute deviation from horizontal position.

In the modes rescue bailout and 3D - Mode the system will also control the collective pitch when it tries to rotate the heli back into level position. Here the maximum amount of pitch is determined by the setting AttitudeControl Pitch in PARAMETER MENU (Point M). When using the mode "rescue bailout with pitch" or "3D - Mode with pitch", additionally it will keep this pitch angle when level position is reached. Then the pilot only can add collective pitch in the same direction, but not in the opposite direction. Check to see if this works correctly and whether the control directions are correct. If the helicopter is kept in hovering position, some positive collective pitch must be applied by AttitudeControl and you can use the thrust stick to add more positive pitch, but not less. Analogous this must work when the heli is in inverted hovering position if using the "3D - Mode with pitch". Here AttitudeControl will apply some negative collective pitch and you can only add more negative pitch, but not positive.
Flying
If not done already, for the first flight keep AttitudeControl deactivated and adjust all flight parameters like tail gyro gain, cyclic gain and so on as described in this manual.
If the heli is set up well you can familiarize yourself with the effect of AttitudeControl. For this we suggest to use the "Bail out rescue mode". Fly the helicopter in a sufficient amount of height in a stable hover and activate the AttitudeControl by using the appropriate switch. The helicopter should continue to hover in approximately the same position. Now give some aileron or elevator stick input and release the stick when the helicopter reached some oblique position. AttitudeControl should bring the helicopter back to the horizontal position more or less rapidly.
Deactivate AttitudeControl and again tilt the helicopter by giving some stick input. Now the helicopter will stay tilted if you release the stick. Only when AttitudeControl is activated by flipping the switch again, the helicopter will be rotated back to horizontal position as before.
If using an AttitudeControl operation mode with collective pitch control, moving the thrust stick does not have any effect in some area as AttitudeControl takes over collective pitch control as long as the thrust stick is in this area and AttitudeControl is activated. Therefore make sure the thrust stick is in a position that will roughly produce the same amount of collective pitch, before and while deactivating AttitudeControl. Otherwise when deactivating AttitudeControl the helicopter would make a leap down, if the thrust stick controls a smaller pitch angle than AttitudeControl.
For safety reason you should never take off or land with activated AttitudeControl. As AttitudeControl actively gives control commands to the control loop of MICROBEAST ULTRA, the swashplate may tilt to one side if the helicopter is not placed perfectly level on the ground. This may cause the helicopter to tilt and crash when trying to take off or when the motor is switched off and the main rotor is running out.
Feineinstellung
- Der genaue Wert für die Wirkstärke der Rettung muss erflogen werden. 50 sollte für den Anfang gute Ergebnisse liefern. Wenn das System nicht so stark reagieren soll und leichter zu übersteuern sein soll, z.B. wenn man den 3D - Modus verwendet und über einen längeren Zeitraum mit aktiver Stabilisierung fliegt, dann wird man den Wert möglicherweise eher reduzieren, z.B. auf 30%. Wenn das System den Heli hingegen sehr schnell und abrupt stabilisieren soll, dann werden höhere Werte, z.B. 60% sinnvoll sein. Für den Anfang sollte der Wert aber nicht allzu hoch sein, da eine sehr hohe Wirkstärke unter Umständen eine extrem abrupte und heftige Reaktion des Systems verursacht, stärker als es der Heli u.U. aushalten kann!
- Die Wirkstärke beeinflusst, wie schnell und heftig der Helikopter bei Eingreifen der Rettungsfunktion in die Neutrallage gedreht wird. Wenn Dir die Wirkung der AttitudeControl zu schwach ist bzw. der Heli zu langsam in die Horizontallage dreht, dann vergrößere den Steuerausschlag für den Schaltgeber der AttitudeControl im Sender (z.B. über die Servowegeinstellung für den entsprechenden Kanal). Sollte andererseits der Heli nach dem Eindrehen in die Neutrallage überschwingen und zu Wippen anfangen, so ist möglicherweise die Wirkstärke der AttitudeControl für diesen Heli zu hoch eingestellt. Reduziere dann ggf. den Steuerausschlag des Schaltgebers entsprechend. Prüfe in solch einem Fall auch nochmals die Einstellung von Taumelscheiben-Empfindlichkeit und Direktanteil. Außerdem empfiehlt es sich, die Höhe der Wirkstärke an den bevorzugten Einsatzzweck anzupassen. Wenn die AttitudeControl als Notfallrettung verwendet werden soll, dann sollte die Wirkstärke möglichst hoch sein. Verwendest Du die AttitudeControl hingegen vorwiegend als Trainingshilfe, z.B. im 3D - Modus, dann stelle die Wirkung der AttitudeControl eher schwach ein, so dass das System die Kontrolle nicht zu abrupt übernimmt und nicht zu stark gegensteuert, wenn Du den Heli fliegst.
- Falls der Heli bei aktiver Rettungsfunktion nicht wie gewünscht horizontal ausgerichtet wird und z.B. zu einer Seite abdriftet, kann die Neutrallage nachjustiert werden. Dies erfolgt über die Schnelltrimmung im PARAMETERMENÜ (bei Punkt A) oder über die StudioX App. Wenn die Lage eher zufällig variiert und das System den Heli immer stärker kippen will, vor allem je länger man fliegt, dann kann das durch schlechte oder falsche Erfassung der Fluglage durch die Sensoren passieren. Ursache hierfür können hochfrequente Vibrationen sein, Temperaturschwankungen oder ein falsche Positionierung des Systems auf dem Heli. Andererseits sind kleinere Lageabweichungen technisch bedingt und sollten nicht weiter problematisch sein (Bitte beachten: das System ist kein hochentwickeltes Autopilotsystem, sondern in erster Linie eine "Not-Rettung"). Wenn das System nach einiger Zeit ein solches Offset entwickelt, lass ihn kurz für einige Sekunden auf der Stelle schweben, ohne die Steuerknüppel zu berühren. Dann wird sich der Horizont wieder an die tatsächliche Fluglage angleichen (vorausgesetzt das Vibrationsniveau ist nicht zu hoch und die Sensordatenerfassung deshalb von Haus aus sehr schlecht).


