Fernsteueranlage
Einrichten der Fernsteuerung
Es kann nahezu jede Fernsteueranlage mit mindestens 6 Steuerkanälen verwendet werden. Grundsätzlich erfolgt die Bedienung des MICROBEAST ULTRA über 5 Steuerkanäle (der 6. Kanal steuert den Motorsteller oder das Gasservo). Für die Verwendung der optionalen Zusatzfunktionen wie AttitudeControl oder Drehzahlregler für Verbrennerhelis können zusätzliche Steuerkanäle von Vorteil sein. Ausserdem können im Betrieb mit Summensignalempfängern weitere Servoausgänge z.B. für Beleuchtung oder Einziehfahrwerk angesteuert werden, sofern entsprechende Kanäle zur Verfügung stehen.
- Erstelle im Fernsteuersender einen neuen Modellspeicher für das Modell.
 |
 |
 |
- Verwende auf keinen Fall die elektronische Taumelscheibenmischung des Fernsteuersenders! Diese Aufgabe wird das MICROBEAST ULTRA übernehmen. Wähle im Fernsteuersender immer eine mechanische Taumelscheibenmischung aus (oftmals mit „H1“, „1 Servo“ oder „Normal“ bezeichnet) bzw. deaktiviere jegliche Art von Mischung („No Mix“).
 |
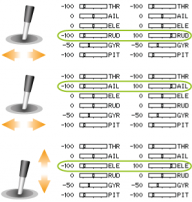
- Stelle alle Trimmungen auf neutral und die Servowege auf 100%. Vergewissere Dich, dass keinerlei Mischfunktionen wie beispielsweise ein Drehmomentausgleich auf Heck aktiv sind und die Einstellungen und Trimmungen in allen Flugphasen gleich sind. Betrachte den Servomonitor des Fernsteuersenders: Jede Steuerknüppelfunktion darf nur genau einen Kanal betätigen (abgesehen vom Pitchknüppel, der üblicherweise auch den Motor mit ansteuert). Bei Knüppelmittenstellung müssen (in allen Flugphasen) die Kanäle in Mittenposition stehen. Denke daran, dass die Servos nicht direkt angesteuert werden, sondern nur per Steuerbefehl dem Gerät mitgeteilt wird, wie schnell der Heli um eine bestimmte Achse drehen soll. Jeder Steuerbefehl wird dabei über genau einen Kanal des Fernsteuersenders betätigt.
 |
- Ändere die Pitchkurven im Sender (noch) nicht, sondern lass sie wie Standardmäßig vorgegeben von -100% bis +100% (oder je nach Senderfabrikat von 0 bis 100%) verlaufen.
 |
 |
 |
- Andere Einstellungen wie z.B. für den Motor oder eventuelle Zusatzkanäle (Beleuchtung, Einziehfahrferwerk, ...) sind wie gewohnt an der Fernsteuerung vorzunehmen. Diese sind im Normalfall von der Einstellung des MICROBEAST ULTRA unabhängig. Falls die interne Drehzahlreglerfunktion oder die AttitudeControl verwendet werden soll, so wird auf die Einstellung dieser Zusatzfunktionen an entsprechender Stelle dieser Anleitung eingegangen.
 |
Achte unbedingt darauf, dass bei Elektromodellen der Motor während der Einstellarbeiten nicht anlaufen kann! Stecke den Motor am besten vom Regler ab, falls der Antriebsakku zur Stromversorgung verwendet wird.
Preparing the receiver
Before using your receiver with MICROBEAST ULTRA make sure that the receiver is bound to the transmitter and that it is sending output data on the servo outputs and/or single-line port. Please refer to the manual of your radio system to find out how binding procedure is performed with your specific system. Also check if there is the need to perform special settings to enable the single-line data output of the receiver in case you intend to use this output port in combination with MICROBEAST ULTRA.
In case of using a single Spektrum® remote DSM2/DSMX satellite receiver directly connected to MICROBEAST ULTRA, you must bind the receiver by the aid of MICROBEAST ULTRA. Here we have no other option to enable binding procedure at the receiver. Please note that it is very important to bind the receiver first before programming MICROBEAST ULTRA and this step must be performed, even if the satellite was already in use and already bound to the transmitter earlier (e. g. in connection with a Spektrum® main receiver unit).
Binding procedure for Spektrum® remote satellites
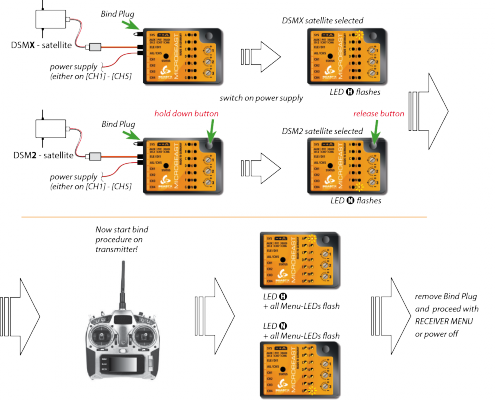
- Insert a Spektrum® “Bind Plug” at the [SYS] port of MICROBEAST ULTRA.
- Disconnect(!) the Spektrum® remote satellite (this is different to previous MICROBEAST and MICROBEAST PLUS devices!)
- In case the power is supplied exclusively at the [SYS] connection, to bind a Spektrum® satellite receiver the power supply must be provided temporarily through any of the other ports [CH1] - [CH5].
Watch out that the motor can not start accidentally when using the BEC of your speed controller to power the unit!
- To bind a DSMX satellite switch on the power supply now. The yellow LED H on the MICROBEAST ULTRA will start to flash. Now connect your remote satellite to the pin board. The receiver's yellow LED will start to flash as well. Now you can bind the transmitter as usual (for more information refer to the instructions of your radio control system).
- To select and bind a DSM2 satellite, hold down the button on MICROBEAST ULTRA while switching on the power supply. Here the LED N on the MICROBEAST ULTRA will flash. Release the button and connect your receiver. Bind the receiver with your transmitter.
After successful binding procedure the receiver‘s LED will stay solid. LED H respectively N flash alternately to all other LEDs for 2 seconds, then MICROBEAST ULTRA will restart. Cycle power and enter receiver setup menu as further setup steps may be required to use this type of receiver. Remove the bind plug and proceed with the setup as described in the following of this manual.

|
Note:
- Check carefully what type of receiver you have and what type you setup. You can bind DSMX satellites as "DSM2", which is wrong! An incorrect setting is not obvious but will lead to malfunction or failure of the radio link later in use.
- It makes no difference if you pull off the “Bind Plug” during the binding process or leave it connected as you would expect from some “standard” Spektrum® receivers!
