Translations:Manuals:MBPlusFblV52:Receiver A/3/en
Jump to navigation
Jump to search

Adjustment on the device
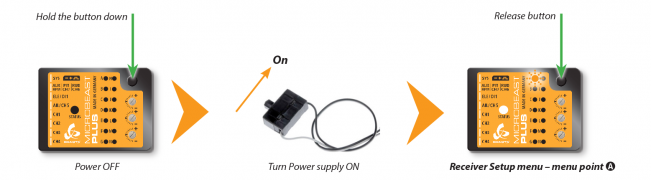
To get into the Receiver menu press the button on MICROBEAST PLUS and hold it down before(!) and while turning on the receiver power supply. The yellow Menu LEDs start to cycle immediately. When you release the button, Menu LED A will be flashing and the color of the Status LED will indicate the receiver type that is selected at the moment.

In order to detect the connected receiver type make sure the receiver is bound to the transmitter and sending out signals. Also make sure the transmitter is setup correctly as shown in the chapter Radio System. Then briefly press the button to start automatic receiver detection routine. The Status LED will indicate which type the system is scanning for at the moment:
| Status-LED | Receiver type/Transmission protocol |
|---|---|
| off | Standard receiver |
| purple | Remote satellite/receiver connected at remote port |
| red | No receiver detected |
| blue | Serial signal at port DI1 |
- In case a single-line receiver is used, the system will skip to Menu Point B when a valid input signal was detected.
- When a Standard receiver is used, the system will exit and restart immediately.
- When detection fails, the system will stay at Menu Point A and the Status LED will flash in red color. Once again make sure your receiver is connected properly to MICROBEAST PLUS, make sure the receiver is bound to the transmitter and sending out control signals. Then please try again.