StudioXm/en: Difference between revisions
Importing a new version from external source |
Updating to match new version of source page |
||
| (42 intermediate revisions by 2 users not shown) | |||
| Line 1: | Line 1: | ||
{{DISPLAYTITLE: | {{DISPLAYTITLE:StudioX software and mobile app|noerror}} | ||
{{TOC_StudioXm/en}} | |||
__TOC__ | __TOC__ | ||
<br /> | <br /> | ||
StudioX | StudioX allows to fully configure your MICROBEAST/MICROBEAST PLUS/MICROBEAST ULTRA, Spektrum AR7210BX and NANOBEAST. You can use it to do all the configuration from the computer or smartphone, to backup settings, load preconfigured setups and do a lot more. In addition you can perform some basic adjustments on older devices like MICROBEAST and Spektrum AR7200BX/AR7300BX.<br /> | ||
<br /> | <br /> | ||
{{ | {{SHORT_QUOTE|width=70|margin=10|Please make sure to always use the latest version in order to be compatible with latest device firmware updates!}}<br /> | ||
<br /> | <br /> | ||
<br /> | <br /> | ||
= | = Smartphone/tablet = | ||
If not already done | If not already done, download and install the latest version of StudioXm from the Apple iTunes Store or GooglePlay Store:<br /> | ||
<br /> | <br /> | ||
<html> | |||
<style> | |||
.banner-container { | |||
display: flex; | |||
align-items: center; | |||
justify-content: center; /* Zentriert die Banner im Container */ | |||
gap: 120px; /* Abstand zwischen den Bannern */ | |||
} | |||
.banner-link { | |||
display: inline-block; | |||
text-decoration: none; /* Entfernt die Unterstreichung des Links */ | |||
} | |||
.banner-link img { | |||
display: block; /* Entfernt unerwünschte Abstände unter dem Bild */ | |||
} | |||
</style> | |||
<div class="banner-container"> | |||
<!-- App Store Banner --> | |||
<a href="https://itunes.apple.com/us/app/studioxm/id1145413743?ls=1&mt=8" class="banner-link" target="_blank"> | |||
<img src="https://www.beastx.com/deu/data/uploads/images/Download_on_the_App_Store_Badge_US-UK_135x40.svg" alt="Download on the App Store" /> | |||
</a> | |||
<!-- Google Play Banner --> | |||
<a href="https://play.google.com/store/apps/details?id=com.freakware.StudioXm" class="banner-link" target="_blank"> | |||
<img src="https://play.google.com/intl/en_us/badges/images/generic/en_badge_web_generic.png" alt="Get it on Google Play" width="150" /> | |||
</a> | |||
</div> | |||
</html> | |||
<br /> | <br /> | ||
'''Make sure to give the App privileges for using the bluetooth connection and to write data to the internal storage.'''<br /> | |||
With iOS you will be asked to grant privileges at first start up. On Android devices sometimes it may be necessary to do this manually in the application settings! (When the StudioX App is not allowed to write to the internal storage, your user specific settings won't be saved, i.e. language and port settings, device names, storing RestorePoints, etc.) Also make sure to allow the App access your internet connection in case you want to download firmware update files for your device. Note this may produce extra costs when using your mobile data connection!<br /> | |||
<br /> | |||
To connect your BEASTX controller with your smartphone/tablet the BLE2SYS bluetooth smart interface is required. This is plugged into your device's SYS port and is used to establish a wireless communication to the phone. | |||
{|class="gallery" | |||
|[[File:Ble2sys.jpg|none|200px]] | |||
|}<br /> | |||
<br /> | |||
= Windows PC/mac = | |||
If not already done you can get StudioX here:<br /> | |||
<br /> | |||
[https://www.beastx.com/eng/index.php?id=support BEASTX website]<br /> | |||
<br /> | <br /> | ||
<br /> | <br /> | ||
| Line 33: | Line 70: | ||
|}<br /> | |}<br /> | ||
After installation of the StudioX software bundle Windows should install the correct drivers when the USB2SYS / SPMA3030 interface is plugged in the | Since Version 15.7.0 you can also use the BLE2SYS interface for a wireless connection to your BEASTX device (only in combination with macOS or Windows 10/11 64-bit versions!). On the computer side a built-in or external bluetooth module (Bluetooth 5.0 compatible or better) is required. If your computer doesn't have a bluetooth module, you can get cheap bluetooth 5.0 USB sticks from your local hardware store.<br /> | ||
<br /> | |||
{|class="gallery" | |||
|[[File:Ble2sys.jpg|none|200px]] | |||
|}<br /> | |||
<br /> | |||
<br /> | |||
==Windows installation== | |||
The setup procedure is easy and works as usual. After installation of the StudioX software bundle, Windows should install the correct drivers automatically when the USB2SYS / SPMA3030 interface is plugged in the USB port for the first time. When using the RX2SIM Multi-Sim Adapter, drivers should install as soon as it is switched to USB2SYS emulation mode (push button repeatedly until LED lights yellow, see RX2SIM manual). Check the notifications of your Windows system: | |||
{|class="gallery" | {|class="gallery" | ||
|[[File:Driver install.png|x50px|noframe|none]] | |[[File:Driver install.png|x50px|noframe|none]] | ||
| Line 39: | Line 85: | ||
|}<br /> | |}<br /> | ||
<br /> | <br /> | ||
If you did not see any message popping up at all, check you Windows device manager if the interface driver has been installed correctly. To access the device manager under windows | If you did not see any message popping up at all, check you Windows device manager if the interface driver has been installed correctly. To access the device manager under windows type devmgmt.msc in the Startmenu's search bar or simply enter '''Device manager'''. | ||
You must be able to find following entry:<br /> | You must be able to find following entry:<br /> | ||
{|class="gallery" | {|class="gallery" | ||
| Line 49: | Line 95: | ||
|} | |} | ||
<br /> | <br /> | ||
In case the drivers did not install correctly please install the SiLabs CP210x VCP drivers from here: [https://studiox.beastx.com/download/win/CP210x_VCP_Windows.zip SiLabs driver package (Windows)].<br /> | |||
<br /> | <br /> | ||
<br /> | <br /> | ||
= | ==macOS installation== | ||
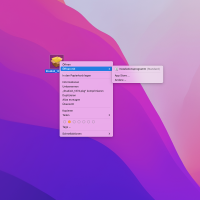
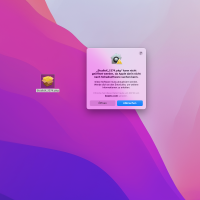
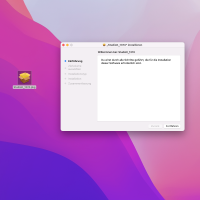
When opening the StudioX .pkg file you may get a message that installation is not allowed. In this case please click the .pkg file with the '''right mouse button'''. Then choose "Open". Now you will see the similar message but this time you can choose "Open". | |||
{|class="gallery" | {|class="gallery" | ||
|[[File: | |width="180pt" style="padding:10px 20px;" align="center"| [[File:Studiox_macos_error.png|x200px|none]] | ||
|width="180pt" style="padding:10px 20px;" align="center"| [[File:Studiox_macos_open.png|x200px|none]] | |||
|width="180pt" style="padding:10px 20px;" align="center"| [[File:Studiox_macos_open_2.png|x200px|none]] | |||
|width="180pt" style="padding:10px 20px;" align="center"| [[File:Studiox_macos_install.png|x200px|none]] | |||
|}<br /> | |}<br /> | ||
<br /> | <br /> | ||
In case your USB2SYS is not displayed in StudioX (Device: "cu.SLAB_USBtoUART") the drivers did not install correctly. Please install the SiLabs CP210x VCP drivers from here: [https://studiox.beastx.com/download/mac/SiLabsUSBDriverDisk.dmg SiLabs driver package (macOS)].<br /> | |||
<br /> | <br /> | ||
<br /> | <br /> | ||
<br /> | <br /> | ||
Latest revision as of 10:30, 10 August 2024
StudioX allows to fully configure your MICROBEAST/MICROBEAST PLUS/MICROBEAST ULTRA, Spektrum AR7210BX and NANOBEAST. You can use it to do all the configuration from the computer or smartphone, to backup settings, load preconfigured setups and do a lot more. In addition you can perform some basic adjustments on older devices like MICROBEAST and Spektrum AR7200BX/AR7300BX.
| Please make sure to always use the latest version in order to be compatible with latest device firmware updates! |
Smartphone/tablet
If not already done, download and install the latest version of StudioXm from the Apple iTunes Store or GooglePlay Store:
Make sure to give the App privileges for using the bluetooth connection and to write data to the internal storage.
With iOS you will be asked to grant privileges at first start up. On Android devices sometimes it may be necessary to do this manually in the application settings! (When the StudioX App is not allowed to write to the internal storage, your user specific settings won't be saved, i.e. language and port settings, device names, storing RestorePoints, etc.) Also make sure to allow the App access your internet connection in case you want to download firmware update files for your device. Note this may produce extra costs when using your mobile data connection!
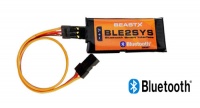
To connect your BEASTX controller with your smartphone/tablet the BLE2SYS bluetooth smart interface is required. This is plugged into your device's SYS port and is used to establish a wireless communication to the phone.
 |
Windows PC/mac
If not already done you can get StudioX here:
BEASTX website
To connect your BEASTX device to the computer you need one of the following USB interfaces:
 |
 |
 |
| BEASTX USB2SYS interface |
SPEKTRUM SPMA3030 interface |
RCWARE RX2SIM Wireless Multi-Sim Adapter with USB2SYS interface emulation |
Since Version 15.7.0 you can also use the BLE2SYS interface for a wireless connection to your BEASTX device (only in combination with macOS or Windows 10/11 64-bit versions!). On the computer side a built-in or external bluetooth module (Bluetooth 5.0 compatible or better) is required. If your computer doesn't have a bluetooth module, you can get cheap bluetooth 5.0 USB sticks from your local hardware store.
 |
Windows installation
The setup procedure is easy and works as usual. After installation of the StudioX software bundle, Windows should install the correct drivers automatically when the USB2SYS / SPMA3030 interface is plugged in the USB port for the first time. When using the RX2SIM Multi-Sim Adapter, drivers should install as soon as it is switched to USB2SYS emulation mode (push button repeatedly until LED lights yellow, see RX2SIM manual). Check the notifications of your Windows system:
 |
 |
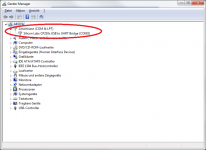
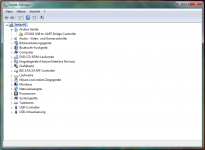
If you did not see any message popping up at all, check you Windows device manager if the interface driver has been installed correctly. To access the device manager under windows type devmgmt.msc in the Startmenu's search bar or simply enter Device manager.
You must be able to find following entry:
In case the drivers did not install correctly please install the SiLabs CP210x VCP drivers from here: SiLabs driver package (Windows).
macOS installation
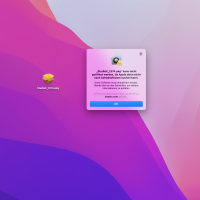
When opening the StudioX .pkg file you may get a message that installation is not allowed. In this case please click the .pkg file with the right mouse button. Then choose "Open". Now you will see the similar message but this time you can choose "Open".
 |
 |
 |
 |
In case your USB2SYS is not displayed in StudioX (Device: "cu.SLAB_USBtoUART") the drivers did not install correctly. Please install the SiLabs CP210x VCP drivers from here: SiLabs driver package (macOS).


