Manuals:BXFbl:Radio Setup/de: Difference between revisions
Shornstein (talk | contribs) Created page with "{{TOC_BXFbl/de|Manuals:BXFbl:Hardware_Installation/de|Manuals:BXFbl:Radio_System:Futaba_SBUS/de||}} {{DISPLAYTITLE:Radio setup|noerror}} __NOTOC__" |
Shornstein (talk | contribs) No edit summary |
||
| Line 1: | Line 1: | ||
{{TOC_BXFbl/de|Manuals:BXFbl:Hardware_Installation/de|Manuals:BXFbl:Radio_System:Futaba_SBUS/de||}} | {{TOC_BXFbl/de|Manuals:BXFbl:Hardware_Installation/de|Manuals:BXFbl:Radio_System:Futaba_SBUS/de||}} | ||
__NOTOC__ | __NOTOC__ | ||
Revision as of 06:11, 18 April 2024
The BEASTX systems can be used with nearly any radio system that provides at least 6 control channels. 4 channels are used for cyclic, pitch, roll and rudder, 1 channels is needed for the motor and 1 channel is used to adjust the gyro gain or to switch parameters. There can be more optional channels to control function like AttitudeControl / Rescue or Governor, but this is not a must have.
The controls can be transmitted from the radio receiver to the BEASTX unit by using a data signal. The systems support a variety of different protocols and manufacturers, and new systems will be added regularly. With MICROBEAST PLUS and ULTRA it's also possible to connect the control inputs to the servo output channel from the receiver in the conventional way.
In the next section we will show the specific connection schemes for each radio system / data protocol. Before, we will show a general guideline on how to setup your radio system for usage with your BEASTX system.
Preparing the radio system
The following setup procedure is shown on a Spektrum DX18 radio, but it's an example for any radio system!
- Create a new model in your radio‘s model memory. We prefer to have a helicopter model in order to use heli specific functions like throttle curve and gyro settings. But you can also use a wing type and assign switches or special mixers to the heli specific function as you like.
 |
 |
 |
- Never enable your radio‘s eCCPM mixing function! Disable any mixing functions for the swashplate or rudder. Each function should be assigned to just one receiver channel. All the swashplate mixing will be done by the BEASTX device. Set your radio‘s swash mixer to mCCPM (mechanical mixing) which is often called “H1”, “1 servo” or “normal“ mixing or disable “swash mixing” if applicable. As mentioned above, you may also use a fixed wing aircraft as model type. Each control function must control one channel on the radio, i. e. CH1 = Thrust, CH2 = Roll, CH3 = Pitch, CH4 = Rudder, ... (the specific channel assignments for your radio system are mentioned in the next sections!).
 |
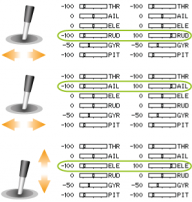
- Make sure that all trims and sub trims are disabled and that all servo travels are set to 100% in any flight mode. There mustn't be any active mixing functions (for example rudder revo-mixing). Have a look at the radio’s servo monitor: each stick has to control one channel / servo output (except for thrust stick which typically controls collective and motor at once when using a heli specific model memory). Please note when using a BEASTX flybarless device you won't directly control the servos of the helicopter. By moving a stick you pass a control command to the system which then performs the necessary servo movements. Each control command is bound to one servo output channel of the transmitter.
 |
- Also do not adjust the collective pitch curve at the moment (if applicable). For the setup procedures it has to be set as a straight line reaching from -100% to +100% (or 0 to 100% depending on radio brand).
 |
 |
 |
- Other functions such as throttle curves, ESC switches or auxiliary functions can be set as usual. But especially for the throttle make sure you can disable the throttle channel and separate it from the collective stick movement for performing the setup. You can do this by using the HOLD switch on the radio or by setting the throttle curve to a flat 0% line. Also it is advisable to create different flight modes for different flight states / rotor head speeds.
 |
Make sure that the motor in electric models can not start when doing the adjustment work! If the drive battery is used as power supply for receiver, servos and BEASTX unit, please disconnect the motor from the ESC for safety reason.
Connecting the receiver
Before connecting your receiver to the BEASTX device make sure that the receiver is bound to the transmitter and that it is sending control signals the servo outputs or data port. In the next section we will give give specific instructions for each radio system, choose your system below to proceed. Please also refer to the manual of your radio system to find out how to setup and use your radio system, especially how binding procedure is performed with your specific system. Also check if there is the need to perform special settings to enable the data output of the receiver in case you intend to use this output port in combination with a BEASTX system.
| Futaba SBUS / SBUS2 |
| Jeti EXBUS |
| SRXL / SUMD / XBUS |
| Spektrum SRXL2 |
| ExpressLRS / CRSF |
| FRSKY SPort / FPort |
| Standard PPM |
| Serial PPM |