FRSKY S.Port & F.Port
FRSky radio offer a huge variety of different receivers and receiver data protocols so that it is very difficult to keep track on all those protocol. Luckily there ase some basic set of protocols that all receivers and radios support, so you should be able to find some working solution.
SBUS
Usually all receivers can send control data using the Futaba SBUS data protocol. As the BEASTX systems support Futaba SBUS for many years, just connect the SBUS output of your receiver to the DI1/IO1 port on your BEASTX system and you're good to go.
S.Port
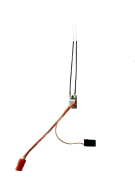
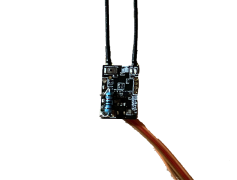
When it comes to sending telemetry data back to the radio it get's more complicated. There is an older system called S.PORT that allows to send telemetry data using a second line. This was firstly introduced for RC drones. One problem here is that the signal is electricaly inverted similar as it is done with Futaba SBUS. But as most controllers do not have signal inverters by default, FRSky did add an inverted S.Port signal to some of their receivers. So that protocol can be read as "normal" UART. If you've got one of those receivers you can use it in combination with MICROBEAST PLUS. MICROBEAST ULTRA has an inverter built in, so here you can use receivers with the original (uninverted) S.PORT.
Please note that you need to add an additional 10k resistor between signal line and ground (minus) in order to stabilize the signal!
|
|
| Archer RS+ using SBUS and S.Port(inv.) signals | Add 10k resistor between S.Port(inv.) and minus |
F.Port
Then there also is F.Port which was introduced in 2020. Here both, telemetry data and control data, are combined using only one data line. This system has been enhanced to F.Port2 and sometimes also is called FBUS. At the moment MICROBEAST ULTRA supports the original F.PORT which seems to be available on any newer FRSky receiver. MICROBEAST PLUS / NANOBEAST can't support F.Port due to it's electrical architecture (bi-directional inverted bus protocol).
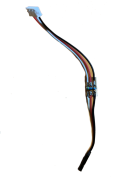
Please note that you may add an additional resistor of 4.7k to 10k between signal line and ground/minus in order to stabilize the singal! It can work without but if the telemetry signal is not stable a resistor will help. This is because of the different signal levels that some FRSky receivers have.

|
|
| Add 4.7k between signal and minus | Use a small PCB to make soldering easier |
Connection scheme
| DI1/IO1 | CH5/IO2 | SYS | SAT | DI2 | Note |
|---|---|---|---|---|---|
| SBUS | - | - | - | - | |
| SBUS | - | S.Port (inv.) | ESC telemetry | - | MB PLUS & NANOBEAST |
| SBUS | - | S.Port | ESC telemetry | - | MB ULTRA |
| - | ESC telemetry | F.Port | - | - | MB ULTRA |
| - | ESC telemetry | - | - | F.Port | MB ULTRA |
S.Port
The wire for ESC control is connected to [CH5] at MICROBEAST PLUS, to [IO2] at MICROBEAST ULTRA and to [CH1] at NANOBEAST.
In order to use SYS for connecting the BLE2SYS / USBSYS for using the StudioX app, simply disconnect the receiver's S.PORT from SYS temporarily, switch off your radio and power cycle your device. It will then enable "normal" SYS operation for programming purpose.
F.Port
The wire for ESC control is connected to [IO1] at MICROBEAST ULTRA. The wire for the ESC telemetry signal is connected to [CH5/IO2].
When using [SYS] for the F.Port signal, you must connect the BLE2SYS / USB2SYS adapter at the DI2 port in order to use the StudioX app. Here you need the Telemetry adapter cable BXA76406 from standard servo connector to 5-pin JST. Alternatively you can simply disconnect the F.PORT signal from SYS temporarily, switch off your radio and power cycle your device. It will then enable "normal" SYS operation for programming purpose. Please note that in this case you will not be able to control the system from the radio during setup with StudioX.
Radio setup
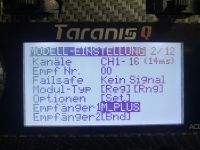
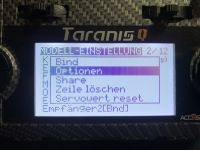
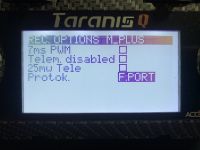
To enable the S.Port or F.Port output scroll down to the MODEL MENU on your FRSKY radio and select the receiver output accordingly.
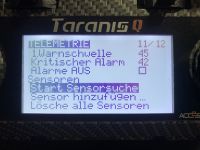
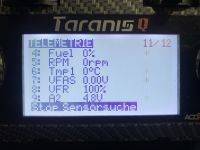
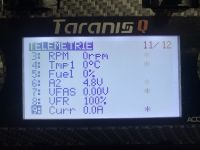
If telemetry data is received you should see all available data when starting the SCAN PROCESS in TELEMETRY MENU of your FRSky radio.
|
|
|
|
|
|
BEASTX setup
In order to use your FRSKY receiver you have to scan the input type in the RECEIVER MENU of your BEASTX device and set the correct channel ordering
for your radio system. We use the channel layout that is also used on FUTABA radio: AETR. You can change the channel layout in the MODEL MENU on your FRSKY radio.
| Channel | Function |
|---|---|
| CH1 | Roll / Aileron |
| CH2 | Pitch / Elevator |
| CH3 | Throttle |
| CH4 | Rudder |
| CH5 | Gain |
| CH6 | Thrust / Collective |
| CH7 | AttitudeControl (optional) |
| CH8 | Governor (optional) |
| CH9 | Aux channel (optional) |
(The optional functions are described in the section Optional features.)
MICROBEAST PLUS / MICROBEAST ULTRA
Push and hold the button on your MICROBEAST and power up the device. Menu LED A will flash instantly. Now release the button. Push again to start the scan process. When scan was successful, Menu LED B will show up. Now push and hold the button for 2 seconds and release in order to load the default channel assignments. If needed you can set up telemetry at Menu LEDs L & M, if applicable; push button briefly to skip. Finally teach throttle failsafe position at Menu LED N by bringing the throttle in lowest position on your radio and push the button again. Now your MICROBEAST will start with init sequence. You can perform basic setup procedure in SETUP MENU when init sequence was completed. For further information about RECEIVER MENU setup, see next section.
NANOBEAST
Connect the SBUS signal of the receiver to [DI1] port and power up NANOBEAST. Connect the push button to [SYS] port. Push and hold the button for 2 seconds, then release. The Status LED will change color or go off. Push the button again to start the scan process. When scan was successful, the Status LED will flash twice. Now push and hold the button for 2 seconds and release in order to load the default channel assignments. If needed you can set up telemetry at Menus L & M, if applicable (Menu L = Status LED flashes long once and then 5 times, for Menu L 6 times); push button briefly to skip. Finally teach throttle failsafe position at Menu N (Status LED flashes long once and then 7 times) by bringing the throttle in lowest position on your radio and push the button again. Now your NANOBEAST will start with init sequence. For further information about RECEIVER MENU setup, see next section. Then perform basic setup procedure in SETUP MENU.
Setup with StudioX
You can also use the StudioX app to start receiver scan and perform further setup steps. In this case open the Control menu in StudioX and click the SCAN button in this menu's screen. For further informations please refer to the StudioX instruction notes.
Please note that when using S.PORT telemetry connected to [SYS], you must disconnect the receiver from [SYS] temporarily, switch off your radio and power cycle your device. It will then enable "normal" [SYS] operation for programming purpose. When using F.Port connected at [SYS] in combination with MICROBEAST ULTRA you can connect your BLE2SYS/USB2SYS at the DI2 port at the side of the device using the Telemetry adapter cable BXA76406.