Translations:Manuals:MB Plus:Flying/8/en
Adjusting the dials

To adjust the dials please only use the supplied plastic BEASTX adjustment tool to prevent damage to the dials!
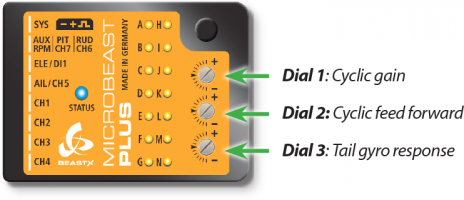
Dial 1: Cyclic gain
The swash gyro gain (cyclic gain) can be set by dial 1 from 50% up to 150%. Turn dial 1 clockwise to increase the gain. The factory setting is horizontal which corresponds to 100% swashplate gain. For your first flights we suggest not changing this setting. However, when using very small helicopters (such as 250 or 450 size), reduce the cyclic gain by 3 marks (=75% gain) as with such small helicopters the control loop tends to overcompensate more easily.
In general the higher the gain, the harder the helicopter will stop after cyclic moves and the more stable and exact the helicopter will fly. But if the gain is too high, the helicopter will tend to oscillate at high frequency especially on the elevator axis. Due to their low mass, this behavior will occur sooner on small helicopters, so typically these do not need as much gain as large helicopters.
On the other hand, in case the gain is too low, the helicopter does not stop precisely and overshoots the more or less after a cyclic movement. Additionally, it feels unstable and sluggish in fast forward flight and when hovering. In general, low gain will allow the helicopter to have more life of its own and so it will not react to stick inputs as precise and immediate as the pilot expects it.
Ideally you set the gain to the sweet spot, at which the system reacts as precise and stable as possible without creating any negative effects.
Dial 2: Cyclic feed forward
This part mixes some amount of stick input directly to the servos, bypassing the control loop. If correctly adjusted, the feed forward relieves the control loop so it will work more efficiently by only having to make residual corrections. Factory setting of the dial is horizontal which provides a good setup in most cases. Turn dial 2 clockwise to increase the cyclic feed forward. This will cause more cyclic stick input going directly to aileron and elevator on the swashplate. Decreasing the direct stick feed forward will do the opposite.
In case the cyclic feed forward is set too high, the stick input will over control the cyclic input from the control loop. Eventually the control loop needs then to steer back and compensate the unwanted cyclic movement. Even though you get the impression to have a more direct and immediate control over the servos with high feed forward values, unwanted side effects may appear, like pitching back on cyclic stops and imprecise fast forward flight.
If the direct cyclic feed forward is too low, the helicopter will feel softer, slower and less "connected". The optimal point depends of many factors like blades, servos, head speed, size and mass of the helicopter. Ideally you can increase the feed forward just as high as possible without any negative effects happening. So you get a quite natural stick feeling and the control loop is supported as good as possible. Before adjusting the cyclic feed forward you should try to find the optimal maximum cyclic gain first (see above). Then adjust the cyclic feed forward and after that, you may have to adjust the cyclic gain once again, as both parameters interact to each other.
The cyclic feed forward does not affect the maximum rate of rotation! If the helicopter turns too slow, you should check the settings of the swashplate limiter in Setup menu point L, change the control behavior at Parameter menu point B or increase the servo travels or “Dual Rate“ setup of your transmitter.
Also to get a quicker and more aggressive response, increase the control behavior at Parameter menu point B (reducing expo and increasing the maximum rotation rate) and increase the cyclic response at Parameter menu point G. It is not recommended to increase the feed forward in this case, although it may produce a quicker servo movement and more direct stick feel at first glance. As described above this value is part of the control loop and you will get side effects as the control loop will not perform optimally, if you do not adjust this part as intended.
Dial 3: Tail gyro response
Turn dial 3 clockwise to increase the tail gyro response. Turning dial 3 counter clockwise will decrease it. Increasing the gyro response will cause a harder stop and quicker response to rudder stick inputs. But if the response is too high, the tail will bounce back after a hard stop and feel spongy when making fast direction changes. If the response is set too low on the other hand, the rudder control feels dull and stopping might be too soft. Ideally the tail should stop perfectly to the point without making any flapping noises.
Factory setting of the dial 3 is horizontal which provides a good setup in most cases. You have to make sure the maximum possible tail gyro gain has already been determined (see above) before adjusting the tail gyro response. Then after adjusting the tail gyro response you may have to adjust the tail gyro gain once again, as these parameters interact to each other.