Difference between revisions of "Manuals:BXFbl:Radio Setup:RemoteSat/de"
Shornstein (talk | contribs) (Created page with "'''NANOBEAST'''<br /> Beim NANOBEAST wird der Satellitenempfänger mit dem „SAT“ gekennzeichneten Anschluss oben auf dem Gerät verbunden.<br /> <br />") |
Shornstein (talk | contribs) (Created page with "Der Regler wird am Port ''CH1'' angesteckt.<br /> <br /> <br />") |
||
| Line 34: | Line 34: | ||
<br /> | <br /> | ||
| − | + | Der Regler wird am Port ''CH1'' angesteckt.<br /> | |
<br /> | <br /> | ||
<br /> | <br /> | ||
Revision as of 19:40, 20 May 2024
Ältere Spektrum®- und JR®-Empfänger verwenden mehrere Satellitenempfänger, die für maximale Reichweite und beste Funkabdeckung an eine Hauptempfängereinheit angeschlossen werden. Mit MICROBEAST und NANOBEAST kannst Du so einen einzelnen Remote-Satelliten direkt an die Flybarless-Einheit anschließen, um ihn in kleinen Hubschraubern zu verwenden und so Gewicht und Kabel zu sparen. Das System kann das Signal von DSMX, DMSS sowie von ALIGN iBus-Remote-Satelliten dekodieren.
Es wird nicht empfohlen, DSMX-, DMSS- oder iBus-Remote-Satelliten in Helikoptern mit einer Größe über der 450er Klasse zu verwenden. Bei größeren Helikoptern kann es aufgrund der Abschirmung durch Carbonteile zu Funkstörungen kommen. Außerdem ist die Reichweite eingeschränkt, wenn nur ein einziger Satellit verwendet wird. Für größere Helis empfehlen wir dringend die Verwendung eines vollwertigen Empfängers mit mehreren Empfangseinheiten. Für Spektrum®-Steuerungen können wir die Verwendung der neueren SRXL2-Satelliten empfehlen, wenn es auf die Größe ankommt. Diese haben viel bessere Übertragungsraten und HF-Stabilität als die älteren DSMX-Satelliten.
Anschlussschema
'MICROBEAST PLUS / MICROBEAST ULTRA
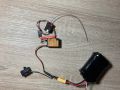
Schließe den Satellitenempfänger an der Seite des MICROBEAST an. Der Anschluss erfolgt an den ersten 3 Pins von rechts, wenn man von der Seite auf das Pinboard blickt. Spannung ist der erste Pin von vorne/rechts, Minus ist der zweite Pin von rechts, Signal wird am dritten Pin von rechts angeschlossen.

|
| JR®/Spektrum® Satellitenanschluss am seitlichen Pinboard |
Der Regler bzw. das Gasservo wird am Port „AIL|CH5“ bzw. „AIL|IO2“ am vorderen Pinboard angeschlossen.
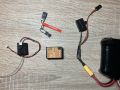
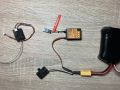
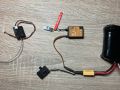
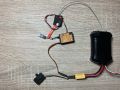
NANOBEAST
Beim NANOBEAST wird der Satellitenempfänger mit dem „SAT“ gekennzeichneten Anschluss oben auf dem Gerät verbunden.
Der Regler wird am Port CH1 angesteckt.
Bind procedure Spektrum® DSMX satellite
MICROBEAST PLUS / NANOBEAST
- Insert a Spektrum® Bind Plug at the [SYS] port.
- To bind a DSMX satellite switch on the power supply now. The yellow LED A on the MICROBEAST PLUS will start to flash immediately. The receiver's yellow LED will start to flash as well. Now you can bind the transmitter as usual (for more information refer to the instructions of your radio control system).
- After successful binding procedure the receiver‘s LED will stay solid. Then the device will restart and enter RECEIVER MENU if the current receiver type is not set to DSMX or will start with init sequence. Remove the bind plug and proceed.
MICROBEAST ULTRA
- Insert a Spektrum® Bind Plug at the [AUX|PIT|RUD] port.
- Disconnect(!) the Spektrum® remote satellite
- To bind a DSMX satellite switch on the power supply now. The yellow LED A on the MICROBEAST ULTRA will start to flash. Now connect your remote satellite to the pin board. The receiver's yellow LED will start to flash as well. Now you can bind the transmitter as usual (for more information refer to the instructions of your radio control system).
- After successful binding procedure the receiver‘s LED will stay solid. Then the device will restart and enter RECEIVER MENU if the current receiver type is not set to DSMX or will start with init sequence. Remove the bind plug and proceed.
Du brauchst: RX, Bind Stecker und Akku
Stecke den Bind Stecker an [AUX-PIT-RUD]
Schalte das MICROBEAST an: LED A blinkt sofort
Stecke dann den RX an - er sollte auch sofort blinken
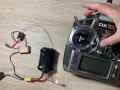
Jetzt starte den Bindevorgang am Sender
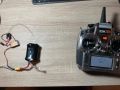
Binden erfolgreich
EMPFÄNGER MENÜ Punkt A


Falls der Bindevorgang fehlschlägt:
- Wenn der Empfänger nicht zu blinken beginnt, stecke ihn einfach aus und schließe ihn erneut an. Das Timing ist hier sehr entscheidend. Es kann sein, dass der Empfänger zu früh mit Strom versorgt wird und dann nicht in den Bindungsmodus wechselt. Versuche, den Empfänger zügiger anzuschließen.
- Wenn die Bindevorgang der Fernsteuerung fehlschlägt, versuche es bitte noch einmal von vorne (Ausschalten und ganz von vorne beginnen). Stelle sicher, dass das die Fernsteuerung mindestens 1 Meter vom Empfänger entfernt ist. Wenn die Steuerung zu nah dran ist, kann dies zu einem instabilen HF-Signal führen.
BEASTX setup
In order to use your remote satellite receiver you have to scan the input type in the RECEIVER MENU of your BEASTX device and set the correct channel ordering
for your radio system if needed.
| Channel | Function |
|---|---|
| CH1 | Throttle |
| CH2 | Roll / Aileron |
| CH3 | Pitch / Elevator |
| CH4 | Rudder |
| CH5 | Gyro gain |
| CH6 | Thrust / Collective |
| CH7 | AttitudeControl (optional) |
| CH8 | Governor (optional) |
| CH9 | Aux channel (optional) |
(The optional functions are described in the section Optional features.)
MICROBEAST PLUS / MICROBEAST ULTRA
Push and hold the button on your MICROBEAST and power up the device. Menu LED A will flash instantly. Now release the button. Push again to start the scan process. When scan was successful, Menu LED B will show up. Now push and hold the button for 2 seconds and release in order to load the default channel assignments. Finally teach throttle failsafe position at Menu LED N by bringing the throttle in lowest position on your radio and push the button again. Now your MICROBEAST will start with init sequence. You can perform basic setup procedure in SETUP MENU when init sequence was completed. For further information about RECEIVER MENU setup, see next section.
NANOBEAST
Make sure throttle on the radio is in idle position. Connect the remote receiver to SAT port and power up NANOBEAST. Connect the push button to SYS port. Push and hold the button for 2 seconds, then release. The Status LED will change color or go off. Push the button again to start the scan process. When scan was successful, the Status LED will flash twice. Now push and hold the button for 2 seconds and release in order to load the default channel assignments. Finally teach throttle failsafe position at Menu N (Status LED flashes long once and then 7 times) by bringing the throttle in lowest position on your radio and push the button again. Now your NANOBEAST will start with init sequence. For further information about RECEIVER MENU setup, see next section. Then perform basic setup procedure in SETUP MENU.
Setup with StudioX
You can also use the StudioX app to start receiver scan and perform further setup steps. In this case open the Control menu in StudioX and click the SCAN button in this menu's screen.
(Picture sys adapter!)