Manuals:BXFbl:Radio Setup:RemoteSat/en: Difference between revisions
Updating to match new version of source page |
Updating to match new version of source page |
||
| (5 intermediate revisions by the same user not shown) | |||
| Line 1: | Line 1: | ||
{{TOC_BXFbl|Manuals:BXFbl:Radio_Setup:FRSKY/en|Manuals:BXFbl:Radio_Setup:Standard_PPM/en||}} | {{TOC_BXFbl|Manuals:BXFbl:Radio_Setup:FRSKY/en|Manuals:BXFbl:Radio_Setup:Standard_PPM/en|RADIOSETUP|}} | ||
{{DISPLAYTITLE:DSMX / DMSS / iBus remote satellite|noerror}} | {{DISPLAYTITLE:DSMX / DMSS / iBus remote satellite|noerror}} | ||
__TOC__ | __TOC__ | ||
| Line 45: | Line 45: | ||
'''MICROBEAST PLUS / NANOBEAST'''<br /> | '''MICROBEAST PLUS / NANOBEAST'''<br /> | ||
* Insert a Spektrum® ''Bind Plug'' at the '''[SYS]''' port. | * Insert a Spektrum® ''Bind Plug'' at the '''[SYS]''' port. | ||
* To bind a DSMX satellite switch on the power supply now. The yellow LED ''' | * To bind a DSMX satellite switch on the power supply now. The yellow LED '''A''' on the MICROBEAST PLUS will start to flash immediately. The receiver's yellow LED will start to flash as well. Now you can bind the transmitter as usual (for more information refer to the instructions of your radio control system). | ||
* After successful binding procedure the receiver‘s LED will stay solid. | * After successful binding procedure the receiver‘s LED will stay solid. Then the device will restart and enter RECEIVER MENU if the current receiver type is not set to DSMX or will start with init sequence. Remove the bind plug and proceed. | ||
<br /> | |||
<br /> | |||
<gallery mode="nolines"> | |||
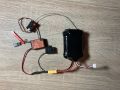
File:DSMXbind MB Plus 1.jpg|You need: RX, bind plug and battery | |||
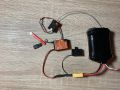
File:DSMXbind MB Plus 2.jpg|Connect bind plug at [SYS] and RX at [DI2] | |||
File:DSMXbind MB Plus 3.jpg|Power up MICROBEAST: LEDs flash | |||
File:DSMXbind MB Plus 4.jpg|Start bind sequence on radio | |||
File:DSMXbind MB Plus 5.jpg|Bind successful | |||
File:DSMXbind MB Plus 6.jpg|Proceed with setup | |||
</gallery> | |||
<br /> | |||
'''MICROBEAST ULTRA (v5.9.x)'''<br /> | |||
* Disconnect(!) the Spektrum® remote satellite and switch on the power supply. | |||
* During init sequence (LED light H-N is running) push and hold the button for 4 seconds, then release | |||
* LEDs A and H flash in alternating sequence | |||
* Now connect your remote satellite to the pin board. The receiver's yellow LED will start to flash in combination with LED A on MICROBEAST | |||
* Now you can bind the transmitter as usual (for more information refer to the instructions of your radio control system). | |||
* After successful binding procedure the receiver‘s LED will stay solid | |||
* Your MICROBEAST will restart and enter RECEIVER MENU. Press button briefly to scan for the receiver and proceed. | |||
<br /> | |||
<br /> | <br /> | ||
''' | {{QUOTE|'''In case binding fails:''' | ||
* | * If receiver does not start to flash simple plug it off and reconnect. Timing is very crucial here, it can be that the receiver gets power to early and does not enter bind mode then. Try to plug it in quicker. | ||
* If binding fails on radio side please try again from beginning (power off and start over). Make sure radio is at least 1 meter / 3 feet away from the RX. If you're too close this can cause unstable RF signal.}} | |||
* | |||
<br /> | <br /> | ||
<br /> | <br /> | ||
| Line 59: | Line 79: | ||
=BEASTX setup= | =BEASTX setup= | ||
In order to use your remote satellite receiver you have to scan the input type in the RECEIVER MENU of your BEASTX device and set the correct channel ordering | In order to use your remote satellite receiver you have to scan the input type in the RECEIVER MENU of your BEASTX device and set the correct channel ordering | ||
for your radio system if needed.<br /> | for your radio system if needed. By default the BEASTX system has a preset channel order that fits to most SPEKTRUM® and JR® radios. If needed you can change the channel ordering in RECEIVER MENU of the BEASTX system.<br /> | ||
<br /> | <br /> | ||
{| class="wikitable" style="text-align: center; margin-left: 70px; background-color: #F9DDCC; border: solid #F18308 2px;" | {| class="wikitable" style="text-align: center; margin-left: 70px; background-color: #F9DDCC; border: solid #F18308 2px;" | ||
|+ style="caption-side:bottom;|SPEKTRUM® default channel order | |+ style="caption-side:bottom;|SPEKTRUM® / JR® default channel order | ||
|- | |- | ||
! style="width: 100px; background-color: #f4bf9e" | Channel | ! style="width: 100px; background-color: #f4bf9e" | Channel | ||
Latest revision as of 08:12, 10 August 2024
Older Spektrum® and JR receivers are using multiple remote satellites that connect to a main receiver unit for maximum range and best radio coverage. With MICROBEAST and NANOBEAST you can connect one single remote satellite directly to the flybarless unit for using in small size helicopters in order to save weight and wires. The system can decode the signal of DSMX, DMSS as well as of ALIGN iBus remote satellites.
It is not recommended to use DSMX, DMSS or iBus remote satellites in helis bigger than 450 size. Bigger helis can cause radio interference due to shielding from carbon parts. Also range is restricted when only using one single remote satellite. For bigger helis we highly recommend using a full size receiver with multiple receiving units. For Spektrum® radios we can recommend using newer SRXL2 remote satellite if size matters. These have much better transmission rates and RF stability than older DSMX satellites.
Connection scheme
MICROBEAST PLUS / MICROBEAST ULTRA
Connect the remote satellite at the side of your MICROBEAST. It must be connected at the first 3 pins from the right, when looking at the pin board from the side. Voltage is the first pin from the front/right, minus is the second pin from the right, signal is connected at the third pin from the right.

|
| JR®/Spektrum® remote satellite connected at side pin board |
The ESC or throttle servo is connected at port AIL|CH5 or AIL|IO2 on the main pinboard.
NANOBEAST
With NANOBEAST connect your remote satellite to the port marked SAT on top of the device.
The ESC is connected at port CH1.
Bind procedure Spektrum® DSMX satellite
MICROBEAST PLUS / NANOBEAST
- Insert a Spektrum® Bind Plug at the [SYS] port.
- To bind a DSMX satellite switch on the power supply now. The yellow LED A on the MICROBEAST PLUS will start to flash immediately. The receiver's yellow LED will start to flash as well. Now you can bind the transmitter as usual (for more information refer to the instructions of your radio control system).
- After successful binding procedure the receiver‘s LED will stay solid. Then the device will restart and enter RECEIVER MENU if the current receiver type is not set to DSMX or will start with init sequence. Remove the bind plug and proceed.
-
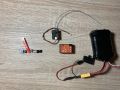 You need: RX, bind plug and battery
 -
![Connect bind plug at [SYS] and RX at [DI2]](/./images/thumb/6/66/DSMXbind_MB_Plus_2.jpg/120px-DSMXbind_MB_Plus_2.jpg) Connect bind plug at [SYS] and RX at [DI2]
Connect bind plug at [SYS] and RX at [DI2] -
 Power up MICROBEAST: LEDs flash
 -
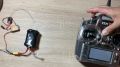 Start bind sequence on radio
 -
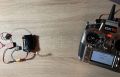 Bind successful
 -
 Proceed with setup

![Connect bind plug at [SYS] and RX at [DI2]](/./index.php?title=File:DSMXbind_MB_Plus_2.jpg)


MICROBEAST ULTRA (v5.9.x)
- Disconnect(!) the Spektrum® remote satellite and switch on the power supply.
- During init sequence (LED light H-N is running) push and hold the button for 4 seconds, then release
- LEDs A and H flash in alternating sequence
- Now connect your remote satellite to the pin board. The receiver's yellow LED will start to flash in combination with LED A on MICROBEAST
- Now you can bind the transmitter as usual (for more information refer to the instructions of your radio control system).
- After successful binding procedure the receiver‘s LED will stay solid
- Your MICROBEAST will restart and enter RECEIVER MENU. Press button briefly to scan for the receiver and proceed.
In case binding fails:
- If receiver does not start to flash simple plug it off and reconnect. Timing is very crucial here, it can be that the receiver gets power to early and does not enter bind mode then. Try to plug it in quicker.
- If binding fails on radio side please try again from beginning (power off and start over). Make sure radio is at least 1 meter / 3 feet away from the RX. If you're too close this can cause unstable RF signal.
BEASTX setup
In order to use your remote satellite receiver you have to scan the input type in the RECEIVER MENU of your BEASTX device and set the correct channel ordering
for your radio system if needed. By default the BEASTX system has a preset channel order that fits to most SPEKTRUM® and JR® radios. If needed you can change the channel ordering in RECEIVER MENU of the BEASTX system.
| Channel | Function |
|---|---|
| CH1 | Throttle |
| CH2 | Roll / Aileron |
| CH3 | Pitch / Elevator |
| CH4 | Rudder |
| CH5 | Gyro gain |
| CH6 | Thrust / Collective |
| CH7 | AttitudeControl (optional) |
| CH8 | Governor (optional) |
| CH9 | Aux channel (optional) |
(The optional functions are described in the section Optional features.)
MICROBEAST PLUS / MICROBEAST ULTRA
Push and hold the button on your MICROBEAST and power up the device. Menu LED A will flash instantly. Now release the button. Push again to start the scan process. When scan was successful, Menu LED B will show up. Now push and hold the button for 2 seconds and release in order to load the default channel assignments. Finally teach throttle failsafe position at Menu LED N by bringing the throttle in lowest position on your radio and push the button again. Now your MICROBEAST will start with init sequence. You can perform basic setup procedure in SETUP MENU when init sequence was completed. For further information about RECEIVER MENU setup, see next section.
NANOBEAST
Make sure throttle on the radio is in idle position. Connect the remote receiver to SAT port and power up NANOBEAST. Connect the push button to SYS port. Push and hold the button for 2 seconds, then release. The Status LED will change color or go off. Push the button again to start the scan process. When scan was successful, the Status LED will flash twice. Now push and hold the button for 2 seconds and release in order to load the default channel assignments. Finally teach throttle failsafe position at Menu N (Status LED flashes long once and then 7 times) by bringing the throttle in lowest position on your radio and push the button again. Now your NANOBEAST will start with init sequence. For further information about RECEIVER MENU setup, see next section. Then perform basic setup procedure in SETUP MENU.
Setup with StudioX
You can also use the StudioX app to start receiver scan and perform further setup steps. In this case open the Control menu in StudioX and click the SCAN button in this menu's screen.
(Picture sys adapter!)