Manuals:BXFbl:Receiver A: Difference between revisions
Shornstein (talk | contribs) No edit summary |
Shornstein (talk | contribs) Marked this version for translation |
||
| (One intermediate revision by the same user not shown) | |||
| Line 14: | Line 14: | ||
<br /> | <br /> | ||
<!--T:4--> | |||
= MICROBEAST PLUS / ULTRA = | |||
To get into the RECEIVER MENU press the button on MICROBEAST PLUS/ ULTRA and hold it down before(!) and while turning on the receiver power supply. The yellow Menu LEDs start to cycle immediately. When you release the button, Menu LED '''A''' will be flashing and the color of the Status LED will indicate the receiver type that is selected at the moment.<br /> | To get into the RECEIVER MENU press the button on MICROBEAST PLUS/ ULTRA and hold it down before(!) and while turning on the receiver power supply. The yellow Menu LEDs start to cycle immediately. When you release the button, Menu LED '''A''' will be flashing and the color of the Status LED will indicate the receiver type that is selected at the moment.<br /> | ||
<br /> | <br /> | ||
| Line 45: | Line 46: | ||
When detection fails, the system will stay at Menu Point '''A''' and the Status LED will flash in red color. Make sure your receiver is connected properly to MICROBEAST PLUS / ULTRA. Also make sure the receiver is bound to the radio and sending out control signals at the receiver ports. Then please try again.<br /><br /><br /> | When detection fails, the system will stay at Menu Point '''A''' and the Status LED will flash in red color. Make sure your receiver is connected properly to MICROBEAST PLUS / ULTRA. Also make sure the receiver is bound to the radio and sending out control signals at the receiver ports. Then please try again.<br /><br /><br /> | ||
<!--T:7--> | |||
= NANOBEAST = | |||
To get into the RECEIVER MENU connect the push button panel to the [SYS] port after turning on the receiver power supply. Now push and hold the button for 2 seconds and release. The Status LED will flash once, indicating Menu Point '''1'''.<br /> | To get into the RECEIVER MENU connect the push button panel to the [SYS] port after turning on the receiver power supply. Now push and hold the button for 2 seconds and release. The Status LED will flash once, indicating Menu Point '''1'''.<br /> | ||
<br /> | <br /> | ||
| Line 56: | Line 58: | ||
<br /> | <br /> | ||
<!--T:9--> | |||
=StudioX app= | |||
When StudioX is started and your BEASTX device is connected with StudioX, click the '''Control Setup''' button to show the adjustment options of RECEIVER MENU.<br /> | When StudioX is started and your BEASTX device is connected with StudioX, click the '''Control Setup''' button to show the adjustment options of RECEIVER MENU.<br /> | ||
* At the top of the screen you can see which type of input signal is selected at the moment, and which telemetry system/ESC is used (if applicable). | * At the top of the screen you can see which type of input signal is selected at the moment, and which telemetry system/ESC is used (if applicable). | ||
| Line 65: | Line 68: | ||
<!--T:10--> | <!--T:10--> | ||
<div | <html> | ||
< | <div style="display: flex; justify-content: flex-start; flex-wrap: wrap; gap: 50px;"> | ||
<div>Choose <b>Control setup</b></div> | <!-- Erstes Bild und Text --> | ||
</div> | <div style="width: 250px; text-align: center;"> | ||
<div | <div style="border-radius: 30px; overflow: hidden; box-shadow: 0 4px 8px rgba(0, 0, 0, 0.2);"> | ||
< | <img src="https://wiki.beastx.com/images/studiox/freakware%202019-07-09%20008.PNG" alt="Screenshot" style="width: 100%; height: auto; display: block;"> | ||
<div | </div> | ||
<div style="margin-top: 20px; margin-bottom: 10px;">Choose <b>Control setup</b></div> | |||
</div> | |||
<!-- Zweites Bild und Text --> | |||
<div style="width: 250px; text-align: center;"> | |||
<div style="border-radius: 30px; overflow: hidden; box-shadow: 0 4px 8px rgba(0, 0, 0, 0.2);"> | |||
<img src="https://wiki.beastx.com/images/studiox/freakware%202019-07-09%20011.PNG" alt="Screenshot" style="width: 100%; height: auto; display: block;"> | |||
</div> | |||
<div style="margin-top: 20px; margin-bottom: 10px;">Here you can see current receiver system, function assignment and failsafe setting</div> | |||
</div> | |||
</div> | </div> | ||
</html> | |||
<br /> | <br /> | ||
<br /> | <br /> | ||
| Line 85: | Line 98: | ||
<!--T:12--> | <!--T:12--> | ||
<div | <html> | ||
< | <div style="display: flex; justify-content: flex-start; flex-wrap: wrap; gap: 50px;"> | ||
<div | <!-- Erstes Bild und Text --> | ||
</div> | <div style="width: 250px; text-align: center;"> | ||
<div | <div style="border-radius: 30px; overflow: hidden; box-shadow: 0 4px 8px rgba(0, 0, 0, 0.2);"> | ||
< | <img src="https://wiki.beastx.com/images/studiox/freakware%202019-07-09%20011.PNG" alt="Screenshot" style="width: 100%; height: auto; display: block;"> | ||
<div | </div> | ||
</div> | <div style="margin-top: 20px; margin-bottom: 10px;">Click "Receiver" button...</div> | ||
<div | </div> | ||
< | <!-- Zweites Bild und Text --> | ||
<div | <div style="width: 250px; text-align: center;"> | ||
<div style="border-radius: 30px; overflow: hidden; box-shadow: 0 4px 8px rgba(0, 0, 0, 0.2);"> | |||
<img src="https://wiki.beastx.com/images/studiox/freakware%202019-07-09%20014.PNG" alt="Screenshot" style="width: 100%; height: auto; display: block;"> | |||
</div> | |||
<div style="margin-top: 20px; margin-bottom: 10px;">...and wait until scan is finished.</div> | |||
</div> | |||
<!-- Drittes Bild und Text --> | |||
<div style="width: 250px; text-align: center;"> | |||
<div style="border-radius: 30px; overflow: hidden; box-shadow: 0 4px 8px rgba(0, 0, 0, 0.2);"> | |||
<img src="https://wiki.beastx.com/images/studiox/freakware%202019-07-09%20016.PNG" alt="Screenshot" style="width: 100%; height: auto; display: block;"> | |||
</div> | |||
<div style="margin-top: 20px; margin-bottom: 10px;">If scan was successful a dialog will display to proceed.</div> | |||
</div> | |||
</div> | </div> | ||
</html> | |||
<br /> | <br /> | ||
<br /> | <br /> | ||
</translate> | </translate> | ||
Latest revision as of 09:12, 10 August 2024
At first menu step of RECEIVER MENU we set the radio system that is used. The system will detect the receiver type automatically when you start the scan process according to the (data) signals the receiver is sending out. When the scan process was successful it may need to adjust additional settings related to the radio system in the following menu steps.
Please note that in the first menu points of RECEIVER MENU there will be no control signal emitted on the throttle output. Only at Menu Point N (Throttle failsafe setting) the output will be activated to check throttle position! If you use a speed controller with BEC, disconnect the motor to avoid unintentional starting of the motor! On a heli with combustion engine you should remove the servo horn from the throttle servo to avoid linkage binding or breaking the servo horn.
MICROBEAST PLUS / ULTRA
To get into the RECEIVER MENU press the button on MICROBEAST PLUS/ ULTRA and hold it down before(!) and while turning on the receiver power supply. The yellow Menu LEDs start to cycle immediately. When you release the button, Menu LED A will be flashing and the color of the Status LED will indicate the receiver type that is selected at the moment.

In order to detect the receiver you're using, make sure the receiver is connected properly, bound to the radio and sending out signals. Also make sure the transmitter is setup correctly. Then briefly press the button to start automatic receiver detection routine. The Status LED will indicate the scan process:
| Status-LED | Receiver type/protocol |
|---|---|
| off | Standard receiver |
| purple | Receiver at remote port |
| red | No receiver detected |
| blue | Receiver at front port |
The system will skip to Menu Point B automatically when a valid input signal was detected. Only if you use a Standard receiver with 5 servo wires connected to each control function at MICROBEAST, the system will exit and restart immediately. Here, there is no need to adjust anything else.
When detection fails, the system will stay at Menu Point A and the Status LED will flash in red color. Make sure your receiver is connected properly to MICROBEAST PLUS / ULTRA. Also make sure the receiver is bound to the radio and sending out control signals at the receiver ports. Then please try again.
NANOBEAST
To get into the RECEIVER MENU connect the push button panel to the [SYS] port after turning on the receiver power supply. Now push and hold the button for 2 seconds and release. The Status LED will flash once, indicating Menu Point 1.
In order to detect the receiver you're using, make sure the receiver is connected properly, bound to the radio and sending out signals. Also make sure the transmitter is setup correctly. Then briefly press the button to start automatic receiver detection routine. The Status LED will indicate the scan process:
The system will skip to Menu Point 2 automatically when a valid input signal was detected (Status LED will flash twice then change to solid blue color). When detection fails, the system will stay at Menu Point 1 and the Status LED will flash in red color. Make sure your receiver is connected properly to NANOBEAST. Also make sure the receiver is bound to the radio and sending out control signals at the receiver ports. Then please try again.
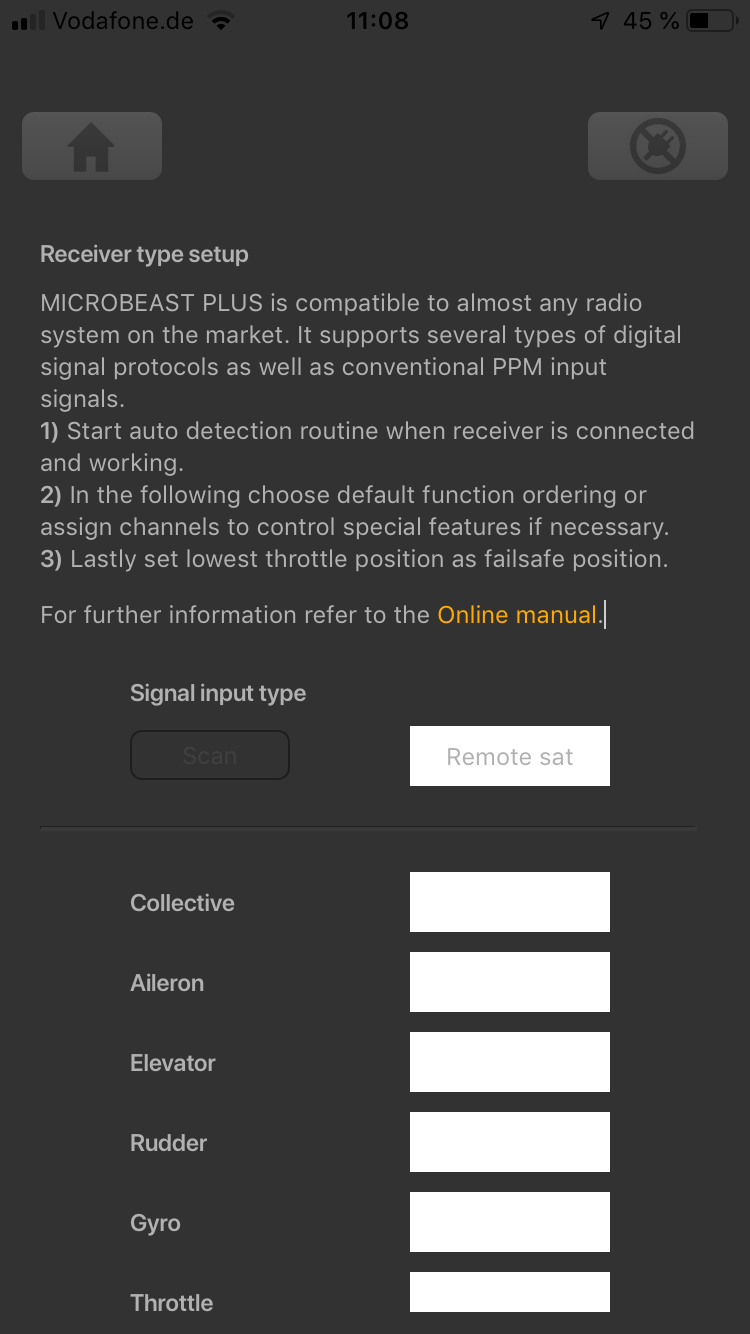
StudioX app
When StudioX is started and your BEASTX device is connected with StudioX, click the Control Setup button to show the adjustment options of RECEIVER MENU.
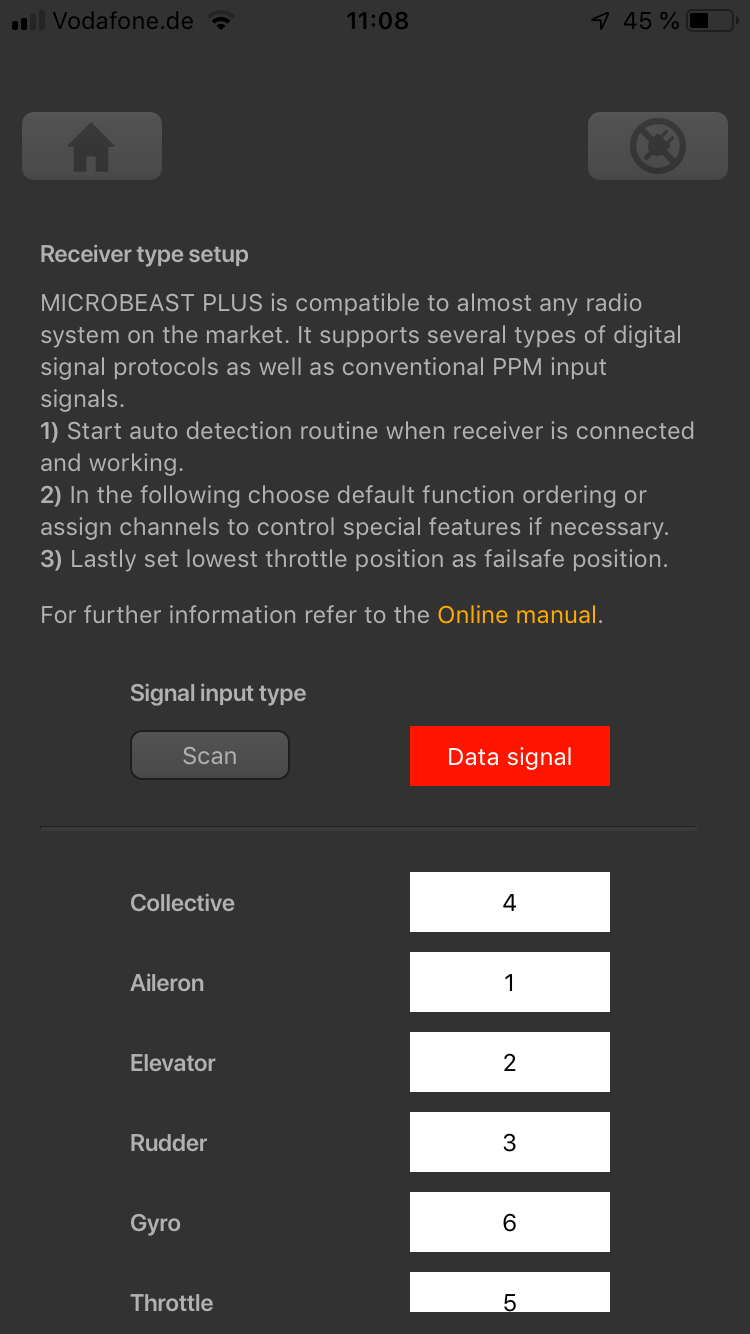
- At the top of the screen you can see which type of input signal is selected at the moment, and which telemetry system/ESC is used (if applicable).
- The rows below show what channels are assigned to which control functions at the moment.
- In the last row you can see the internal value for throttle failsafe position that is set at the moment.

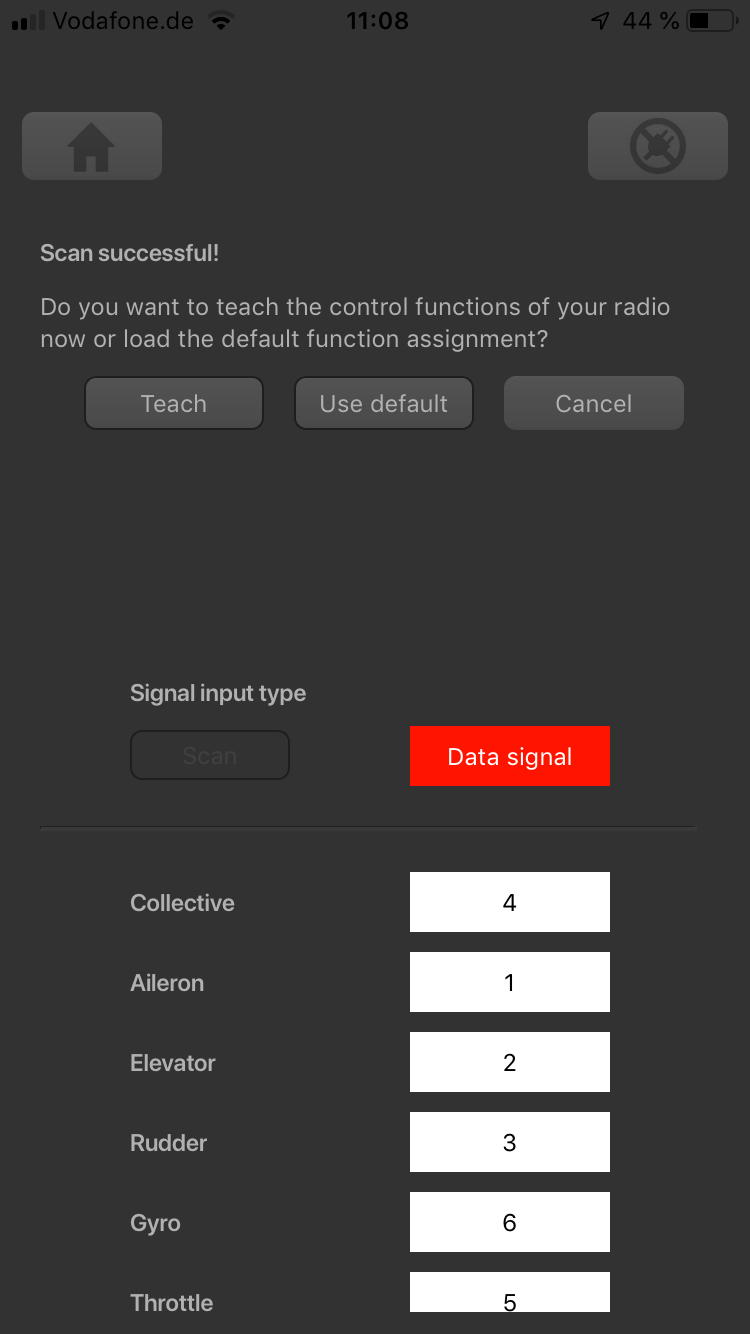
In order to detect the receiver you're using, make sure the receiver is connected properly, bound to the radio and sending out signal. Also make sure the transmitter is setup correctly. Now press the "Receiver" button to start automatic receiver detection routine. The ongoing scan process is displayed:
- In case a single-line receiver is used, a dialog will appear on success. This asks how to proceed with function assignments.
- When a Standard receiver is used, the system will restart directly and you can leave the setup screen.
- When detection fails, once again make sure your receiver is connected properly to the BEASTX system. Make sure the receiver is bound to the transmitter and sending out control signals. Then please try again.