Manuals:BXFbl:Setupmenu E: Difference between revisions
Shornstein (talk | contribs) No edit summary |
Shornstein (talk | contribs) Marked this version for translation |
||
| Line 12: | Line 12: | ||
<br /> | <br /> | ||
<!--T:12--> | |||
{{SHORT_QUOTE|width=90|'''Note:''' This setup step applies to BEASTX devices with standard tail servo control. If you're using a helicopter with tailmotor, please follow the description in the next page. Make sure that you've installed the correct firmware with the feature '''Tailmotor''' enabled or disabled. If using the '''Tailmotor firmware''', you will not be able to correctly control your tail servo as shown below and vice versa!}}<br /> | {{SHORT_QUOTE|width=90|'''Note:''' This setup step applies to BEASTX devices with standard tail servo control. If you're using a helicopter with tailmotor, please follow the description in the next page. Make sure that you've installed the correct firmware with the feature '''Tailmotor''' enabled or disabled. If using the '''Tailmotor firmware''', you will not be able to correctly control your tail servo as shown below and vice versa!}}<br /> | ||
<br /> | <br /> | ||
| Line 22: | Line 23: | ||
<br /> | <br /> | ||
<!--T:13--> | |||
Attach a servo horn to the rudder servo in such way that the tail linkage rod forms a 90 degree angle to the servo horn (or as close as possible) and adjust the linkage rod as described in the manual for your helicopter. For most helicopters the tail pitch slider should be centred and the tail rotor blades will then have some positive pitch to compensate for the torque of the main rotor.<br /> | Attach a servo horn to the rudder servo in such way that the tail linkage rod forms a 90 degree angle to the servo horn (or as close as possible) and adjust the linkage rod as described in the manual for your helicopter. For most helicopters the tail pitch slider should be centred and the tail rotor blades will then have some positive pitch to compensate for the torque of the main rotor.<br /> | ||
<br /> | <br /> | ||
| Line 27: | Line 29: | ||
<br /> | <br /> | ||
<!--T:14--> | |||
This mechanical adjustment especially is important when using the tail gyro in Normal-Rate mode. If the adjustment was not done properly the helicopter will constantly drift to one side or the other on the rudder axis. When using the tail gyro only in HeadingLock mode this adjustment is not so critical. Here the gyro will actively control the rudder so the helicopter does exactly follow the commands of the rudder stick. Anyhow, for optimum performance of the gyro a good mechanical adjustment is essentially!<br /> | This mechanical adjustment especially is important when using the tail gyro in Normal-Rate mode. If the adjustment was not done properly the helicopter will constantly drift to one side or the other on the rudder axis. When using the tail gyro only in HeadingLock mode this adjustment is not so critical. Here the gyro will actively control the rudder so the helicopter does exactly follow the commands of the rudder stick. Anyhow, for optimum performance of the gyro a good mechanical adjustment is essentially!<br /> | ||
<br /> | <br /> | ||
| Line 48: | Line 51: | ||
<br /> | <br /> | ||
<!--T:15--> | |||
{{QUOTE|Always set servo directions in the transmitter first, then check the Status display of your BEASTX device or in the StudioX app. Change the internal control direction if it does not match the real direction. '''Do not change the internal direction in order to change the servo direction! This is only used for telling the gyro in which direction it must move the servo.''' Be very conscientious when doing this setup step, as wrong gyro direction will cause loss of control during takeoff and you probably crash the helicopter!<br /> | {{QUOTE|Always set servo directions in the transmitter first, then check the Status display of your BEASTX device or in the StudioX app. Change the internal control direction if it does not match the real direction. '''Do not change the internal direction in order to change the servo direction! This is only used for telling the gyro in which direction it must move the servo.''' Be very conscientious when doing this setup step, as wrong gyro direction will cause loss of control during takeoff and you probably crash the helicopter!<br /> | ||
<br /> | <br /> | ||
<!--T:16--> | |||
'''In addition you can check the gyro direction by turning the helicopter by hand around its vertical axis.''' When turning the heli the gyro must move the servo so that the rotor will produce a counter action agains the turn direction. So later in flight the gyro will stop the helicopter from unwanted movement. Here the LED will light up in '''blue''' color when you turn the helicopter to the '''right''' and light up in '''red''' when you turn it to the '''left'''. So you can get a little reminder when you do not know which is the correct stick direction to setup, when you need to do the setup later on the field!}}<br /> | '''In addition you can check the gyro direction by turning the helicopter by hand around its vertical axis.''' When turning the heli the gyro must move the servo so that the rotor will produce a counter action agains the turn direction. So later in flight the gyro will stop the helicopter from unwanted movement. Here the LED will light up in '''blue''' color when you turn the helicopter to the '''right''' and light up in '''red''' when you turn it to the '''left'''. So you can get a little reminder when you do not know which is the correct stick direction to setup, when you need to do the setup later on the field!}}<br /> | ||
<br /> | <br /> | ||
| Line 87: | Line 92: | ||
<br /> | <br /> | ||
<!--T:17--> | |||
{{QUOTE|Always set servo directions in the transmitter first, then check the Status display of your BEASTX device or in the StudioX app. Change the internal control direction if it does not match the real direction. '''Do not change the internal direction in order to change the servo direction! This is only used for telling the gyro in which direction it must move the servo.''' Be very conscientious when doing this setup step, as wrong gyro direction will cause loss of control during takeoff and you probably crash the helicopter!<br /> | {{QUOTE|Always set servo directions in the transmitter first, then check the Status display of your BEASTX device or in the StudioX app. Change the internal control direction if it does not match the real direction. '''Do not change the internal direction in order to change the servo direction! This is only used for telling the gyro in which direction it must move the servo.''' Be very conscientious when doing this setup step, as wrong gyro direction will cause loss of control during takeoff and you probably crash the helicopter!<br /> | ||
<br /> | <br /> | ||
<!--T:18--> | |||
'''In addition you can check the gyro direction by turning the helicopter by hand around its vertical axis.''' When turning the heli the gyro must move the servo so that the rotor will produce a counter action agains the turn direction. So later in flight the gyro will stop the helicopter from unwanted movement.}}<br /> | '''In addition you can check the gyro direction by turning the helicopter by hand around its vertical axis.''' When turning the heli the gyro must move the servo so that the rotor will produce a counter action agains the turn direction. So later in flight the gyro will stop the helicopter from unwanted movement.}}<br /> | ||
<br /> | <br /> | ||
Revision as of 14:17, 4 June 2024
Next we have to setup the rudder gyro. For this we set the limits of the tail pitch control and the control directions, so the gyro will not move the servo further than allowed and in correct direction.
In first line the rudder limits are necessary to prevent the gyro from moving the servo over the mechanical limits and damaging the servo. But when adjusting the limits please note that the optimum throw is not necessarily determined by the maximum possible control travel of the tail pitch slider. When the tail mechanics allow a very high range of pitch, it may be advisable to adjust the limits based on the maximum allowed angle of attack of the tail rotor blades. Otherwise high tail pitch throw can cause aerodynamic stall of the blades. Such stalls can cause very bad stopping behavior like overshooting of the tail when stopping from rotation and can also cause bad tail response to rudder stick input when performing directional changes. Keep this in mind when adjusting the tail rotor endpoints! Check the helicopter‘s manual to find out how much tail pitch is useful and where to set end points.
| Note: This setup step applies to BEASTX devices with standard tail servo control. If you're using a helicopter with tailmotor, please follow the description in the next page. Make sure that you've installed the correct firmware with the feature Tailmotor enabled or disabled. If using the Tailmotor firmware, you will not be able to correctly control your tail servo as shown below and vice versa! |
Mechanical setup of the rudder servo
In the following of this setup step you will be asked to connect the rudder servo to your BEASTX device. With MICROBEAST PLUS/ULTRA the servo connects to [CH4] output. Watch out for correct polarity, the black or brown minus wire must be the clostest to the bottom of the device. Using NANOBEAST please connect the servo to [CH2] output. Here the servo polarity is similar to SPEKTRUM/Horizon Hobby servos, from inside to outside: signal, minus, plus.

Attach a servo horn to the rudder servo in such way that the tail linkage rod forms a 90 degree angle to the servo horn (or as close as possible) and adjust the linkage rod as described in the manual for your helicopter. For most helicopters the tail pitch slider should be centred and the tail rotor blades will then have some positive pitch to compensate for the torque of the main rotor.

This mechanical adjustment especially is important when using the tail gyro in Normal-Rate mode. If the adjustment was not done properly the helicopter will constantly drift to one side or the other on the rudder axis. When using the tail gyro only in HeadingLock mode this adjustment is not so critical. Here the gyro will actively control the rudder so the helicopter does exactly follow the commands of the rudder stick. Anyhow, for optimum performance of the gyro a good mechanical adjustment is essentially!
Adjustment on the device
Using the EasySetup adjustment on the device this setup is separated in two Menu Points. At Menu Point E we set the rudder limits, at Menu Point F we teach the control direction.
SETUP MENU E - Rudder limits
- To adjust the servo limits move the rudder stick in one direction until the servo reaches the maximum endpoint without any binding or stall. Release the rudder stick when correct position is reached. If you moved the servo too far you can steer the stick to the opposite direction and move the pitch slider a short way back. Also you can tap the stick briefly to only make minor adjustments. Once the correct endpoint has been found, don‘t move the rudder stick anymore and wait a second for the Status-LED to flash. This will indicate that the new position was stored. (If necessary you can change position as often as you want, but always wait until the Status-LED flashes when finished and proceeding to the next step!)
- Now adjust the opposite direction. For this again use the rudder stick and hold it to move the servo/tail pitch slider into the other direction. Proceed as described to set the maximum endpoint and again wait until the position has been indicated with the flashing Status LED.
- When both positions have been set skip to the next Menu Point F by pushing the button on the device briefly.
SETUP MENU F - Rudder control direction
- Move the rudder stick and check the rudder direction on the helicopter. If the stick is moving the servo into the wrong direction use the servo reverse function of your transmitter and reverse the rudder channel to set stick control direction correctly.
- Now set the rudder direction of the BEASTX system: When you move the rudder stick to the right, the Status LED must light up or flash in blue color. When you move the rudder stick to the left, the Status LED must light up or flash in red color. When the display is inverted (red = right and blue = left) reverse the display (internal control direction) by tapping the aileron(!) stick once.
- Optional: When you move the rudder stick to full deflection, the Status LED should light solid, not just flash. If this is not the case, increase the servo throw/endpoint of the rudder channel in the transmitter just as far so that the Status LED changes from flashing to solid when the rudder stick reaches the end position. (Note: Do not increase the endpoint too much in the transmitter. We need an exact match of full stick position and stick end position. So the Status LED should just change from flashing to solid when raching the end position.)
Always set servo directions in the transmitter first, then check the Status display of your BEASTX device or in the StudioX app. Change the internal control direction if it does not match the real direction. Do not change the internal direction in order to change the servo direction! This is only used for telling the gyro in which direction it must move the servo. Be very conscientious when doing this setup step, as wrong gyro direction will cause loss of control during takeoff and you probably crash the helicopter!
In addition you can check the gyro direction by turning the helicopter by hand around its vertical axis. When turning the heli the gyro must move the servo so that the rotor will produce a counter action agains the turn direction. So later in flight the gyro will stop the helicopter from unwanted movement. Here the LED will light up in blue color when you turn the helicopter to the right and light up in red when you turn it to the left. So you can get a little reminder when you do not know which is the correct stick direction to setup, when you need to do the setup later on the field!
Setup with StudioX app
- When you move the rudder stick to full deflection, the Status LED on the BEASTX system should light solid and the label right or left should change the color accordingly. If the stick is not moving far enough, you will see the message "Increase!" In this case increase the servo throw/endpoint of the rudder channel in the transmitter just as far so that the Status LED changes from flashing to solid when the rudder stick reaches the end position and the label will disappear in the software. Repeat this for the other direction. Note: Do not increase the endpoint too much in the transmitter. We need an exact match of full stick position and stick end position. So the Status LED should just change from flashing to solid when raching the end position.
<img class="ios" src="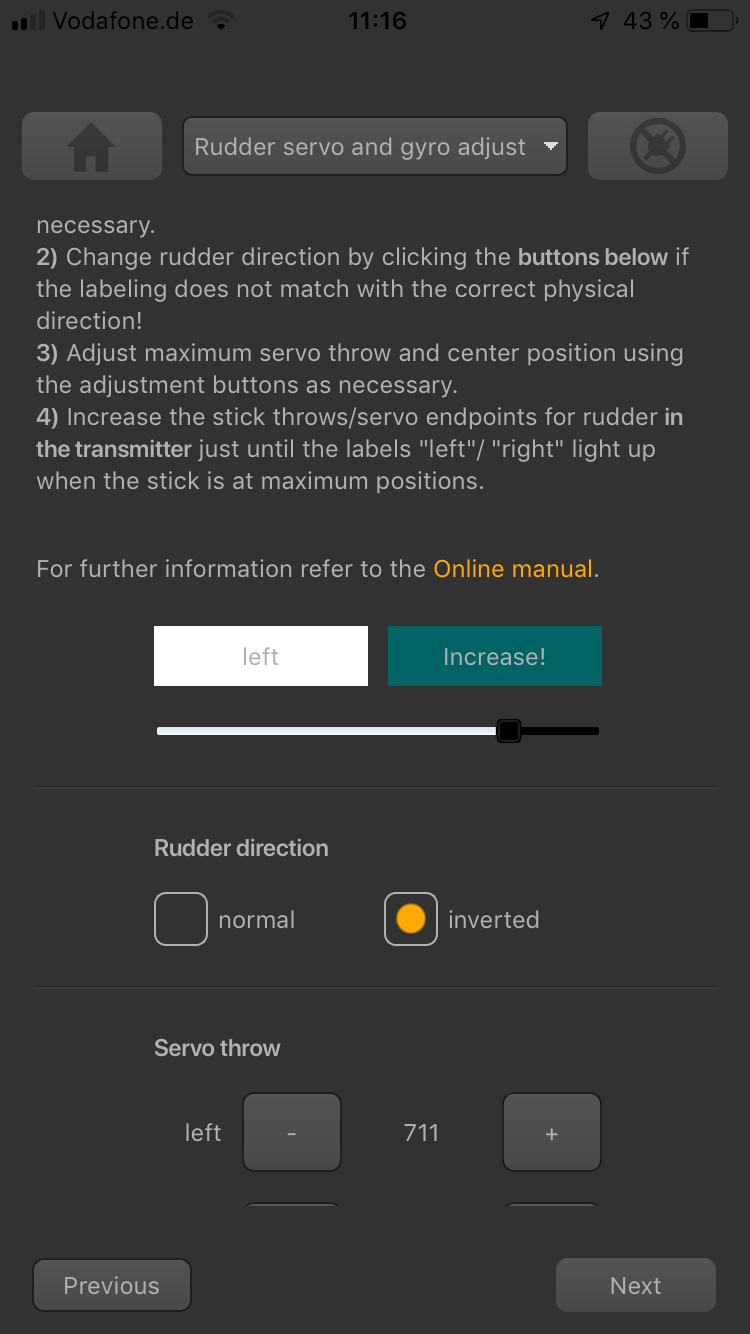 ">
">
<img class="ios" src="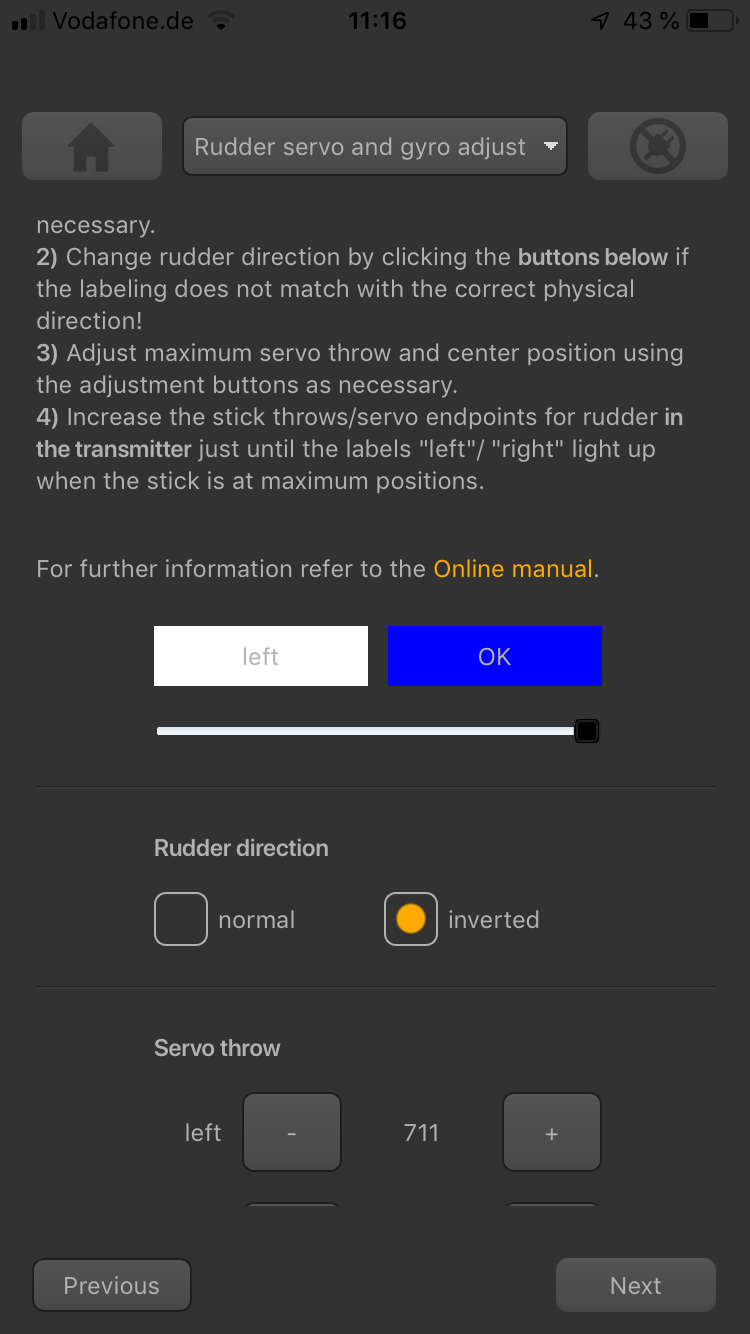 ">
">
- Now check the rudder direction of the servo on the helicopter. If the stick is moving the servo into the wrong direction use the servo reverse function of your transmitter and reverse the rudder channel to set stick control direction correctly. When the servo is moving correctly, set the rudder direction of the BEASTX gyro: When you move the rudder stick/servo to the right, the Status LED must light up or flash in blue color. When you move the rudder stick to the left, the Status LED must light up or flash in red color. When the display is inverted (red = right and blue = left), reverse the display (internal control direction) by choosing either normal or inverted in the software.
<img class="ios" src="">
<img class="ios" src="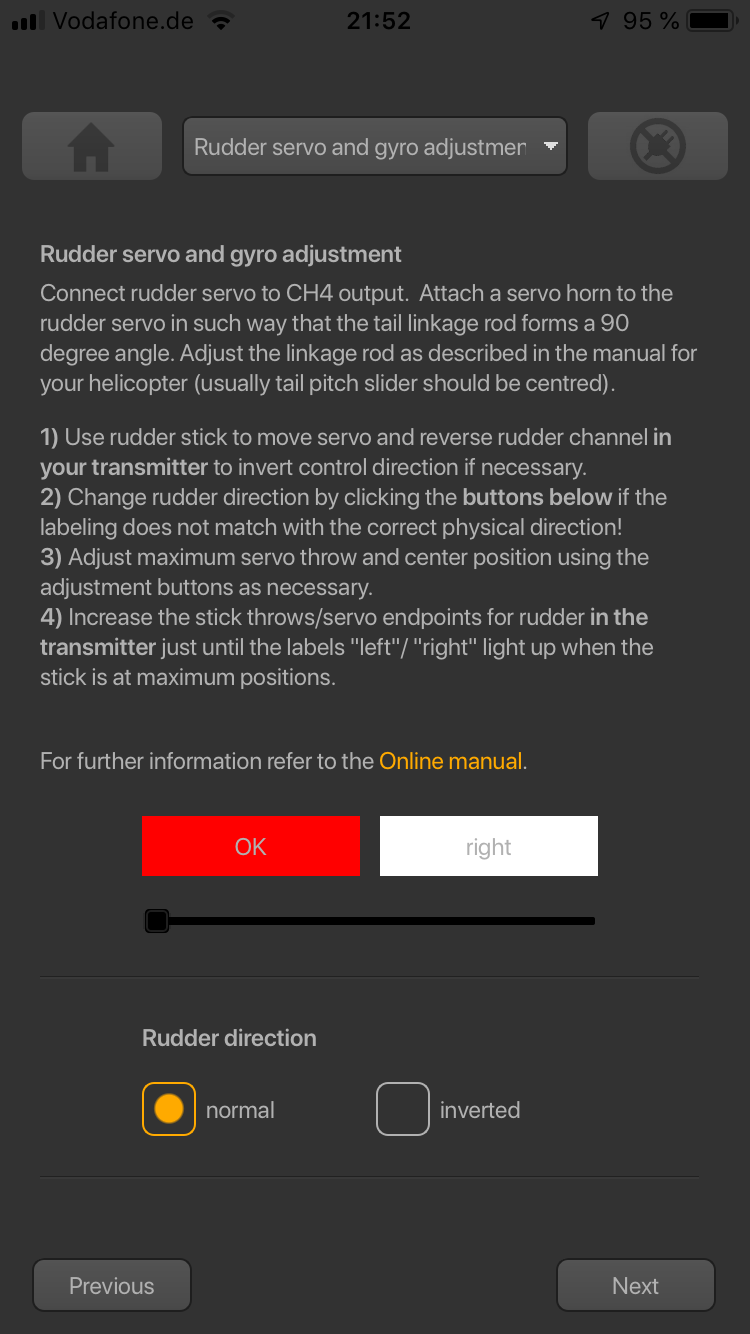 ">
">
- Finally adjust the servo limit by changing the values in the two adjustment boxes for each direction. To do so, carefully use the rudder stick to move the servo to the endpoint (watch out to not jam the servo) and increase/decrease the endpoint as necessary.
<img class="ios" src="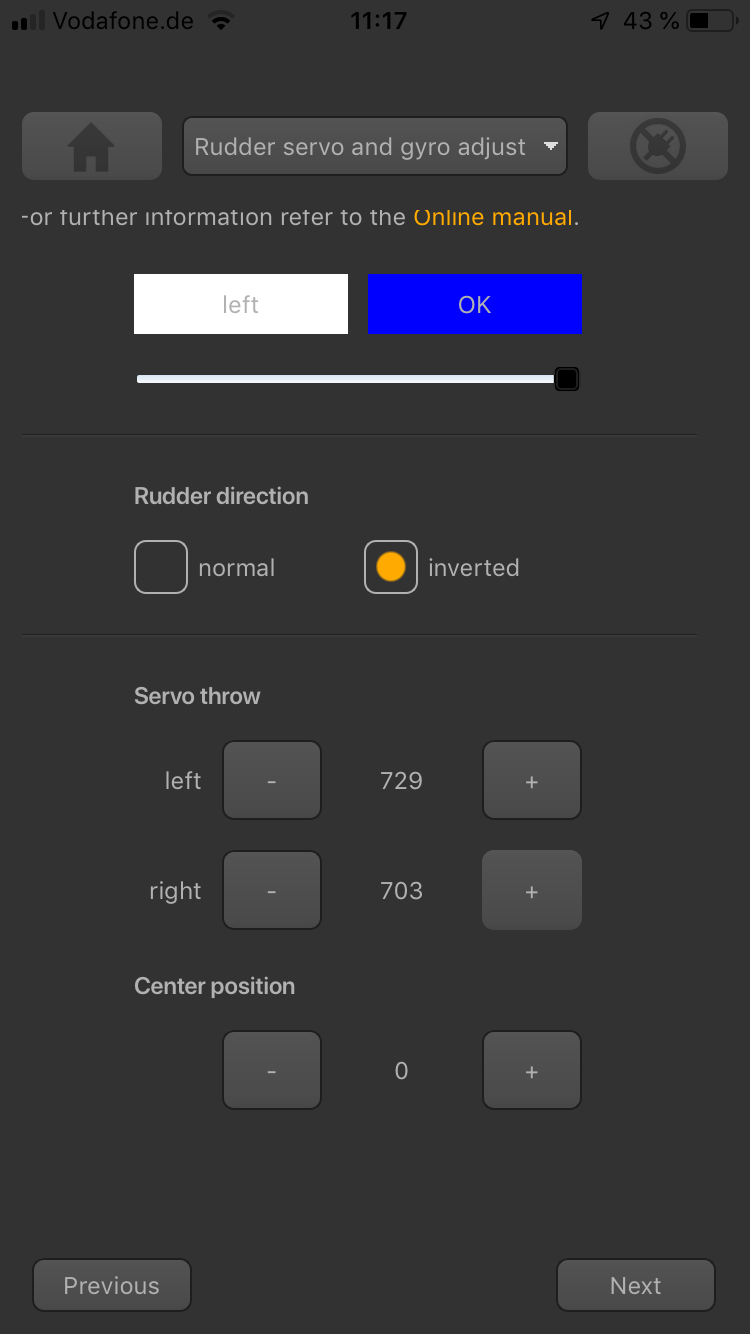 ">
">
Always set servo directions in the transmitter first, then check the Status display of your BEASTX device or in the StudioX app. Change the internal control direction if it does not match the real direction. Do not change the internal direction in order to change the servo direction! This is only used for telling the gyro in which direction it must move the servo. Be very conscientious when doing this setup step, as wrong gyro direction will cause loss of control during takeoff and you probably crash the helicopter!
In addition you can check the gyro direction by turning the helicopter by hand around its vertical axis. When turning the heli the gyro must move the servo so that the rotor will produce a counter action agains the turn direction. So later in flight the gyro will stop the helicopter from unwanted movement.
Extra info: Why setting stick endpoints?
This ensures that control range of the radio system matches the internal range of the BEASTX system. Later when setting the control style you can adjust how fast your helicopter should turn around the vertical axis. To get reproducable results you have to match your radio to the system!
Extra info: How the gyro works!
The gyro always tries to steer in the opposite direction of the rotation that is applied to the helicopter. If you move the helicopter by hand around its vertical axis, the gyro must actuate a rudder servo movement to compensate this rotation. If for example you move the nose of the helicopter to the left (tail moving to the right), the gyro has to steer right the same way as you would steer right with the rudder stick, so that the tail is pushed back to the left.}}
-
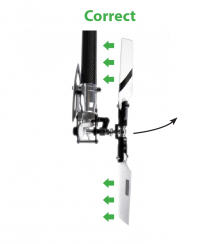 When moving the tail to the right by hand (nose of the heli to the left), the gyro will steer to the right, so the tail is pushed back to the left.
 -
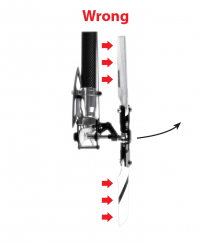 When moving the tail to the right by hand (nose of the heli to the left), the gyro steers to the left and so the tail will move even further!


Please note: This only shows an example for the ALIGN T-Rex 500 helicopter. Actually the tail pitch slider may move to a different position on your helicopter. This mainly depends on how the tail blade grips are controlled and how the tail mechanics is constructed in general. Check the manual of your helicopter to find out which directions the rudder must move on your helicopter.